connecting-systems-services-integration-suite-codejam
Exercise 03 - Building our first integration flow
At the end of this exercise, you’ll have successfully created a simple integration flow that communicates with the SAP S/4HANA Cloud mock server.
[!NOTE] What is an integration flow 1?
An integration flow allows you to specify how SAP Cloud Integration is to process a message. The modelling environment, provided in SAP Cloud Integration, enables you to design the details of message processing (its senders and receivers and the individual processing steps) with a graphical user interface.
The diagram below captures what we will achieve as part of this exercise from a data flow point of view. First, we will expose an HTTP endpoint through which we can send requests to the integration flow we develop. Next, the integration flow will extract some data (the employee_id) from the payload received. Finally, the employee_id is passed to the SAP S/4HANA Cloud Business Partner mock service to retrieve Business Partner information.
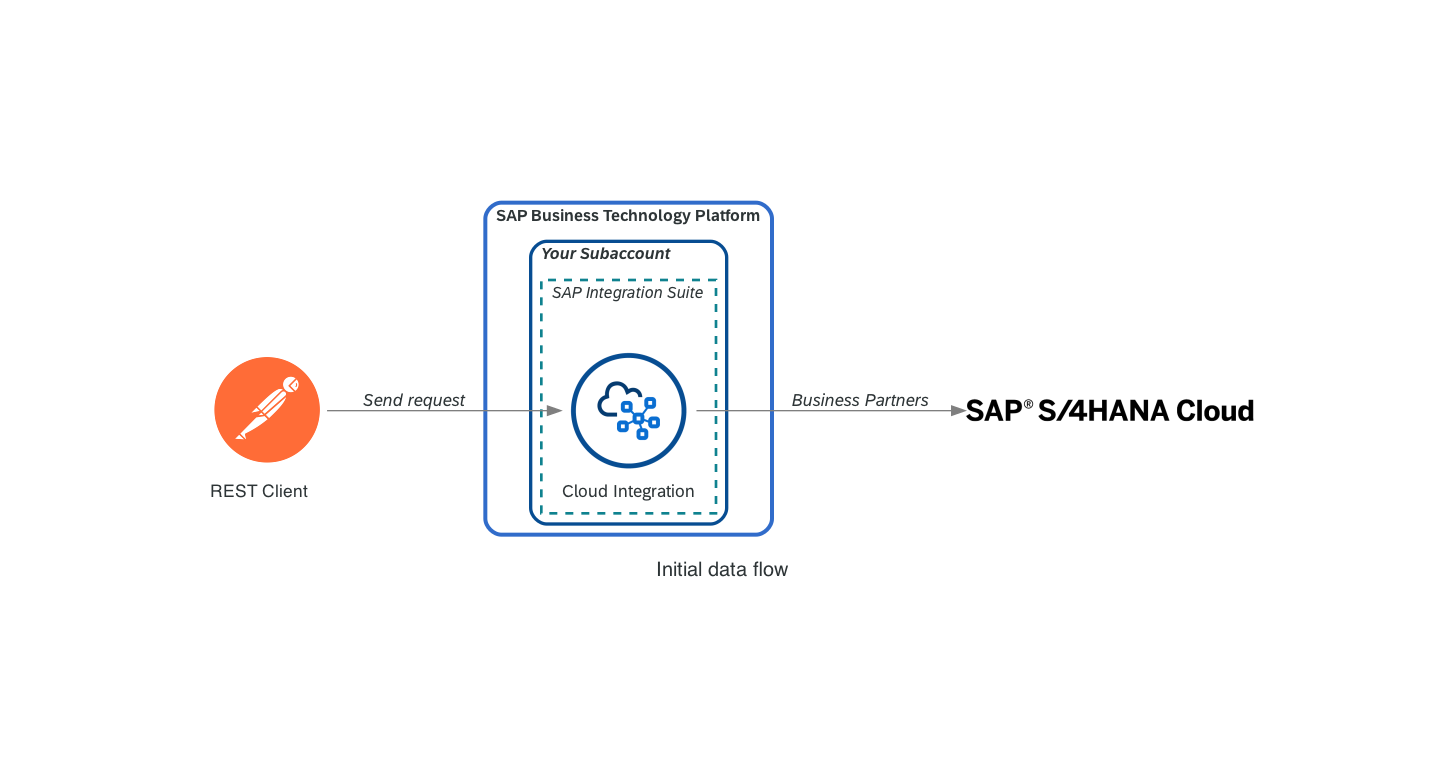
The integration flow expects a sample request message like the one below and should return a response message like the one underneath the request.
[!TIP] The assets folder contains a sample request and a complete response payload.
// Sample request
{
    "employee_id": "1003764"
}

// Sample response
{
    "d": {
        "__metadata": {
            "id": "http://s4-mock-server-service.default.svc.cluster.local:443/sap/opu/odata/sap/API_BUSINESS_PARTNER/A_BusinessPartner('1003764')",
            "uri": "http://s4-mock-server-service.default.svc.cluster.local:443/sap/opu/odata/sap/API_BUSINESS_PARTNER/A_BusinessPartner('1003764')",
            "type": "API_BUSINESS_PARTNER.A_BusinessPartnerType"
        },
        "BusinessPartner": "1003764",
        "Customer": "",
        "Supplier": "",
        "AcademicTitle": "",
        "AuthorizationGroup": "",
        "BusinessPartnerCategory": "1",
        "BusinessPartnerFullName": "John Doe",
        "BusinessPartnerGrouping": "BP02",
        "BusinessPartnerName": "John Doe",
        "BusinessPartnerUUID": "00163e30-4e2a-1ed8-8483-a08c52249f04",
        ...
        "to_BusinessPartnerAddress": {
            "results": [
                {
                    "__metadata": {
                        "id": "http://s4-mock-server-service.default.svc.cluster.local:443/sap/opu/odata/sap/API_BUSINESS_PARTNER/A_BusinessPartnerAddress(BusinessPartner='1003764',AddressID='28238')",
                        "uri": "http://s4-mock-server-service.default.svc.cluster.local:443/sap/opu/odata/sap/API_BUSINESS_PARTNER/A_BusinessPartnerAddress(BusinessPartner='1003764',AddressID='28238')",
                        "type": "API_BUSINESS_PARTNER.A_BusinessPartnerAddressType"
                    },
                    "BusinessPartner": "1003764",
                    "AddressID": "28238",
                    "ValidityStartDate": "/Date(1518393600000+0000)/",
                    "ValidityEndDate": "/Date(253402300799000+0000)/",
                    "AuthorizationGroup": "",
                    "AddressUUID": "00163e30-4e2a-1ed8-8483-a08c5224bf04",
                    "AdditionalStreetPrefixName": "",
                    "AdditionalStreetSuffixName": "",
                    "AddressTimeZone": "CET",
                    "CareOfName": "",
                    "CityCode": "",
                    "CityName": "Walldorf",
                    "CompanyPostalCode": "",
                    "Country": "DE",
                    "County": "",
                    "DeliveryServiceNumber": "",
                    "DeliveryServiceTypeCode": "",
                    ...
                }
            ]
        }
    }
}
[!NOTE] ℹ️ While going through the exercise, you might encounter common problems not explicitly related to it. Your first stop should be the troubleshooting.md page, which includes a list of these common problems and their potential solutions.
Before building the integration flow, let’s start with some context and talk a bit about what Enterprise Integration Patterns are and what Apache Camel is.
Enterprise Integration Patterns (EIP)

Under the hood, SAP Cloud Integration runs Apache Camel 🐪, an open-source integration framework based on the enterprise integration patterns. This means that SAP Cloud Integration supports the implementation of these patterns. The patterns are explained in detail in the Enterprise Integration Patterns book by Gregor Hohpe and Bobby Woolf and as stated on the website, the patterns provide a consistent vocabulary and visual notation framework to describe large-scale integration solutions across many technologies. The Enterprise Integration Patterns book is a great place to start if you are interested in the integration topic and want to understand the underlying concepts behind the patterns and some components available in SAP Cloud Integration.
The Integration Flow Design Guidelines - Enterprise Integration Patterns package, available in the SAP Business Accelerator Hub, contain integration flows that illustrate the design of the most common Enterprise Integration Patterns. These integration flows can be used as a reference when exploring an integration pattern and seeing how you can implement it in SAP Cloud Integration. These also come in handy when implementing the integration patterns in your integration flows.
[!NOTE] ℹ️ For more information about enterprise integration patterns, see https://www.enterpriseintegrationpatterns.com/patterns/messaging/
Apache Camel

As mentioned before, Apache Camel is an open-source integration framework based on the enterprise integration patterns, and it is what’s running under the hood in SAP Cloud Integration.
Do you need to understand how Apache Camel works to develop integration flows in SAP Cloud Integration?
Not necessarily, but it is essential to remember that Apache Camel runs within SAP Cloud Integration. Knowing this can help you develop complex integration flows, understand its behaviour and troubleshoot exceptions that might be raised when executing an integration flow.
You’ll notice that the SAP Cloud Integration documentation includes details of various Camel headers/properties. For example, the HTTP Receiver Adapter documentation tells us how we can use the CamelHttpUri, CamelHttpQuery, CamelCharsetName exchange headers/properties to set values or override a behaviour during message processing dynamically. In addition, different adapters expose other Camel headers/properties that we can use during runtime.
Also, SAP Cloud Integration support the Camel Simple expression language, and we interact with it in different components, e.g. Content Modifier, write variables, filtering. The Simple language documentation can come in handy when dealing with expressions.
Access your Cloud Integration workspace
You set up SAP Integration Suite and activated several capabilities as part of the prerequisites of this SAP CodeJam. We now must access the Cloud Integration workspace to build our first integration flow.
👉 Go to the BTP Cockpit, open the SAP Integration Suite application from within Services > Instances and Subscriptions.
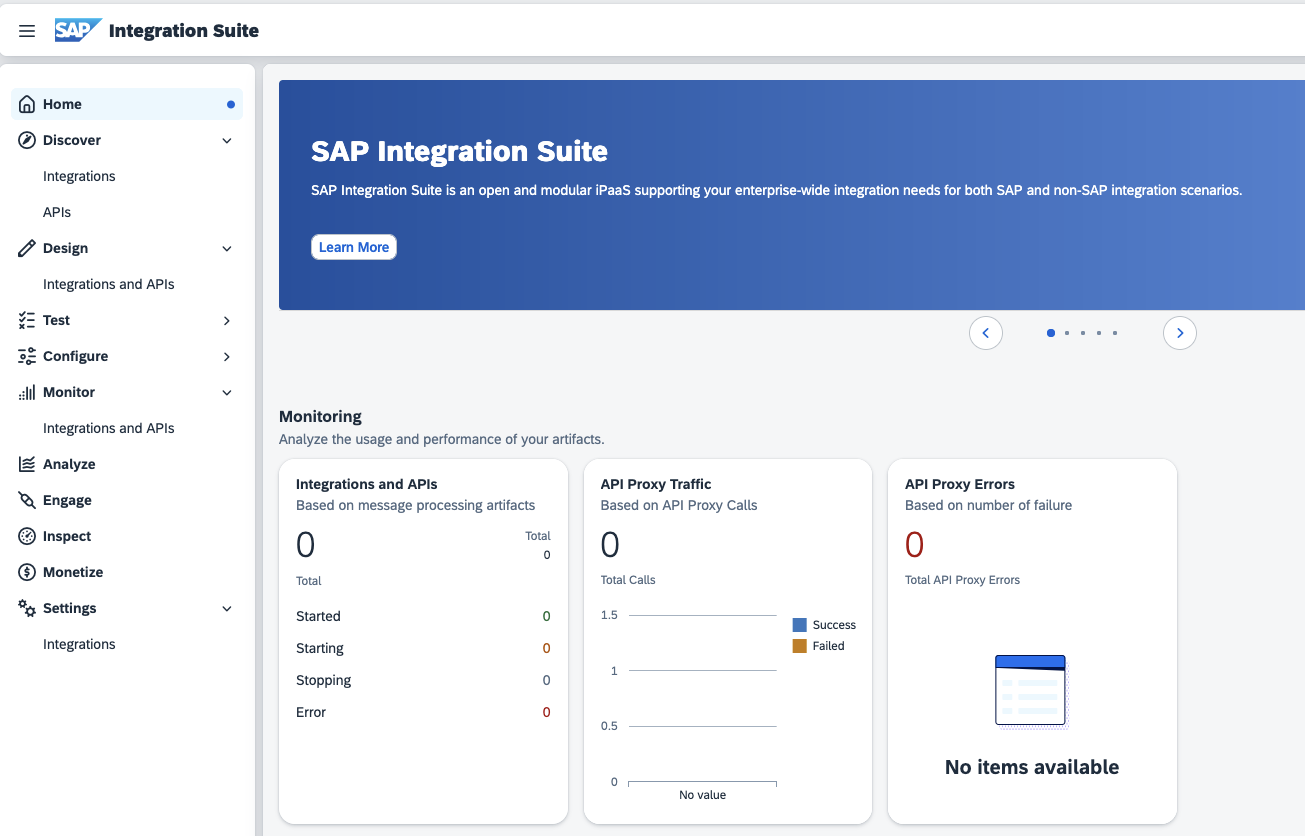
We are now on the landing page of SAP Integration Suite. The page is divided into various sections: Discover, Design, Test, Configure, Monitor, Settings and more. In this CodeJam, we will interact the most with Design and Monitor. Below is a brief explanation of what you can find in each section.
Discover > Integrations: Here, you can find predefined integration content provided by SAP that you can use out of the box and adapt to your requirements.Design > Integrations and APIs: This is where you design your integration content. It contains the graphical integration flow modelling environment. You will find a list of integration packages defined for the tenant. When you select an integration package, you can find the integration flows (and other artifacts) defined for the package (on theArtifactstab).Monitor > Integrations and APIs: This is where you can monitor your integration flow. You also use this section to manage additional artifacts that you deploy on your tenant to complement your integration flows (for example, User Credential artifacts to configure connections using basic authentication).
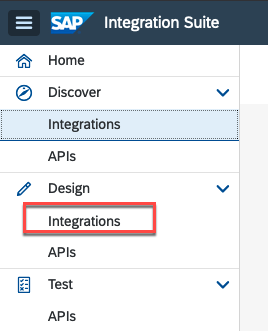
Design
Let’s jump to the Design > Integrations and APIs component to start developing our integration flow. Before designing our integration flow, we will need to create an integration package. Cloud Integration allows us to assemble integration contents, e.g. integration flows, message mappings, value mappings, scripts, and APIs, into packages so that they can be part of our integration scenarios. An integration package in essence is a container for our integration flows and other artifacts. It allows us to group related integration artifacts together, for example, all components required to solve/achieve an integration scenario.
👉 Choose the Create button and enter the integration package’s name and short description and then choose the Save button.
| Field | Value |
|---|---|
| Name | Connecting Systems CodeJam |
| Technical Name | ConnectingSystemsCodeJam |
| Short description | The benefits platform will send us a request for an employee ID. |
Once created, we can start adding artifacts to our package.
Various artifacts can be part of an integration package, for example:
- Data Type: Contains the structure of data that defines the message.
- Integration Adapter: The integration adapter artifact allows you to import custom integration adapters in your integration package.
- Integration Flow: An integration flow allows you to specify how a message is processed on a tenant. You can use integration flows to specify specific integration patterns like mapping or routing and to connect to external systems.
- Message Mapping: Allows you to map (transform) messages from one format (structure) to another. For example, you can use a message mapping to map a JSON payload received from System A to an XML payload that System B expects.
- Message Type: Describes the structure of a message.
- OData API: You can develop OData APIs that expose existing data sources, such as SOAP, as OData endpoints.
- REST API: A REST API-based integration scenario with HTTPS sender adapter.
- SOAP API: A SOAP API-based integration flow with a SOAP 1.x sender adapter.
- Script collection: Script Collection is an artifact in itself that is a bundle of scripts. Create a script collection within an integration package so that you create scripts in it and then reuse the bundle of scripts across any number of integration artifacts within that package.
- Value Mapping: You use the value mapping artifact to represent multiple values for a single object. For example, a product in Company A is referred by the last three letters as “IDE”. The same product is referred in Company B by product code ‘‘0100IDE”. When Company A sends message to Company B, it needs to take care of the difference in the representations of the same product. So, Company A defines an integration flow with a mapping element that contains reference to the value mapping definition. You create such value mapping groups in a Value Mapping artifact.
You can learn more about the different artifacts in the SAP Integration Suite documentation - https://help.sap.com/docs/integration-suite/sap-integration-suite/integration-artifact-types.
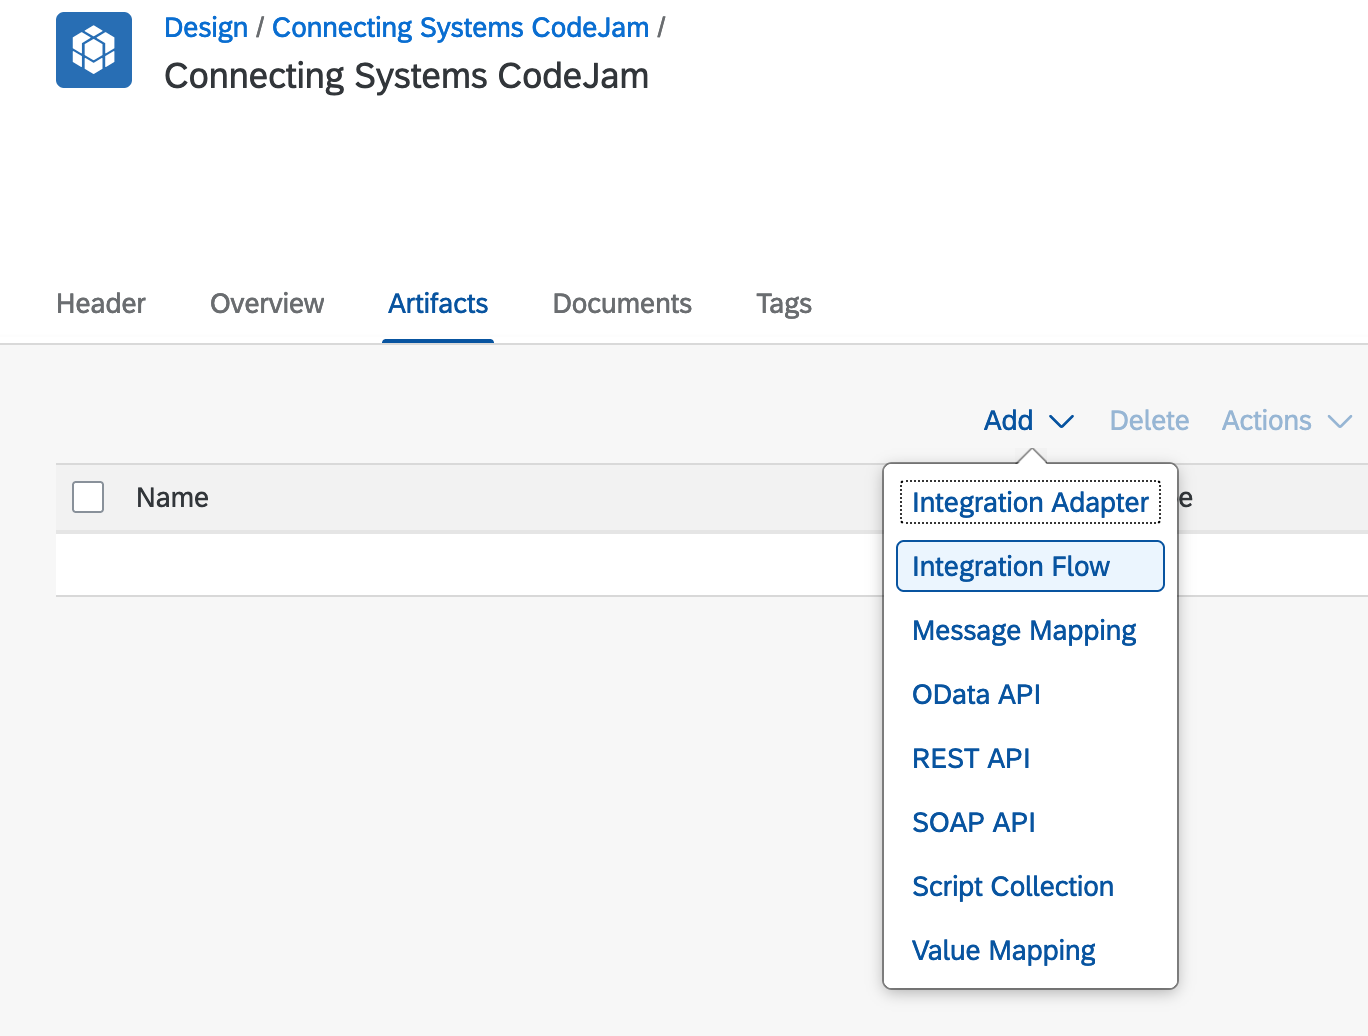
👉 Navigate to the Artifacts tab in your integration package, Add an Integration Flow, and specify a Name and ID for the integration flow. Once created, click on the new integration flow.
| Field | Value |
|---|---|
| Name | Request Employee Dependants |
| ID | RequestEmployeeDependants |
If the
Addbutton is greyed out, you are not in Edit mode. Choose theEditbutton in the upper right-hand corner.
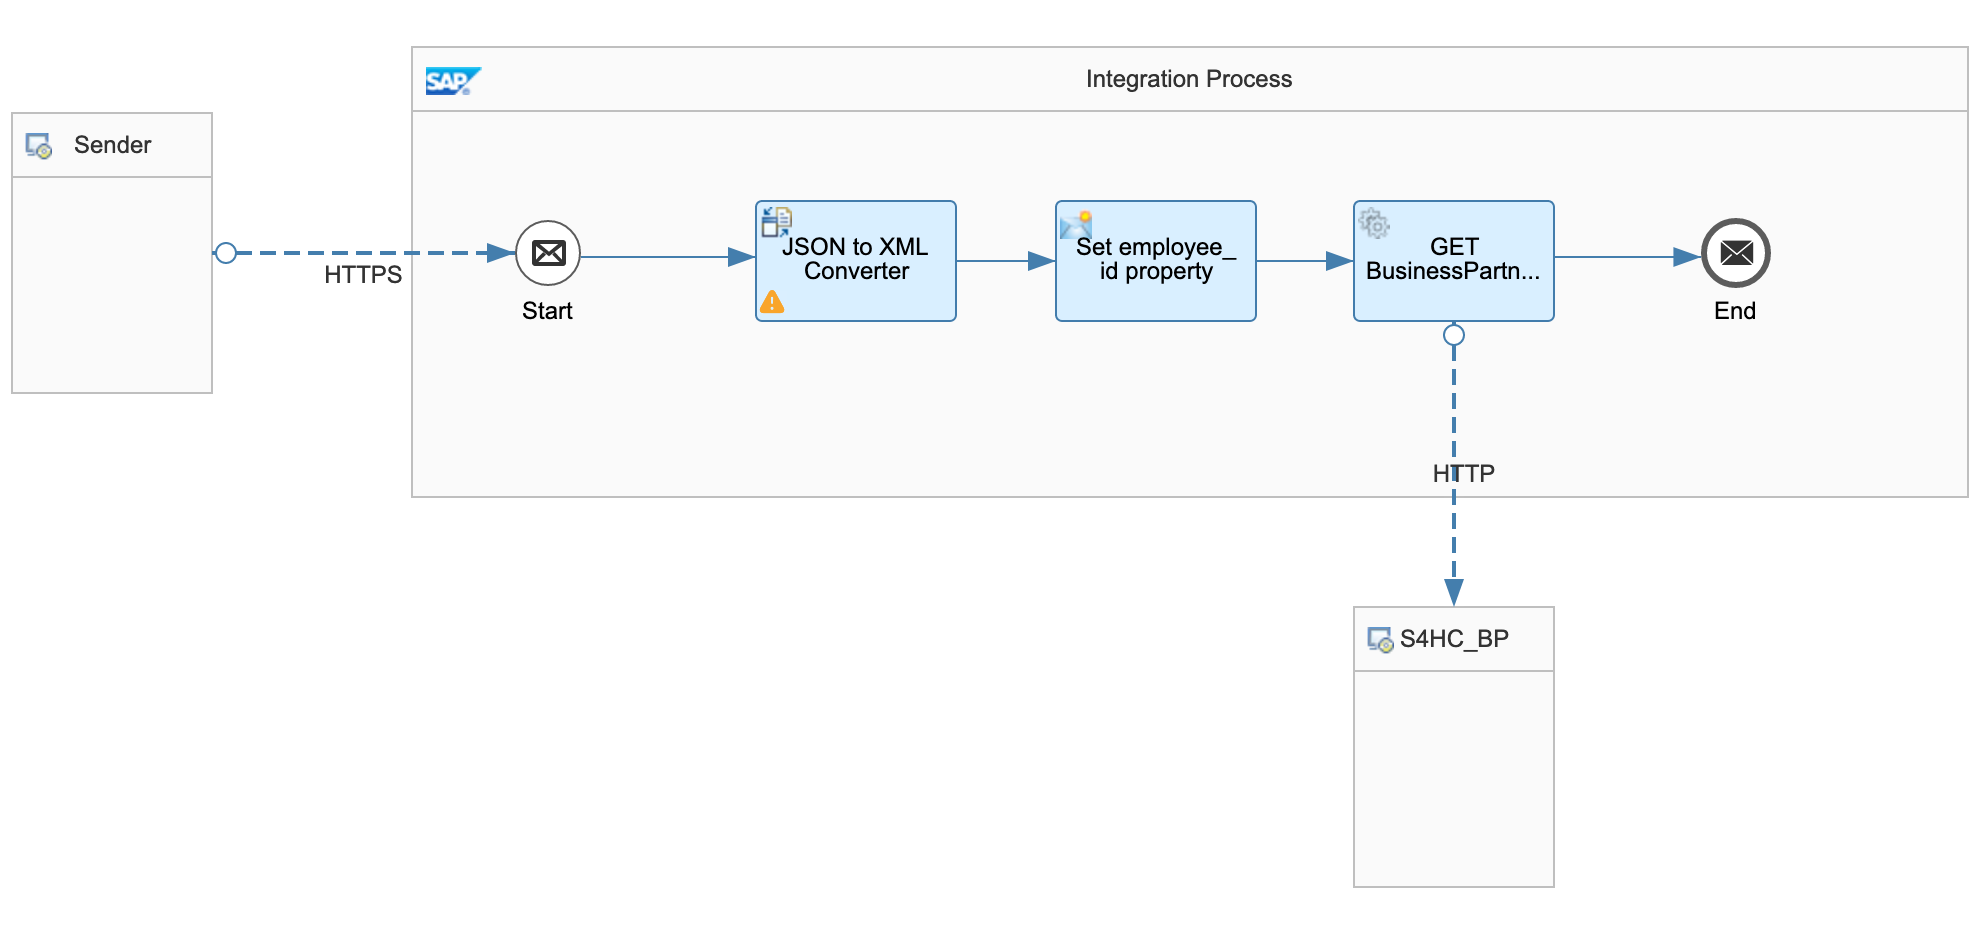
When accessing the newly created integration flow, you’ll notice a couple of things:
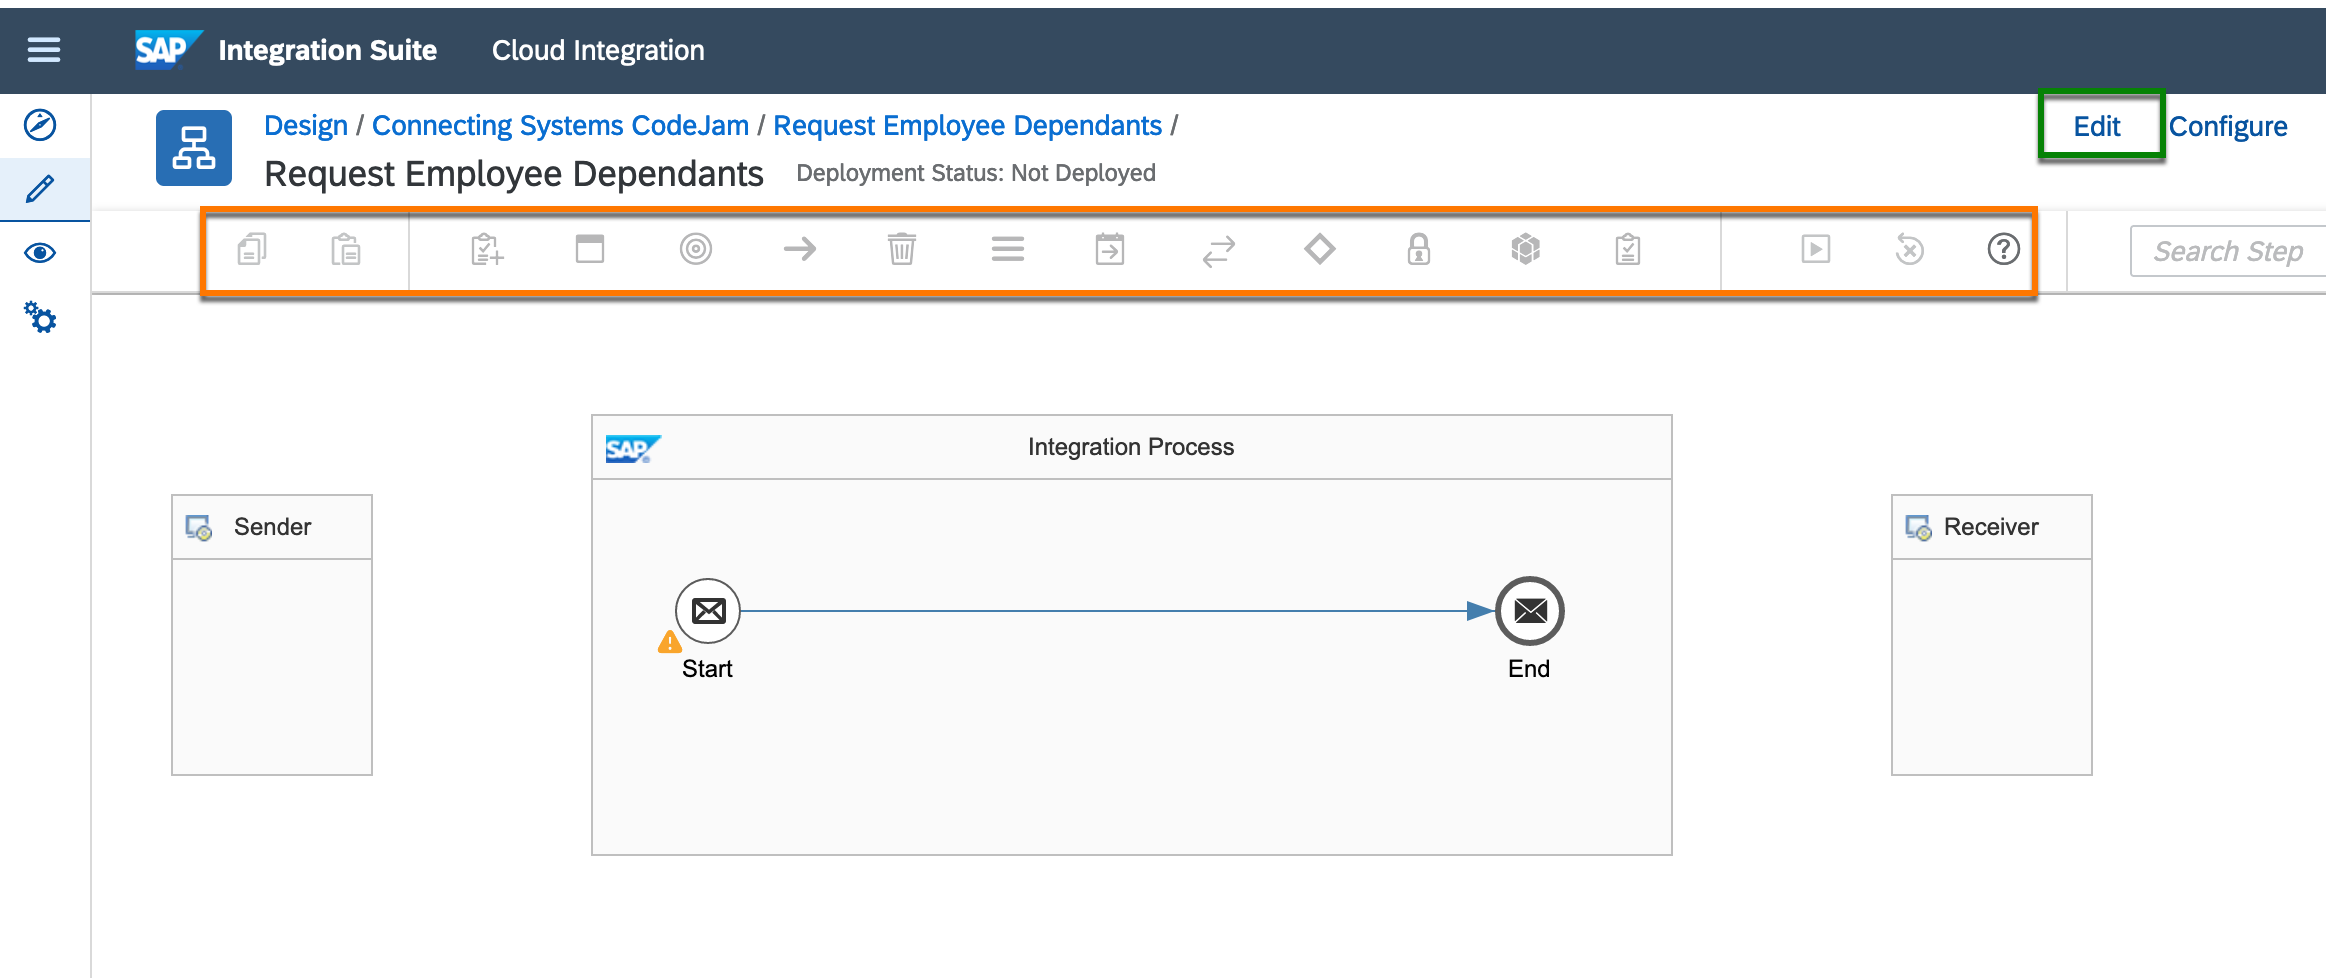
- There is no connection between the Sender participant and our integration process or the integration process and the Receiver participant.
- The palette is greyed out (highlighted in orange), and we cannot modify the integration flow. This is because our integration flow is not in edit mode. To switch to edit mode, click the
Edit button(highlighted in green). - The configuration section at the bottom of the modelling area is collapsed. The contents of this section will change depending on the object selected in the modelling area. To expand it, click the “Restore button”.
Modeling
We will expose the integration flow via an HTTP endpoint. To send requests to the integration flow, we will also require a user with the ESBMessaging.send role. The user we will use should have been created as part of the CodeJam prerequisites. This is the Process Integration runtime instance that was set up by the booster.
Sender participant
👉 If not in editing mode, click the Edit button to enter edit mode in our integration flow, connect the sender participant to the start message event, and select HTTPS as the adapter.
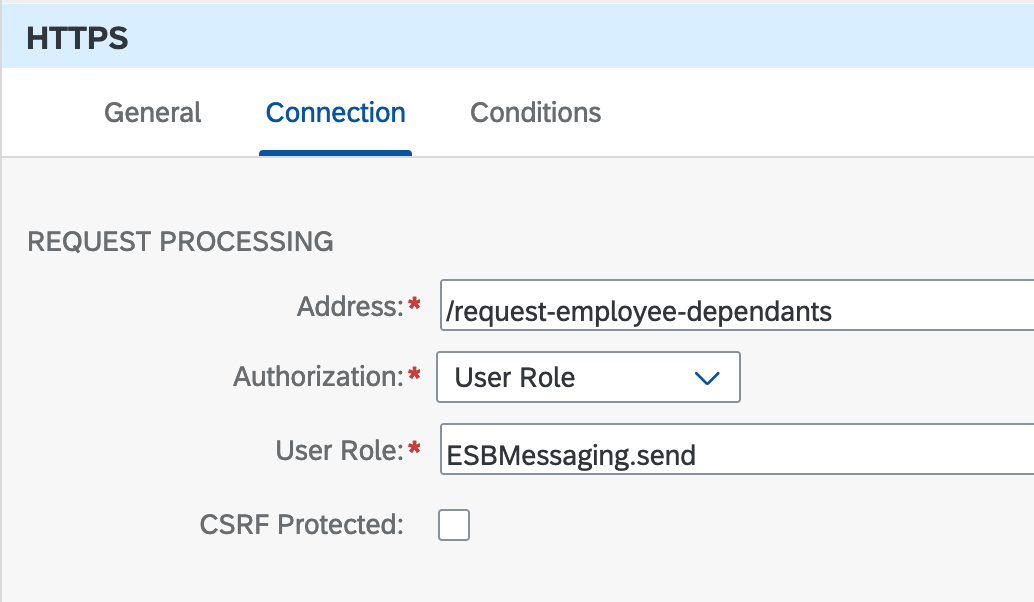
👉 Now that we’ve connected the sender participant, we can proceed to configure the connection of the HTTPS adapter. First, we need to specify an address, then a user role and finally, if the endpoint should be CSRF (Cross-site request forgery 2) protected.
[!IMPORTANT] Make sure to uncheck the
CSRF Protectedcheckbox.
| Field | Value |
|---|---|
| Address | /request-employee-dependants |
| Authorization | User Role |
| User Role | ESBMessaging.send |
| CSRF Protected | Unchecked |
JSON to XML converter
To extract the data needed from the request, we will first convert the JSON payload to XML. Using XML eases the message processing in the integration flow, e.g. take advantage of XPath in the Content Modifier transformation step. For this, we will need to add a couple of steps to the integration flow. We can do this by selecting the step from the palette (highlighted in orange in a few screenshots above) or clicking the Add button in the hover menu. I prefer using the hover menu as the search functionality is convenient.
👉 Add the JSON to XML converter and the Content Modifier transformation to the integration flow
The JSON to XML converter enables you to transform messages in JSON format to XML format. This step replaces the exchange body with an XML payload, similar to the one below, and the XML payload will contain a root node. We can set the name of the root node in the JSON to XML Converter - Processing tab.
<?xml version='1.0' encoding='UTF-8'?>
<root>
    <employee_id>1003764</employee_id>
</root>
Content Modifier
We can use the content modifier to define local properties for storing additional data during message processing. You can also use it to set header properties required in the HTTP request to other systems. The header and properties in the exchange can be used in connectors and conditions in the integration flow.
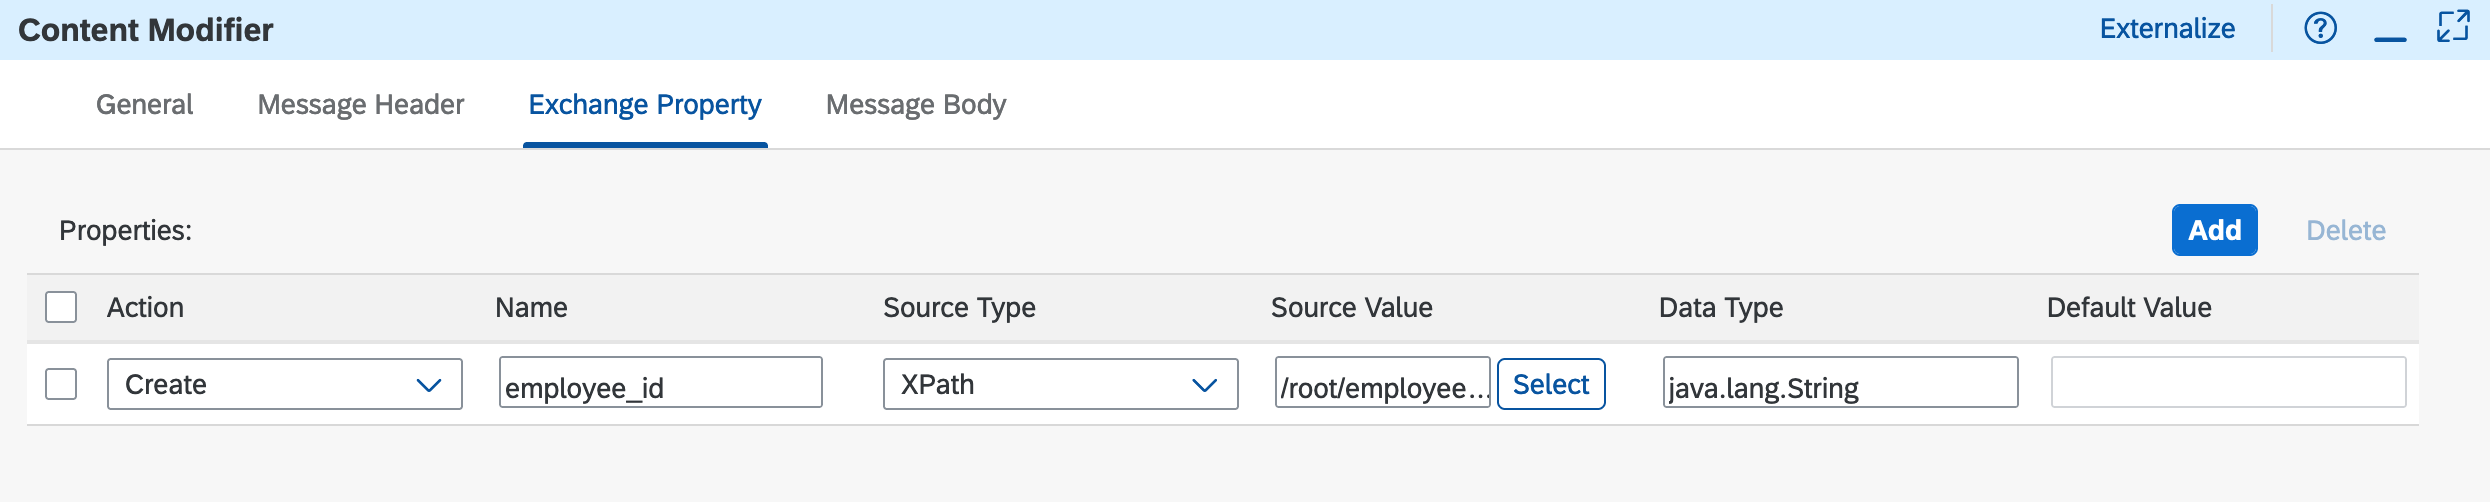
👉 Let’s create a property in our exchange. Navigate to the Exchange Property tab in the Content Modifier. Then click the Add button to add a new property. The employee_id exchange property will store the employee_id value sent in the request payload. To do this, we need to access the field value using XPath. Let’s configure the Content Modifier - Exchange Property, as shown in the screenshot below.
| Field | Value |
|---|---|
| Action | Create |
| Name | employee_id |
| Source Type | XPath |
| Source Value | /root/employee_id |
| Data Type | java.lang.String |
[!NOTE] XPath is a query language for selecting nodes from an XML document. In our case, the
/root/employee_idXPath expression will return the value of theemployee_idnode, which is1003764in our example above.
Request/Reply
For our integration scenarios, we require that our integration flow communicates with the SAP S/4HANA Cloud mock server to retrieve Business Partner data. In this case, we will use the request reply step to connect to the Business Partner mock service.
[!NOTE] In exercise 4, we will further process the data received from the SAP S/4HANA Cloud - Business Partner mock service.
👉 Add a Request Reply external call to call the SAP S/4HANA Cloud - Business Partner mock service, connect it to the Receiver participant, and select as a receiver the HTTP adapter, and set the connections details in the HTTP adapter.
[!IMPORTANT] To display the UI for the receiver HTTP adapter, make sure to select the connecting line, not the Request Reply step or the Receiver participant.
HTTP Connection details:
| Field | Value |
|---|---|
| Address | https://s4hana-mock.cfapps.eu10.hana.ondemand.com/sap/opu/odata/sap/API_BUSINESS_PARTNER/A_BusinessPartner('${property.employee_id}’) |
| Query | $expand=to_BusinessPartnerAddress |
| Proxy Type | Internet |
| Method | GET |
| Authenticaton | None |
If you are running the services used in this CodeJam locally 🐳 , checkout how you will need to configure the Receiver HTTP Adapter in the Configure HTTP adapter in Cloud Integration section of the optional exercise 01.
Let’s break down the configuration set in the HTTP adapter:
- Connection Details:
- Address: URL of the SAP S/4HANA Cloud mock server we’re connecting to, e.g., https://s4hana-mock.cfapps.eu10.hana.ondemand.com. You’ll notice that we are also including the full path and dynamically setting the value stored in the
employee_idexchange property as part of the URL.🐪 At runtime, the ${property.employee_id} string specified in the
Addressfield will be substitute with the value that is stored in the property. We created this property in the Content Modifier previously. Following this approach you can dynamically set string values with values stored in the exchange headers/properties. For more information, check out how you can use the Camel Simple Expression language in SAP Cloud Integration. - Query: Query string that we want to send with the HTTP request. In our case, we are just expanding the
to_BusinessPartnerAddressfield. - Proxy: The type of proxy that you are using to connect to the target system. In our case, we are communicating with a cloud system; therefore, we select Internet. If we would be communicating with an on-premise system, we will need to set it to On-Premise.
- Method: Action that the HTTP request must perform. In our case, a GET request.
- Authentication: The mock server has no authentication enabled hence why we select None. In a real-world scenario, you would set up a communication user in SAP S/4HANA and deploy the credentials to the secure store in SAP Cloud Integration.
- Address: URL of the SAP S/4HANA Cloud mock server we’re connecting to, e.g., https://s4hana-mock.cfapps.eu10.hana.ondemand.com. You’ll notice that we are also including the full path and dynamically setting the value stored in the
- Header Details:
- Request Headers: List of headers that you want to send to the target system. We don’t need to send request headers to the Business Partners mock service, but we will use this field to include a header parameter in a future exercise.
- Response Headers: List of headers coming from the target system’s response. They will be available in the exchange after the request.
We’ve completed the design of our basic integration flow. In it, we’ve used some of the most commonly used flow steps, converter (JSON to XML), transformer (Content Modifier), and external call (Request Reply). We will extend this integration flow in future exercises to cover other commonly used flow steps.
🧭 Before deploying the integration flow, let’s dedicate some time to navigate/click around and get familiar with the properties of the flow steps we just included in the integration flow. Click around the palette and see what other flow steps are available. Check out other flow steps that we’ve not used. Drag/add them to the integration flow to see their properties. Once you’ve done some self-discovery, make sure you leave the integration flow like the one on the screenshot above and come back here to continue with the exercise.
Now let’s proceed to deploy the integration flow.
Deploy
We need to deploy the integration flow before it is ready to receive requests.
👉 Save your integration flow and Deploy it by clicking the respective buttons in the upper right corner of the modelling area.
[!NOTE] The deployment pop-up dialog will appear and it contains a dropdown. In our case, the only option available is Cloud Integration. That said, SAP Integration Suite now support deployments to on-premises landscape via Edge Integration Cell, which is an optional hybrid runtime environment. If you had an instance configured in your SAP Integration Suite instance, then it will be displayed here.
[!WARNING] If you are working in the SAP BTP trial environment, the first you deploy an integration flow will take some time :-). Also, it might say that it has failed to deploy, when in reality the deployment might still be in progress. You can check the deployment status by clicking the
Navigate to Manage Integration Contentlink.
Once deployed, and the runtime status is ✅ Started, you can select the Navigate to Manage Integration Content link and it will take you to the details of the deployed content. An HTTP endpoint URL, similar to the one below, will be displayed in the UI.
[!TIP] Alternatively you can check the deployment of the integration flow from the
Monitor > Integrations and APIssection. Then click theAlltile underManage Integration Content.
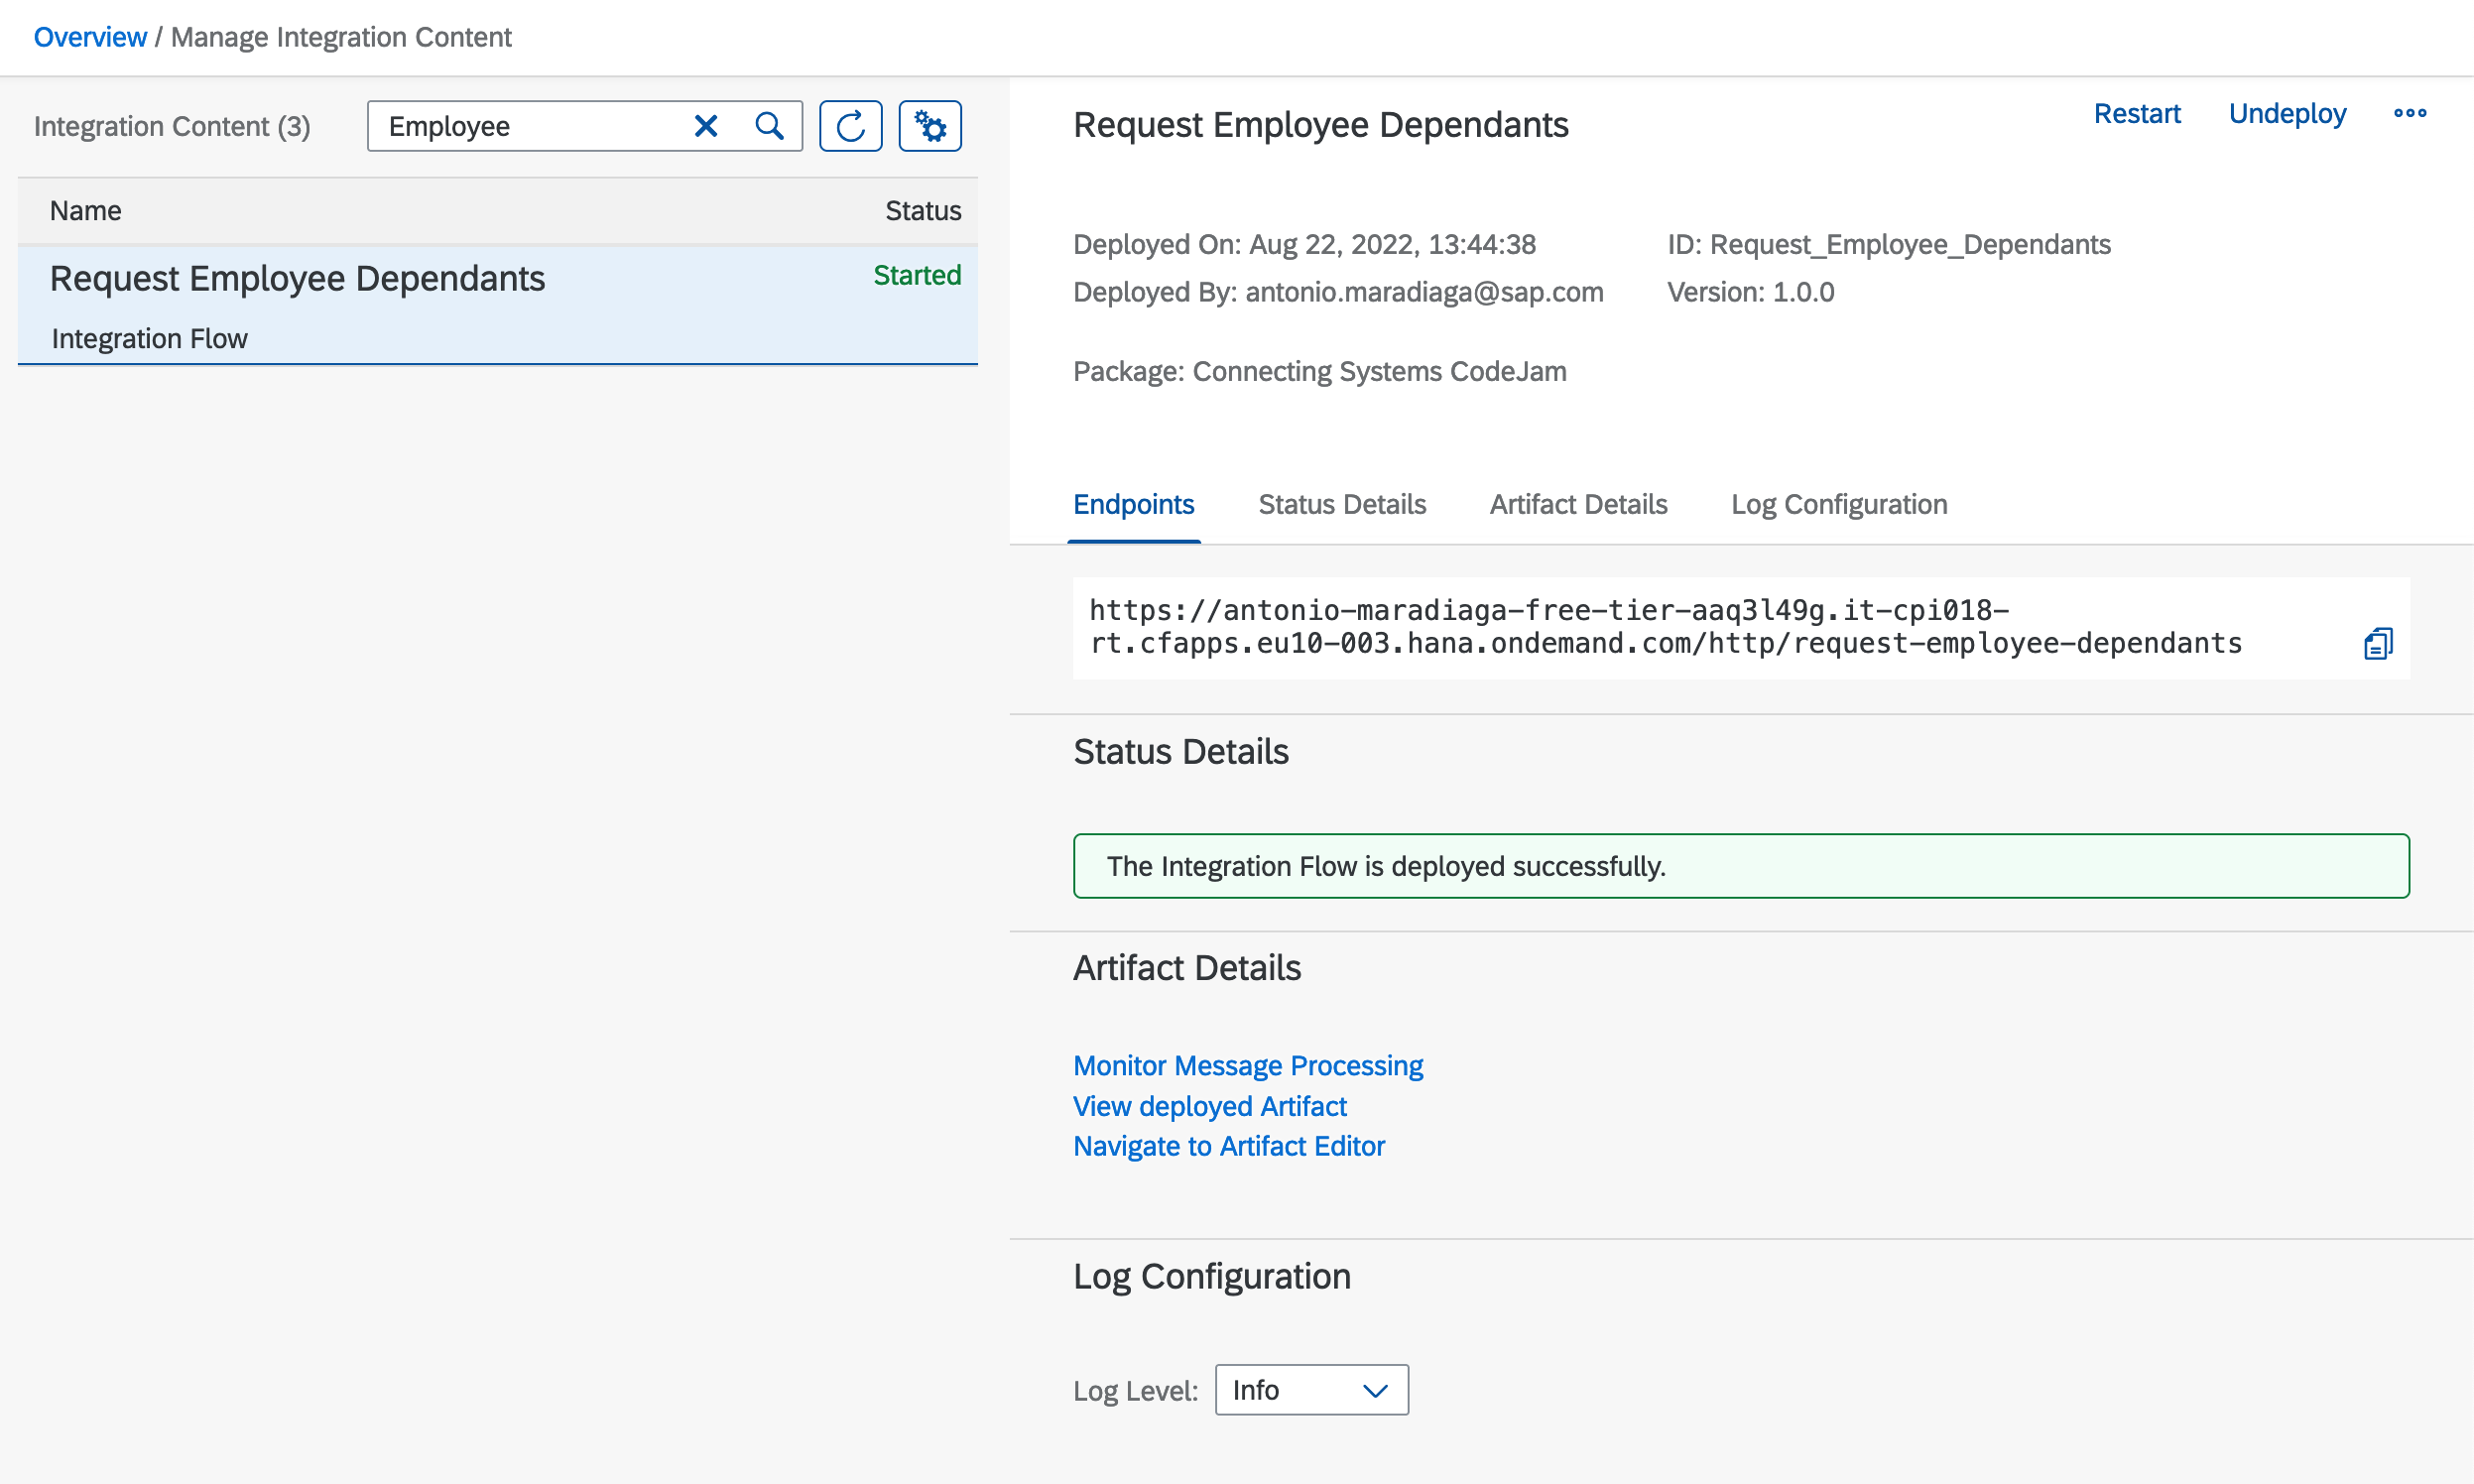
[!CAUTION] ℹ️ In case you don’t see the HTTP endpoint URL immediately in the deployed content page, see troubleshooting.
👉 Copy the HTTP endpoint URL, as we will use it in the next exercise, sending requests and monitoring the integration flow.
Summary
Congratulations, you’ve built and deployed the first integration flow. You now have a basic understanding of some of the most commonly used integration flow steps.
Further reading
- Integration Artifact Types part of an integration package.
- Defining the JSON-to-XML converter
- Request Reply external call
- Externalise parameters of an Integration flow
If you finish earlier than your fellow participants, you might like to ponder these questions. There isn’t always a single correct answer and there are no prizes - they’re just to give you something else to think about.
- Now that you’ve built your first integration flow with SAP Cloud Integration, how would you compare the process of building an integration flow to writing a program to achieve the same?
- Can you think of a problem we might face if we set the
employee_idproperty as a header property instead of an exchange property? - In the receiver HTTP adapter, we hardcoded a URL. How can we parametrise this field or other fields in our integration flow? Why would we want to parametrise our integration flow?
- How can we configure our integration flow so that the error can be returned to the sender whenever an error is raised during execution?
Next
Continue to 👉 Exercise 04 - Sending messages and monitoring our integration flow