cloud-cap-samples-java
Welcome to CAP Samples for Java
![]()
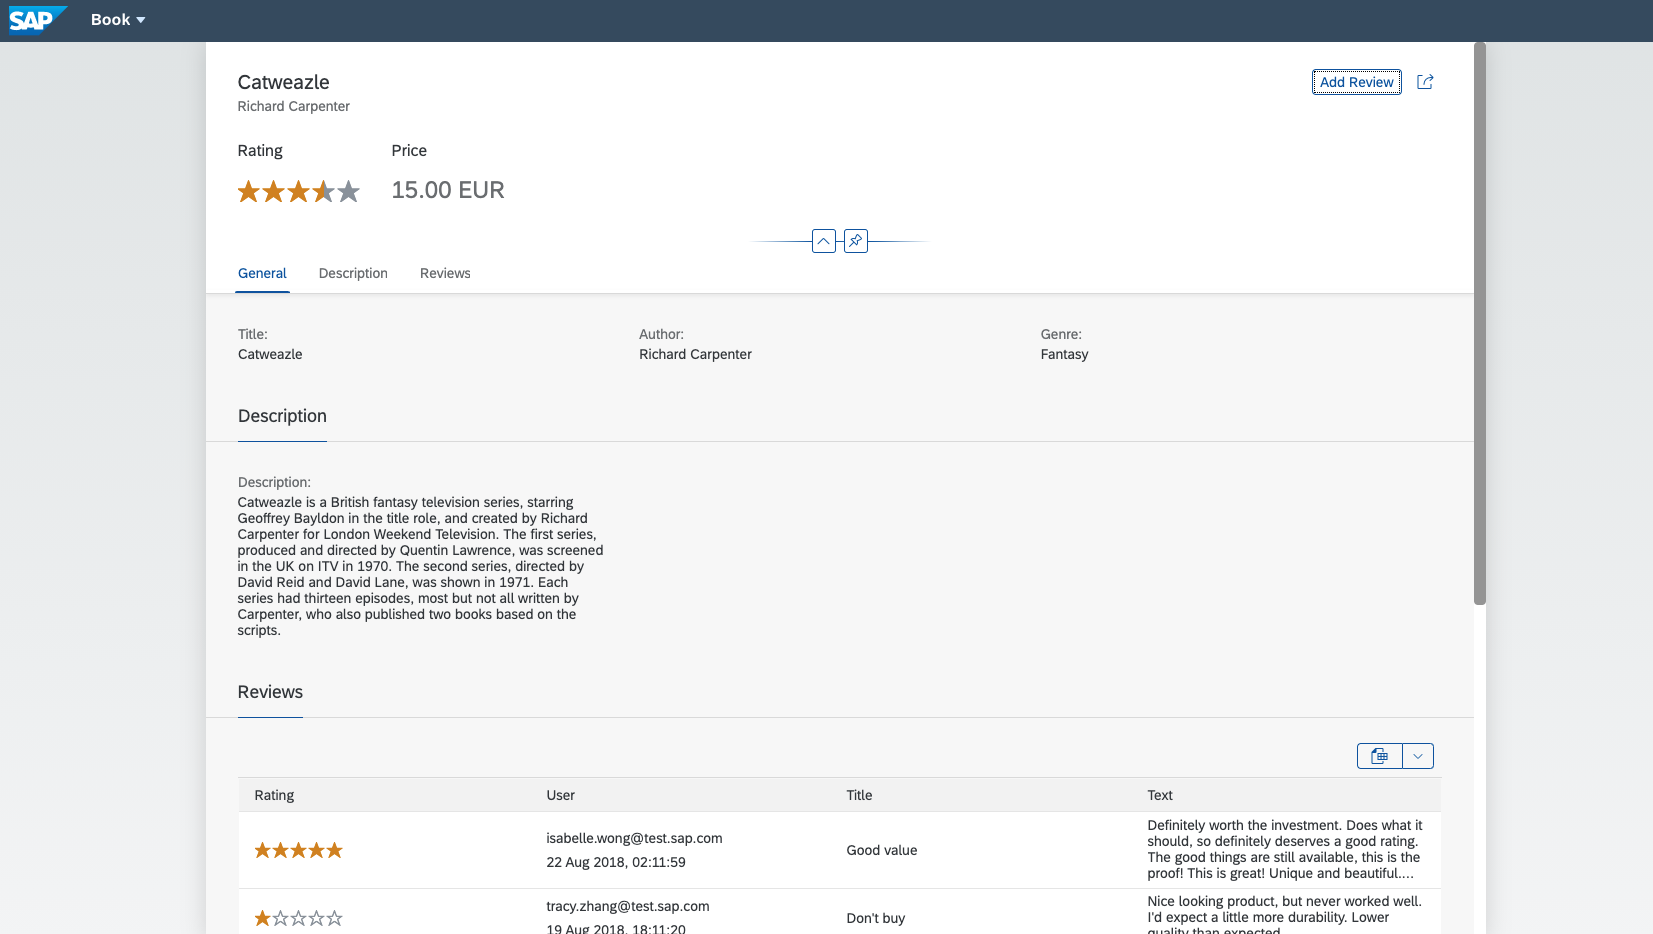
Welcome to the bookshop-java project. It demonstrates how to build business applications using the CAP Java SDK providing a book shop web application as an example. The application in this project enables browsing books, managing books, and managing orders.
Outline
- Overview
- Getting Started
- Prerequisites
- Clone Build & Run
- Using VS Code
- Using Eclipse
- Using IntelliJ Idea (Community and Ultimate)
- Database Setup and Spring Profiles
- API_BUSINESS_PARTNER Remote Service and Spring Profiles
- Deploy to SAP Business Technology Platform, Cloud Foundry
- Deploy to SAP Business Technology Platform, Kyma Runtime
- Setup Authorizations in SAP Business Technology Platform
- Code Tour
- Get Support
- License
Overview
This sample application shows how to conveniently create business applications based on CDS domain models, persisting data with H2, or SAP HANA, and exposing an OData V4 frontend with an SAP Fiori frontend on top.
This sample uses Spring Boot as an application framework. Although a CAP Java application isn’t required to build on Spring Boot, it’s the first choice of framework, as it’s seamlessly integrated.
The domain models are defined using CDS entity definitions.
By default, an in-memory H2 database is used for data persistency. Once productively deployed to SAP Business Technology Platform, SAP HANA can be used.
Services are defined using CDS Service Models. The OData V4 Protocol Adapter translates the CDS service models into corresponding OData schemas and maps the incoming OData requests to the corresponding CDS services.
Although CAP provides generic event handlers to serve most CRUD requests out-of-the-box, it’s possible to add business logic through Custom Event Handlers.
A SAP Fiori UI is added using predefined SAP Fiori elements templates. SAP Fiori annotations add information to the service definitions, on how to render the data.
CAP provides built-in multitenancy support with out-of-the box tenant isolation. The sample application demonstrates usage of MTX sidecar based on streamlined MTX and can be deployed as multitenant application. The deprecated classic MTX setup is shown in the mtx-classic branch for reference.
Demonstrated Features
Framework and Infrastructure related Features:
- Application configuration for Spring and CDS using application.yaml
- Mocking users for local development
- Authentication & Authorization (including user-specific restrictions with
@restrictin the Admin Service) - Cloud Foundry Deployment using MTA with XSUAA Service Bindings
- Application Router configuration including authentication via the XSUAA Service. See package.json, xs-app.json and xs-security.json
- Multitenancy configuration via mta-multi-tenant.yaml, .cdsrc.json, sidecar module
- Feature toggles. In CF, features can be toggled by assigning the roles
expertorpremium-customerto the user. - Messaging configuration and handlers with local messaging and message brokers.
- Consumption of Remote services in [srv/external.cds] and [srv/notes-mashup.cds]
Domain Model related Features:
- CDS Query Language with a Static CDS Model in the Admin Service
- Use of Aspects in the Model Definition such as the
managedorcuidAspect in Books - Input validation using model annotation
@assert.format - Data Localization for Books
- Use of Media Data in Books and AdminService
Service Model related Features:
- Custom event handlers such as the Custom business logic for the Admin Service
- Custom actions such as
addToOrderin the Admin Service. The Action implementation is in the Admin Service Event Handler - Add annotations for searchable elements in the Admin Service
- Localized Messages in the Admin Service Event Handler
- role- and instance-based restrictions in AdminService and ReviewService
- Use of
@cds.persistence.skipin AdminService - Media Data processing in the Admin Service Event Handler
User Interface related Features:
- Support for SAP Fiori Elements
- SAP Fiori Draft based Editing for Books, Orders and Reviews
- SAP Fiori annotations specific for Browse Books, Manage Books, Manage Orders, Manage Reviews and common annotations, which apply to all UI’s
- UI Annotations for custom actions in the Browse Books and Manage Books UI, including annotations for a button and a popup
- Value Help for Books and Authors
- Model Localization for English and German language for static texts
- Custom File Upload extension which provides a button for uploading
CSVfiles - A simple Swagger UI for the CatalogService API at http://localhost:8080/swagger/index.html
- UI5 Tree Table with CRUD requests and Value Help for GenreHierarchy. Please note, that Tree Tables must be used with HANA (for productive usage) or H2 (for local development and testing).
- Custom actions such as
moveSiblingin the Admin Service. This action demonstrates experimental UI feature ChangeNextSiblingAction. The Action implementation is in the Hierarchy Sibling Action Handler
CDS Maven Plugin Features:
- Install Node.js in the default version.
- Install a configured version of @sap/cds-dk.
- Execute arbitrary CDS commands.
- Generate Java POJOs for type-safe access to the CDS model.
- Clean project from artifacts of the previous build.
Getting Started
The following sections describe how to set up, build, and run the project.
Prerequisites
Make sure you have set up a development environment (that means, you’ve installed the CDS Compiler, Java 21, and Apache Maven) as described here. This sample application requires a Java 21 compatible JDK. We recommend using SapMachine 21.
Clone Build & Run
- Clone the project:
git clone https://github.com/SAP-samples/cloud-cap-samples-java.git
- Build and run the application:
mvn spring-boot:run
[!NOTE] Please note that some IDEs may interfere with their autobuild when launching the application from the CLI using Maven. Therefore, please ensure that no IDEs are running in parallel or launch the application natively from your preferred IDE as described below.
- Use the following links in the browser to check if everything works fine:
- http://localhost:8080: This should show the automatically generated index page of served paths.
- http://localhost:8080/fiori.html: This is the actual bookshop application UI.
- http://localhost:8080/swagger/index.html: This is providing a Swagger UI for the CatalogService API.
You’ll start with a predefined stock of books as this procedure starts the bookshop application with a CSV-initialized in-memory H2 database.
Two mock users in addition to the default mock users are defined for local development:
- User:
user, password:userto browse books - User:
admin, password:adminto manage books and orders
Testing in hybrid mode
You can test the GenreHierarchyTest on H2 using the profile default as well as on HANA using the profile cloud
cds bind --exec -- mvn clean install -Dspring.profiles.active=cloud
Using VS Code
VS Code supports the project out-of-the-box, when using the Extension Pack for Java.
To launch the application in VS Code navigate to the Application class and click on Run or Debug.
Using Eclipse
Use the following steps to import the project to Eclipse:
-
Import the project using File > Import > Existing Maven Projects.
Now, you should see the projects bookshop and bookshop-parent in the project/package explorer view.
-
In Project Explorer, change the property “Package Presentation” from “Flat” to “Hierarchical” for better understanding.
Building and Running
-
To compile the project, right-click the file
pom.xmlin thebookshop-parentproject root folder and select Run as > Maven build.In the following dialog, enter the string
clean installinto the field labeled with “Goals” and click “Run”.Note: This step also compiles the CDS artifacts, thus repeat this once you made changes to the CDS model. This step also generates source files, therefore refresh the “bookshop” project in your IDE.
-
To run the application, right-click the
bookshopproject root in the Package Explorer and select Run as > Spring Boot App (make sure you have Spring Tools 4 installed).This step creates a default Run Configuration named
Bookshop - Applicationand starts the application afterwards. To go on with the next step, stop the application again. -
Then, set the default working directory by editing your Run Configuration via Run > Run Configurations > Bookshop - Application. On the tab Arguments change the default Working Directory to:
${workspace_loc:bookshop-parent}Afterward, click Run. This step starts the applications
mainmethod located insrc/main/java/my/bookshop/Application.java.
Using IntelliJ Idea (Community and Ultimate)
IntelliJ can handle the project more or less out-of-the-box. Since some of the event handlers in the project rely on the code generated from the CDS model the build path of the project (module) needs to be extended with the folder containing the generated code. In order to add the generated code you need to add the ‘gen’ folder to the build path:
- Right-click the
srv/src/gen/javafolder, select ‘Mark Directory as’ and mark it as ‘Sources Root’. - Right-click the
srv/src/gen/resourcesfolder, select ‘Mark Directory as’ and mark it as ‘Resources Root’.
After the generated code is considered by IntelliJ’s build the application can be handled just as any other Spring Boot application in IntelliJ.
Database Setup and Spring Profiles
The application comes with two predefined profiles that determine how to run the application: default, and cloud (see srv/src/main/resources/application.yaml).
-
The
defaultprofile specifies to use an in-memory H2 database. The in-memory database is set up automatically during startup of the application and initialized with some example data from CSV files. -
When deploying the application to Cloud Foundry, the CF Java Buildpack automatically configures the
cloudSpring profile. This profile doesn’t specify any datasource location. In that case CAP Java can automatically detect SAP HANA service bindings available in the environment.
API_BUSINESS_PARTNER Remote Service and Spring Profiles
The behavior of the API_BUSINESS_PARTNER remote service is controlled using profiles (see srv/src/main/resources/application.yaml):
-
Using mock data via internal service: When using only the
defaultprofile (default when omitting any profile setting), the API_BUSINESS_PARTNER API is mocked as a local service using the mock data. -
Using mock data via internal service through OData: With the
mockedprofile, all requests to the API_BUSINESS_PARTNER service will be routed through HTTP and OData to itself (http://localhost:<port>/api/API_BUSINESS_PARTNER/...). This mode is similar to using a real remote destination, and such helps to prevent issues from differences in local service and remote service behavior. -
Using the sandbox environment: You can access data from the SAP API Business Hub sandbox with the
sandboxprofile. The API key needs to be provided with the environment variableCDS_REMOTE_SERVICES_API_BUSINESS_PARTNER_HTTP_HEADERS_APIKEYor in the respective section inapplication.yaml. You can retrieve it by clicking on Show API Key on this page after logging in. -
Using S/4HANA cloud or on-premise system: With the
destinationprofile, you can access data from a real S/4HANA system. You need to create a destination with names4-destinationand make sure that an instance of XSUAA and destination service are bound to your application. For an on-premise destination, you additionally need to bind the connectivity service and add an additional propertyURL.headers.sap-clientwith the S/4HANA client number to your destination.
The profiles sandbox and destination can be combined with the default profile for hybrid testing and with the cloud profile when deployed to the cloud.
Deploy to SAP Business Technology Platform, Cloud Foundry
CAP Java applications can be deployed to the SAP Business Technology Platform either in single tenant or in multitenancy mode. See Multitenancy in CAP Java for more information.
Prerequisites:
- Install the Cloud MTA Build Tool:
npm install -g mbt. - Install the Cloud Foundry Command Line Interface.
- Get an SAP Business Technology Platform account to deploy the services and applications.
- Create a SAP HANA Cloud Instance in your SAP Business Technology Platform space.
- Ensure you have an entitlement for
SAP HANA Schemas & HDI Containerswith planhdi-sharedin the same space. - Ensure you have provided an API Key for the sandbox environment as described in the previous section.
[!NOTE] Please note that some IDEs may interfere with their autobuild during the MTA build and thus lead to corrupt MTA build results. Therefore, please ensure that no IDEs are running in parallel with your MTA build.
Deploy as Single Tenant Application:
- Rename
mta-single-tenant.yamltomta.yaml - Run
mbt build - Run
cf login - Run
cf deploy mta_archives/bookshop_1.0.0.mtar
Deploy as Multitenant Application:
- Rename
mta-multi-tenant.yamltomta.yaml - Run
mbt build - Run
cf login - Run
cf deploy mta_archives/bookshop-mt_1.0.0.mtar - Go to another subaccount in your global account, under subscriptions and subscribe to the application you deployed.
- Run
cf map-route bookshop-mt-app <YOUR DOMAIN> --hostname <SUBSCRIBER TENANT>-<ORG>-<SPACE>-bookshop-mt-appor create and bind the route manually.<YOUR DOMAIN>: Find the app domain for your landscape by executingcf domains. It commonly starts withcfapps..<SUBSCRIBER TENANT>: The subdomain of the subscriber subaccount. You can find this info in the subaccount overview.
[!NOTE] Please note that the route length is limited to 63 characters and can easily be exceeded. So keeping the app name and sub-account subdomain as short as possible will help you stay within length.
Before you can access the UI using the (tenant-specific) URL to the bookshop(-mt)-app application, make sure to Setup Authorizations in SAP Business Technology Platform.
Deploy to SAP Business Technology Platform, Kyma Runtime
TIP: You can find more information in the Deploy Your CAP Application on SAP BTP Kyma Runtime tutorial and in the Deploy to Kyma/K8s guide of the CAP documentation.
Preconditions
- BTP Subaccount with Kyma Runtime
- BTP Subaccount with Cloud Foundry Space
- HANA Cloud instance available for your Cloud Foundry space
- BTP Entitlements for: HANA HDI Services & Container plan hdi-shared, Launchpad Service plan standard
- Container Registry (e.g. Docker Hub)
- Command Line Tools:
kubectl,kubectl-oidc_login,pack,docker,helm,cf - Logged into Kyma Runtime (with
kubectlCLI), Cloud Foundry space (withcfCLI) and Container Registry (withdocker login) @sap/cds-dk>= 6.6.0
Add Deployment Files
CAP tooling provides you a Helm chart for deployment to Kyma.
For single tenant deployment, replace the requires section in .cdsrc.json with:
    "requires": {
        "auth": {
            "kind": "xsuaa"
        },
        "approuter": {
            "kind": "cloudfoundry"
        },
        "db": {
            "kind": "hana-cloud"
        }
    },
In addition remove "profile": "with-mtx-sidecar" from .cdsrc.json and delete the mtx folder in root.
For multi tenant deployment, replace the requires section in .cdsrc.json with:
    "requires": {
        "multitenancy": true,
        "extensibility": true,
        "toggles": true,
        "auth": {
            "kind": "xsuaa"
        },
        "approuter": {
            "kind": "cloudfoundry"
        }
    },
Add the CAP Helm chart with the required features to this project:
cds add helm
Use API_BUSSINESS_PARTNER Remote Service (optional, single tenant only)
You can try the API_BUSINESS_PARTNER service with a real S/4HANA system with the following configuration:
-
Create either an on-premise or cloud destination in your subaccount.
-
Add configuration required for the destination service by executing the following command.
cds add destination -
Set the profiles
cloudanddestinationactive in yourvalues.yamlfile:srv: ... env: SPRING_PROFILES_ACTIVE: cloud,destination -
For on-premise only: Add the connectivity service to your Helm chart:
cds add connectivityNote:
cds add helmwill not add configuration required to create a Connectivity Service Instance. This Service Instance should be created by the Kyma Cluster Administrator. For more information regarding configuration of Connectivity Instance, please check the documentation.
See also: API_BUSINESS_PARTNER Remote Service and Spring Profiles
Prepare Kubernetes Namespace
Create container registry secret
Create a secret container-registry with credentials to access the container registry:
bash ./scripts/create-container-registry-secret.sh
The Docker Server is the full qualified hostname of your container registry.
Create a HDI container / Service Manager Instance and a Secret
This step is only required if you’re using a BTP Trial account. If you’re using a production or a free tier account then you can create HDI Container from Kyma directly by adding a mapping to your Kyma namespace in your HANA Cloud Instance and skip this step.
Single Tenant
bash ./scripts/create-db-secret.sh bookshop-db
It will create a HDI container bookshop-db instance on your currently targeted Cloud Foundry space and a secret bookshop-db with the credentials in your current Kubernetes namespace.
Make the following changes to your chart/values.yaml.
srv:
  bindings:
    db:
-     serviceInstanceName: hana
+     fromSecret: bookshop-db
...

hana-deployer:
  bindings:
    hana:
-     serviceInstanceName: hana
+     fromSecret: bookshop-db

...
- hana:
-   serviceOfferingName: hana
-   servicePlanName: hdi-shared
Make the following changes to your chart/Chart.yaml.
dependencies:
  ...
-  - name: service-instance
-    alias: hana
-    version: ">0.0.0"
  ...
Multi Tenant
bash ./scripts/create-sm-secret.sh bookshop-sm
It will create a Service Manager bookshop-sm instance on your currently targeted Cloud Foundry space and a secret bookshop-sm with the credentials in your current Kubernetes namespace.
Make the following changes to your chart/values.yaml.
srv:
  bindings:
    service-manager:
-     serviceInstanceName: service-manager
+     fromSecret: bookshop-sm
...

sidecar:
  bindings:
    service-manager:
-     serviceInstanceName: service-manager
+     fromSecret: bookshop-sm

...
- service-manager:
-   serviceOfferingName: service-manager
-   servicePlanName: container
Make the following changes to your chart/Chart.yaml.
dependencies:
  ...
-  - name: service-instance
-    alias: service-manager
-    version: ">0.0.0"
  ...
Build
cds build --production
Build image for CAP service:
mvn clean package -DskipTests=true
pack build ${YOUR_CONTAINER_REGISTRY:?}/bookshop-srv \
        --path srv/target/*-exec.jar \
        --buildpack gcr.io/paketo-buildpacks/sap-machine \
        --buildpack gcr.io/paketo-buildpacks/java \
        --builder paketobuildpacks/builder-jammy-base \
        --env SPRING_PROFILES_ACTIVE=cloud \
        --env BP_JVM_VERSION=17
(Replace ${YOUR_CONTAINER_REGISTRY:?} with the full-qualified hostname of your container registry)
Build Approuter Image:
pack build ${YOUR_CONTAINER_REGISTRY:?}/bookshop-approuter \
     --path app \
     --buildpack gcr.io/paketo-buildpacks/nodejs \
     --builder paketobuildpacks/builder-jammy-base \
     --env BP_NODE_RUN_SCRIPTS=""
Build database deployer image (single tenant only):
pack build ${YOUR_CONTAINER_REGISTRY:?}/bookshop-hana-deployer \
     --path db \
     --buildpack gcr.io/paketo-buildpacks/nodejs \
     --builder paketobuildpacks/builder-jammy-base \
     --env BP_NODE_RUN_SCRIPTS=""
Build sidecar image (multi tenant only):
pack build ${YOUR_CONTAINER_REGISTRY:?}/bookshop-sidecar \
     --path mtx/sidecar/gen \
     --buildpack gcr.io/paketo-buildpacks/nodejs \
     --builder paketobuildpacks/builder-jammy-base \
     --env BP_NODE_RUN_SCRIPTS=""
Push container images
You can push all the container images to your container registry, using:
docker push ${YOUR_CONTAINER_REGISTRY:?}/bookshop-srv

docker push ${YOUR_CONTAINER_REGISTRY:?}/bookshop-approuter
Single Tenant
docker push ${YOUR_CONTAINER_REGISTRY:?}/bookshop-hana-deployer
Multi Tenant
docker push ${YOUR_CONTAINER_REGISTRY:?}/bookshop-sidecar
Configuration
Make the following changes in the chart/values.yaml file.
-
Change value of
global.domainkey to your cluster domain. -
Replace
<your-cluster-domain>inxsuaa.parameters.oauth2-configuration.redirect-uriswith your cluster domain. -
Replace
<your-container-registry>with your container registry. -
Make the following change to add backend destinations required by Approuter.
-  backendDestinations: {}
+  backendDestinations:
+     backend:
+       service: srv
+     mtx-api:
+       service: srv
- Add your image registry secret created in Create container registry secret step.
global:
  domain: null
-  imagePullSecret: {}
+  imagePullSecret:
+    name: container-registry
- If the application is deployed multiple times in the same cluster, make sure to adapt the values of
xsappnameandappNameundersaasRegistryParametersinvalues/Chart.yaml
Deployment
Deploy the helm chart using the following command:
Single Tenant
helm install bookshop ./chart --set-file xsuaa.jsonParameters=xs-security.json
Before you can access the UI you should make sure to Setup Authorizations in SAP Business Technology Platform.
Click on the approuter url logged by the helm install to access the UI.
Multi Tenant
helm install bookshop ./chart --set-file xsuaa.jsonParameters=xs-security-mt.json
In case of multi tenant, you’ll have to subscribe to the application from a different subaccount. You can follow the steps mentioned here to access the application.
Setup Authorizations in SAP Business Technology Platform
To access services and UIs that require specific authorizations (e.g. admin) you need to assign a corresponding role and role collections to your user in SAP BTP Cockpit.
- For single-tenant applications open the subaccount where you deployed the
bookshopapplication to. For multitenant applications open the subaccount where you subscribed to thebookshopapplication. - Navigate to Security -> Roles
- Create a role with name
bookshop-adminbased on theadminrole template of thebookshopapplication:- Enter a Business Partner ID of your S/4 system as value for the
businessPartnerattribute. When using the sandbox environment use10401010.
- Enter a Business Partner ID of your S/4 system as value for the
- Navigate to Security -> Role Collections
- Create a new role collection
bookshop-admin:- Assign the
bookshop-adminrole to this role collection - Assign the role collection to your user
- Assign the
Code Tour
Take the guided tour in VS Code through our CAP Samples for Java and learn which CAP features are showcased by the different parts of the repository. Just install the CodeTour extension for VS Code.
Get Support
In case you have a question, find a bug, or otherwise need support, please use our community. See the documentation at https://cap.cloud.sap for more details about CAP.
License
Copyright (c) 2022 SAP SE or an SAP affiliate company. All rights reserved. This file is licensed under the Apache Software License, version 2.0 except as noted otherwise in the LICENSE file.