Prerequisite
Complete Exercise 5 before starting this exercise.
BAS required for graphical editor
The graphical calculation view editor is only available in SAP Business Application Studio. There is no supported local alternative.
Exercise 6 - Create Calculation View and Expose via CAP (SAP HANA Cloud)
In this exercise you will build your first SAP HANA Calculation View inside Business Application Studio, then wire it into your CAP application so it is queryable as an OData endpoint — all without writing a single SQL CREATE VIEW statement.
Source
These steps are from Create Calculation View and Expose via CAP (SAP HANA Cloud) on SAP Tutorials.
Create calculation view
With the SAP Cloud Application Programming Model and its implementation of Core Data Services (CDS), we don't directly import a Calculation View or other native DB artifact. This import, however, is important if you want to expose these artifacts via OData V4 services, since that requires a CDS entity or view.
But CDS does have an annotation called @cds.persistence.exists. This annotation allows you to re-define an existing DB object and CDS won't attempt to create or alter it. It will just assume it already exists in the matching state.
This feature does require you to completely redefine the DB artifact with exactly the same name, columns and column names.
In this exercise, lets see how we can create a calculation view and other artifacts and expose them to CDS.
For more details on this topic, including advanced features such as parameters and quoted names, please refer to the online documentation here: https://cap.cloud.sap/docs/advanced/hana#create-sap-hana-native-object
Calculation Views and other HANA native artifacts allow you to leverage HANA specific features and optimizations that might not otherwise be available at the abstraction layers within the SAP Cloud Application Programming Model. Calculation Views are especially good at aggregation and filtering of large datasets. In this exercise will create a simple join Calculation View based upon or small data set and data model. This is done so we focus on the mechanics of combining HANA native with CAP without needing the typical large data set where the technical advantages of Calculation Views become more apparent.
Create a new Calculation View via View > Command Pallette and then SAP HANA: Create SAP HANA Database Artifact command pallet entry.
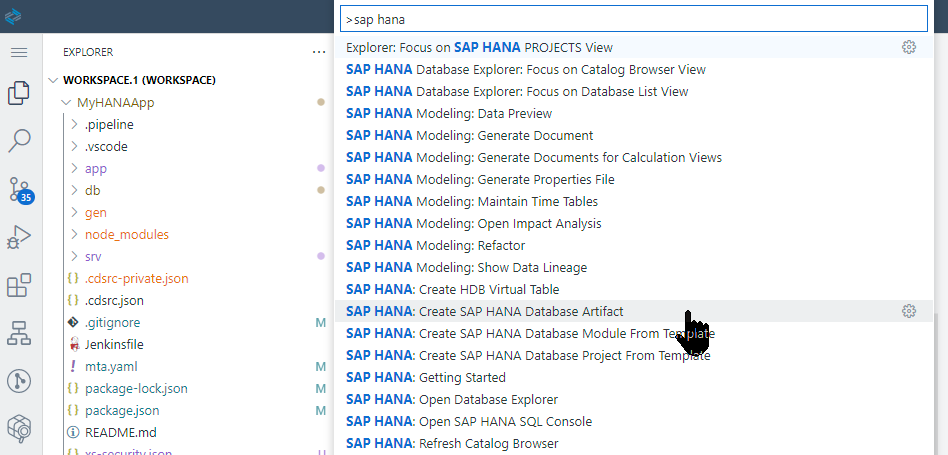
Create a calculation view called
V_INTERACTIONof Data Category DIMENSION and Dimension Type of STANDARD. Press Create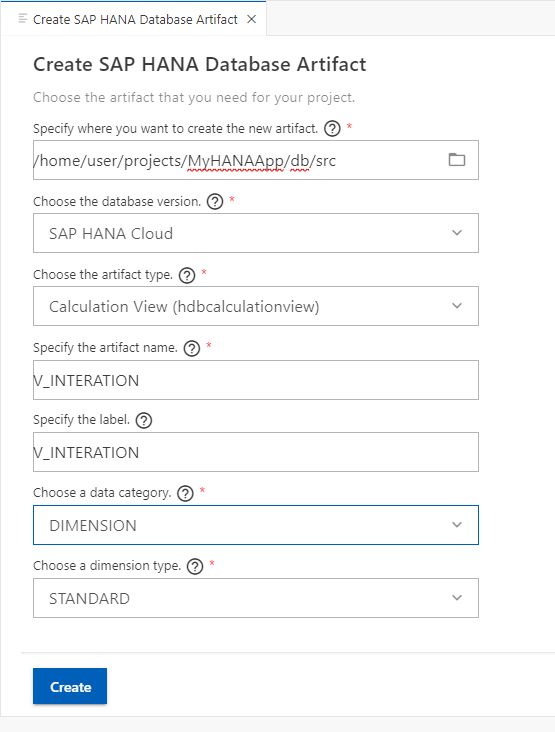
The new artifact is created in the
/db/srcfolder. This way you can have a single HANA database model that contains both HANA native content and CAP generated content.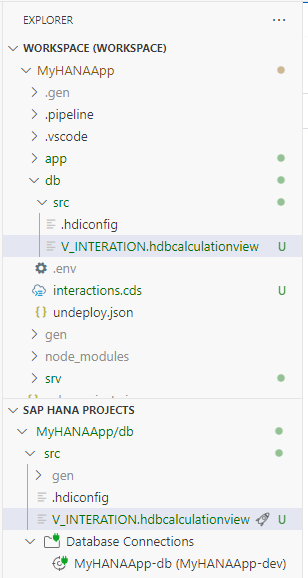
Click on the
V_INTERACTION.hdbcalculationviewto load the graphical calculation view editor.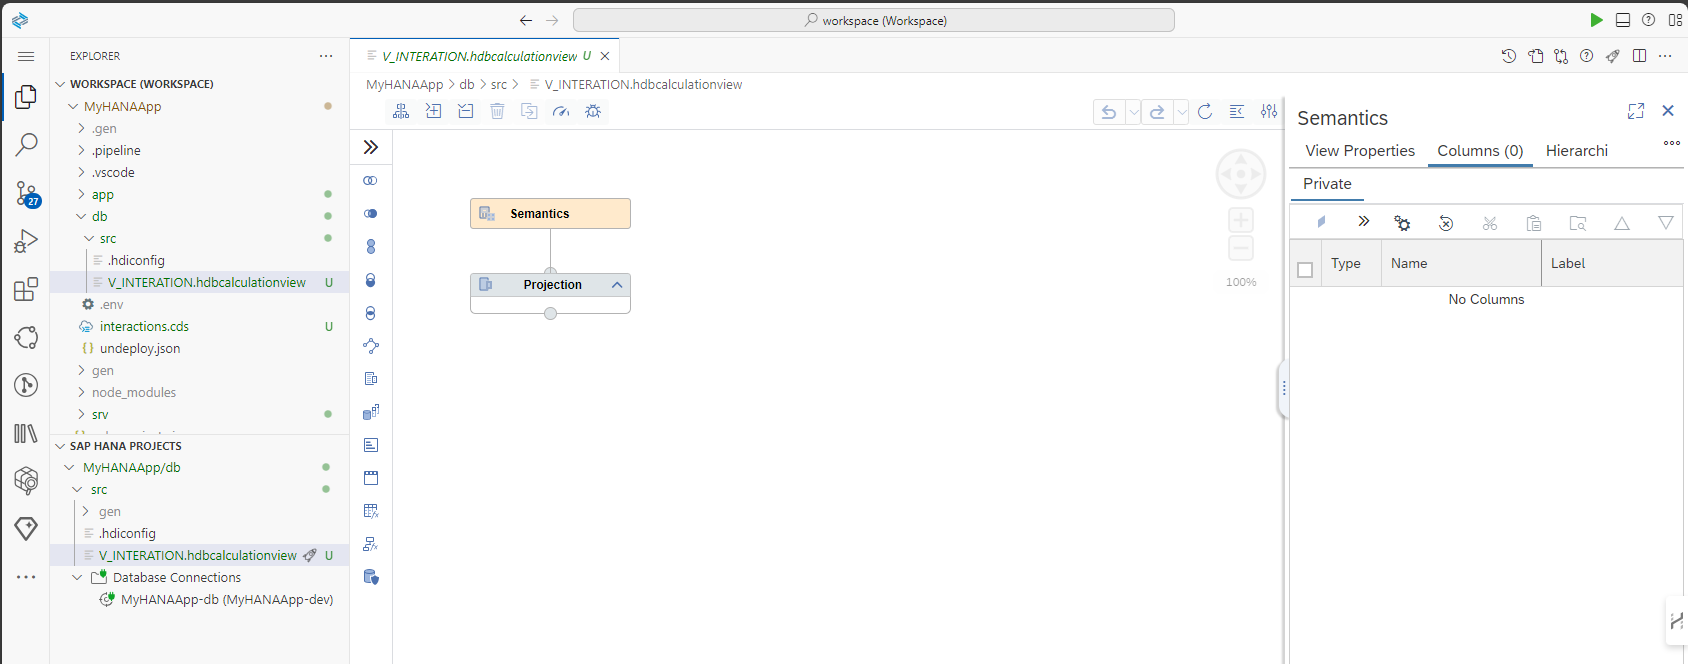
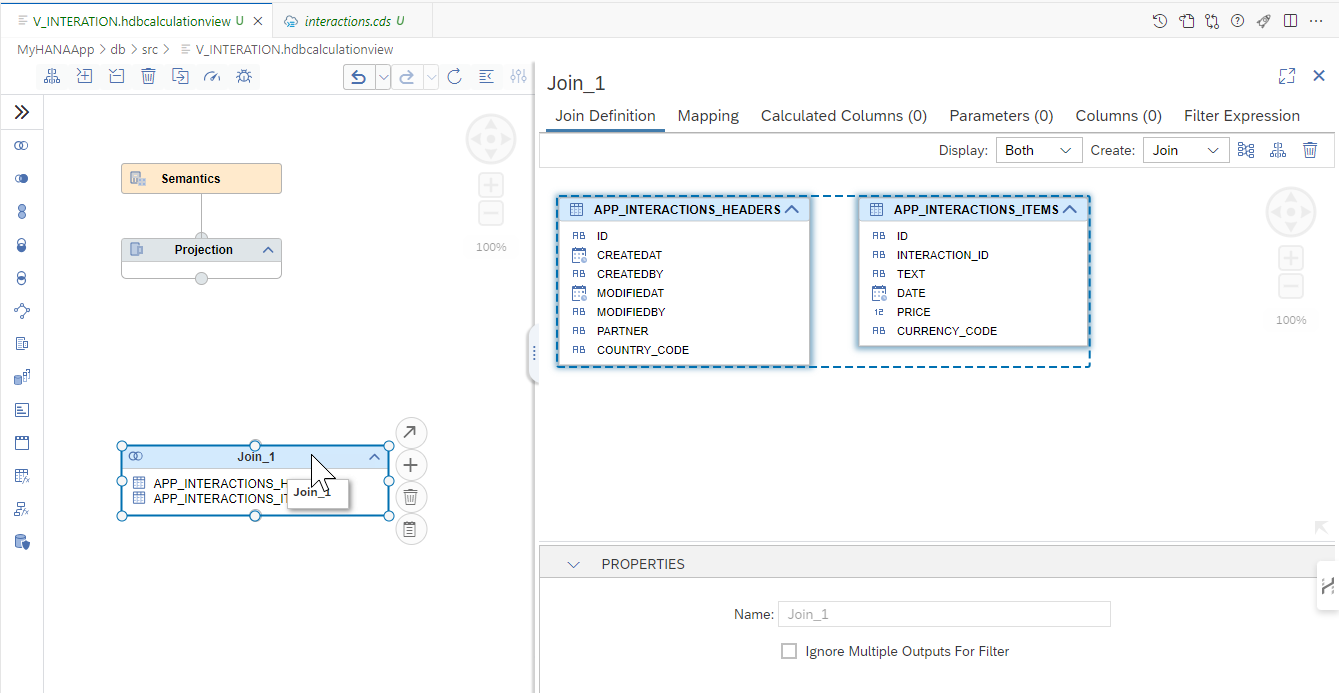
Model the join relationship
Drop a
joinnode into the modeling space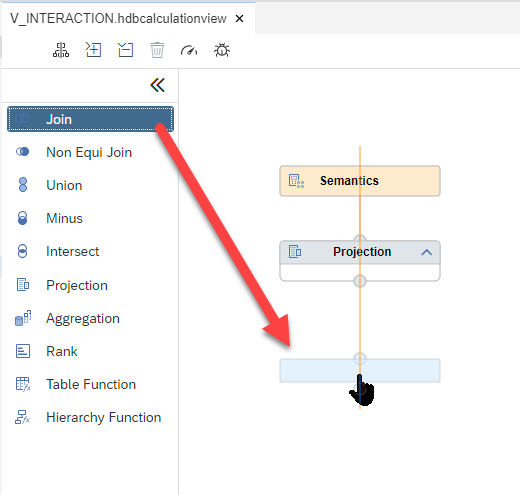
Use the
 sign to add tables to the node.
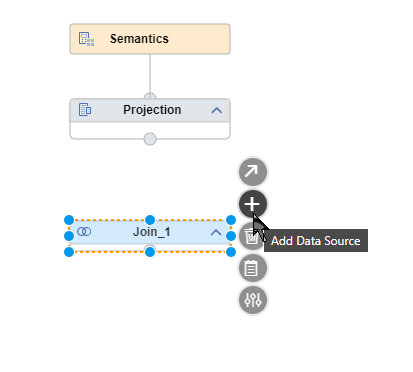
Type in
HEADERand then select the table you created earlier via CDS calledAPP_INTERACTIONS_HEADERand press Finish.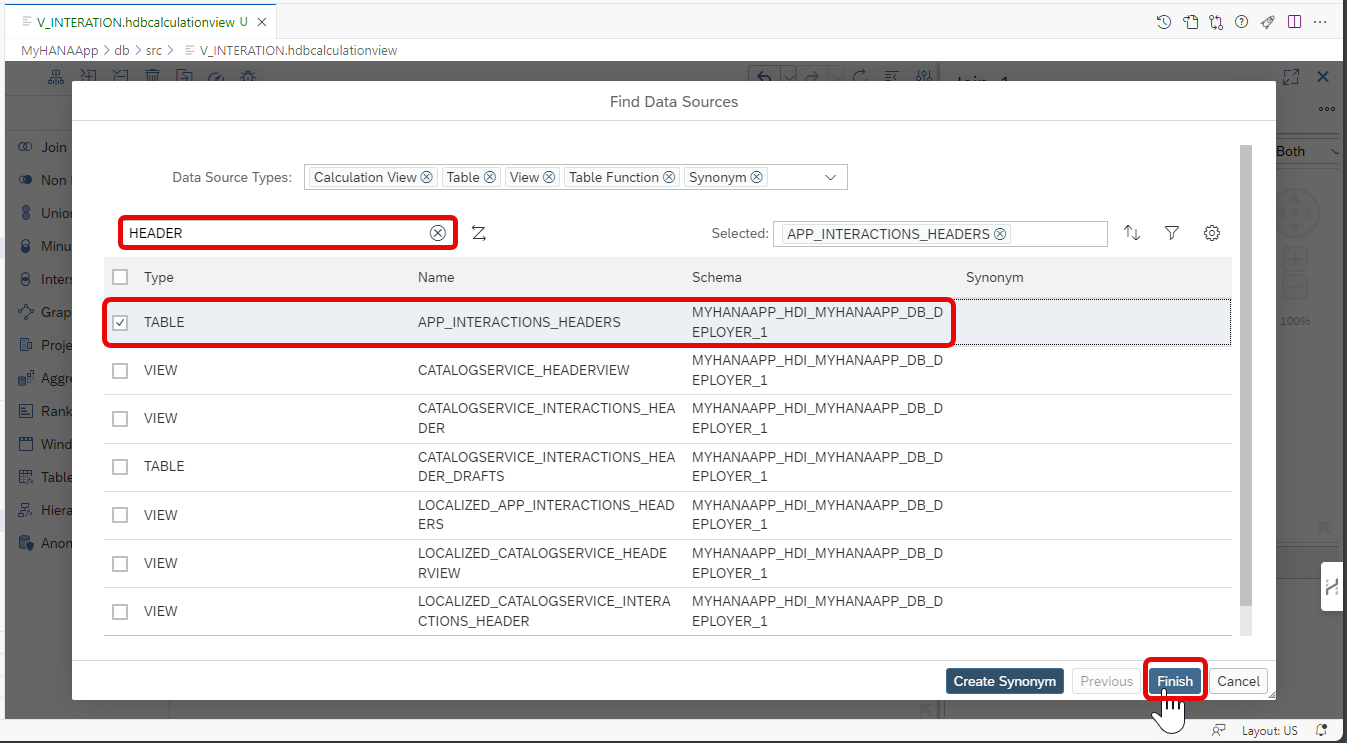
Repeat the process to add the
APP_INTERACTIONS_ITEMStable to the same join node. You should see both artifacts in the join node.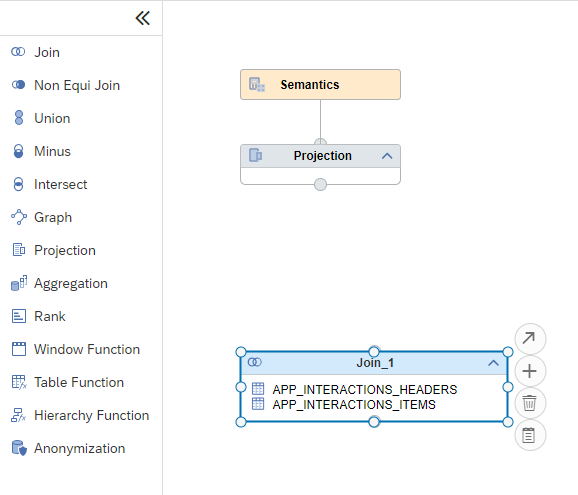
Double-click on the join node. A panel will open on the right.
Drag and drop the
IDfield to theINTERACTION_IDfield.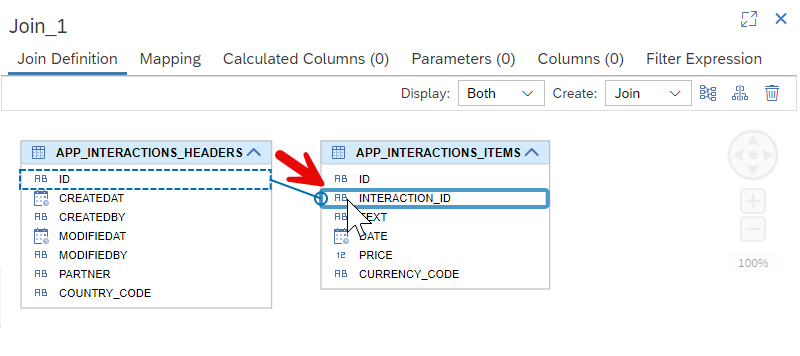
Set the cardinality to
1..n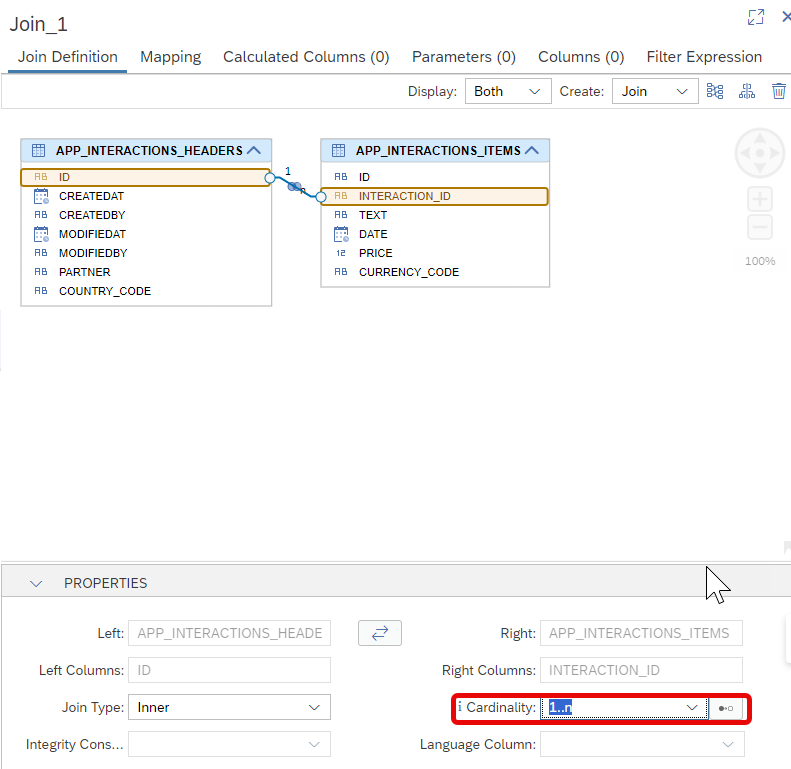
In the Mapping tab, add all the columns except
ID*Columns as output columns.
Connect the join node with the Projection node using the

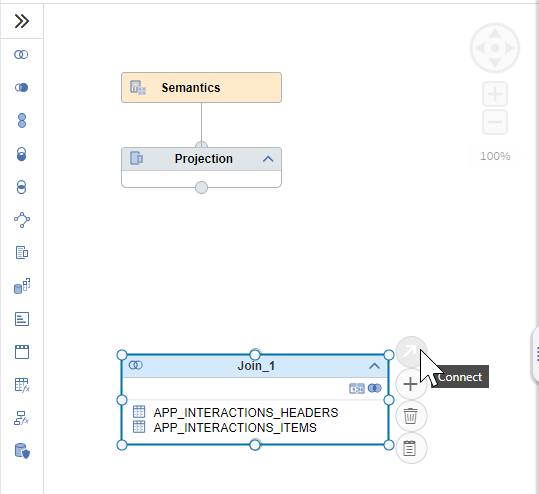
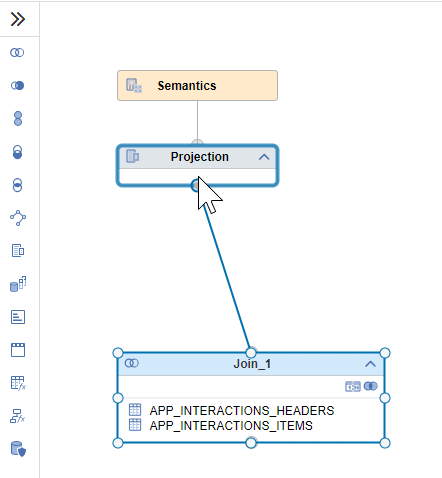
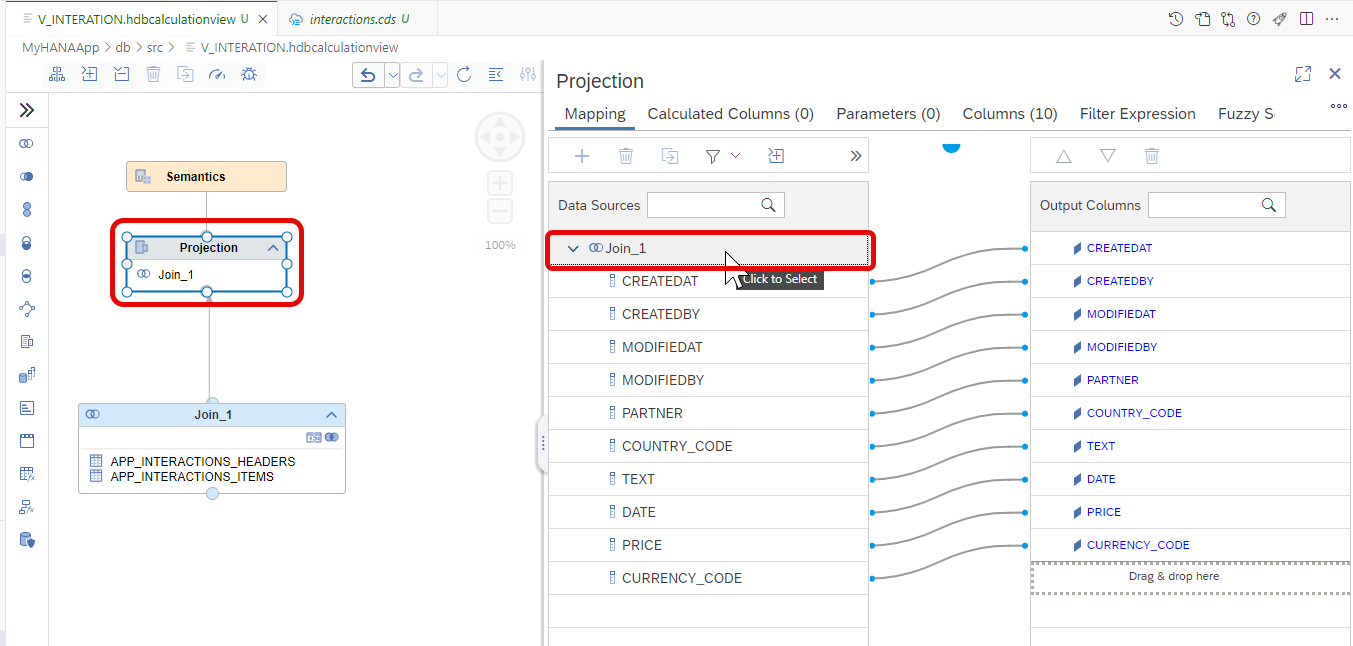
Click on the Projection node and double-click on the join parent to add all the columns to the output
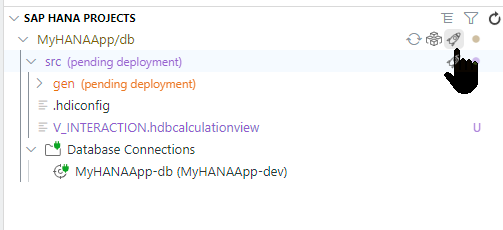
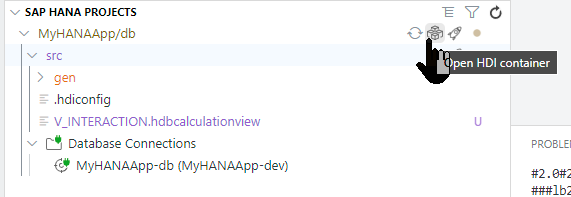
From the SAP HANA Projects view, press the Deploy button
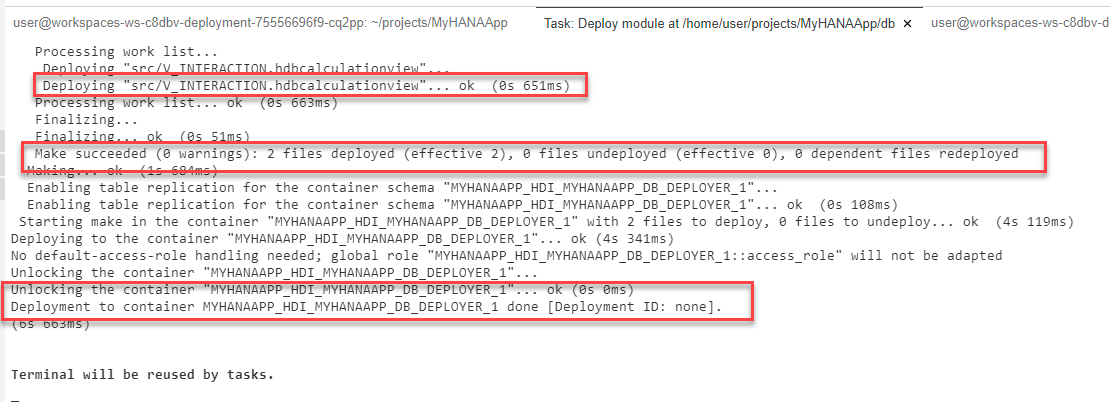
Check the deployment log to make sure everything was successfully created in the database.
Open the HDI Container in the Database Explorer
Under Column Views you will find your Calculation View. Choose Open Data
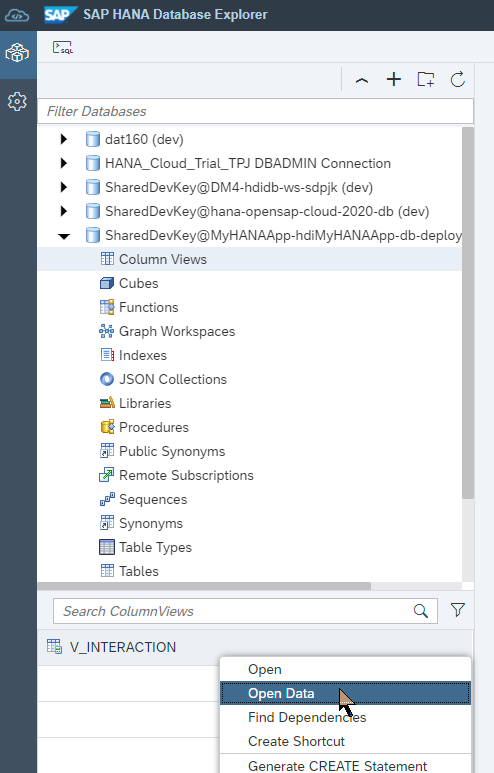
Go to the Raw Data and you should see the header and item data joined together.

Create calculation view proxy entity
We now want to expose our Calculation View to the Cloud Application Programming model by creating a "proxy" entity for the view in the CDS data model.
Return to the Business Application Studio and open
interactions.cds.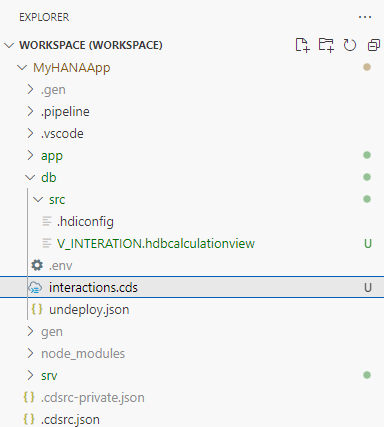
We need our proxy entity to be created without the namespace in our current
interactions.cds. Therefore comment out the namespace line and add all the existing content except theusing ...line in a new context forapp.interactions.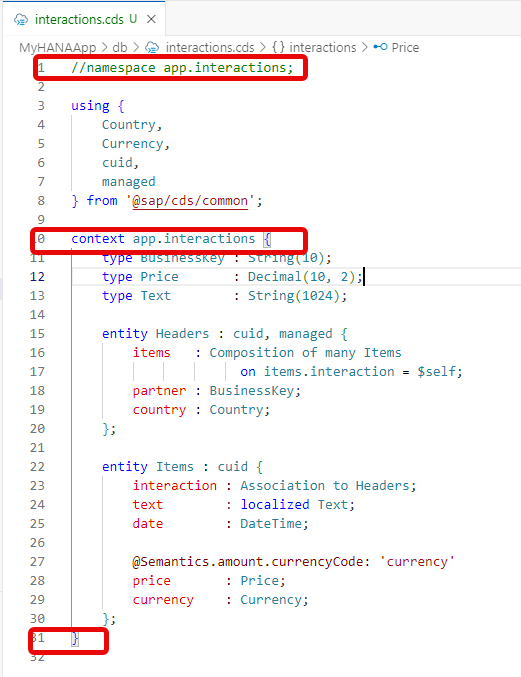
We need to add a matching entity definition for the Calculation View. This means redefining all the column names and data types / lengths. Doing so manually would be error prone, but the
hana-clihas a utility that will help. Open a terminal and change to thedbfolder with the commandcd db. Now issue the command:shellhana-cli inspectView -v V_INTERACTION -o cds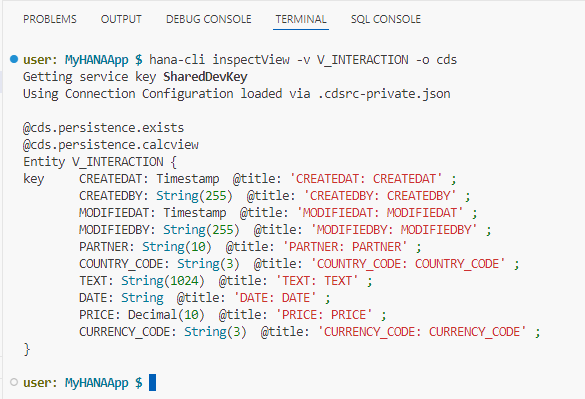
With this command you are looking up the definition of the view but asking for the output (-o) in the CDS format.
Copy this block from the terminal and paste it into the
interactions.cdsfile at the end outside the context block.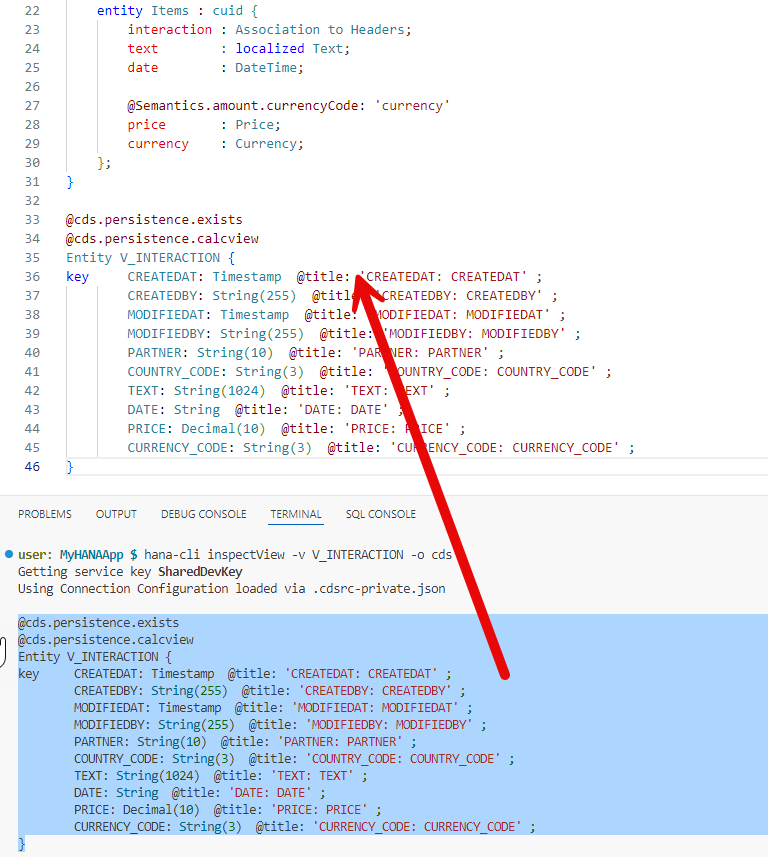
CDS does have an annotation called
@cds.persistence.exists. This annotation allows you to re-define an existing DB object and CDS won't attempt to create or alter it. It will just assume it already exists in the matching state.There is also the annotation@cds.persistence.calcview. This will further tell the Cloud Application Programming Model that this target entity is also a Calculation View.Now open the
interactions_srv.cdsfile from the/srvfolder. Add this new Calculation View based entity to the CAP service as read-only.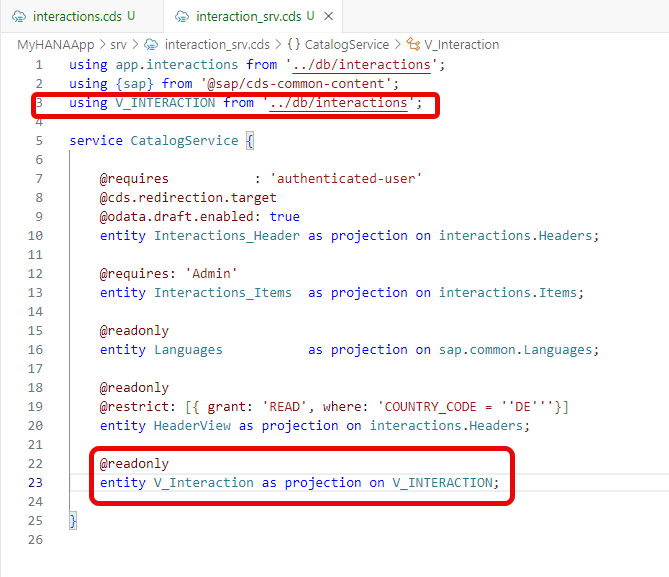
From the terminal return to the root of the project and issue the command:
cds build --productionshellcds build --production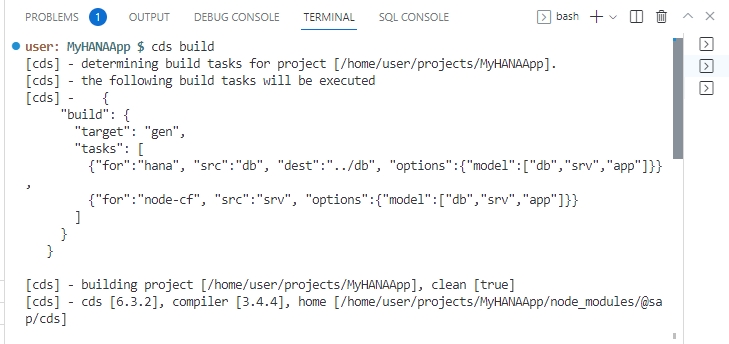
Although we didn't add any new database artifacts to the project, the addition of an entity to the service layer causes new views to be generated within SAP HANA. Therefore we need to deploy to the database using the SAP HANA Projects view before we can test.
From the console in the project root hopefully you still have the
cds watch ...running. Otherwise start it again withcds watch --profile hybridto start the CAP service layer for testing. If you have performed the tutorial SAP HANA Cloud, Add User Authentication to Your Application, remember you must also run the application router to test your service with authentication.You can test your view via the service layer by adding
/odata/v4/catalog/V_Interactionto the path.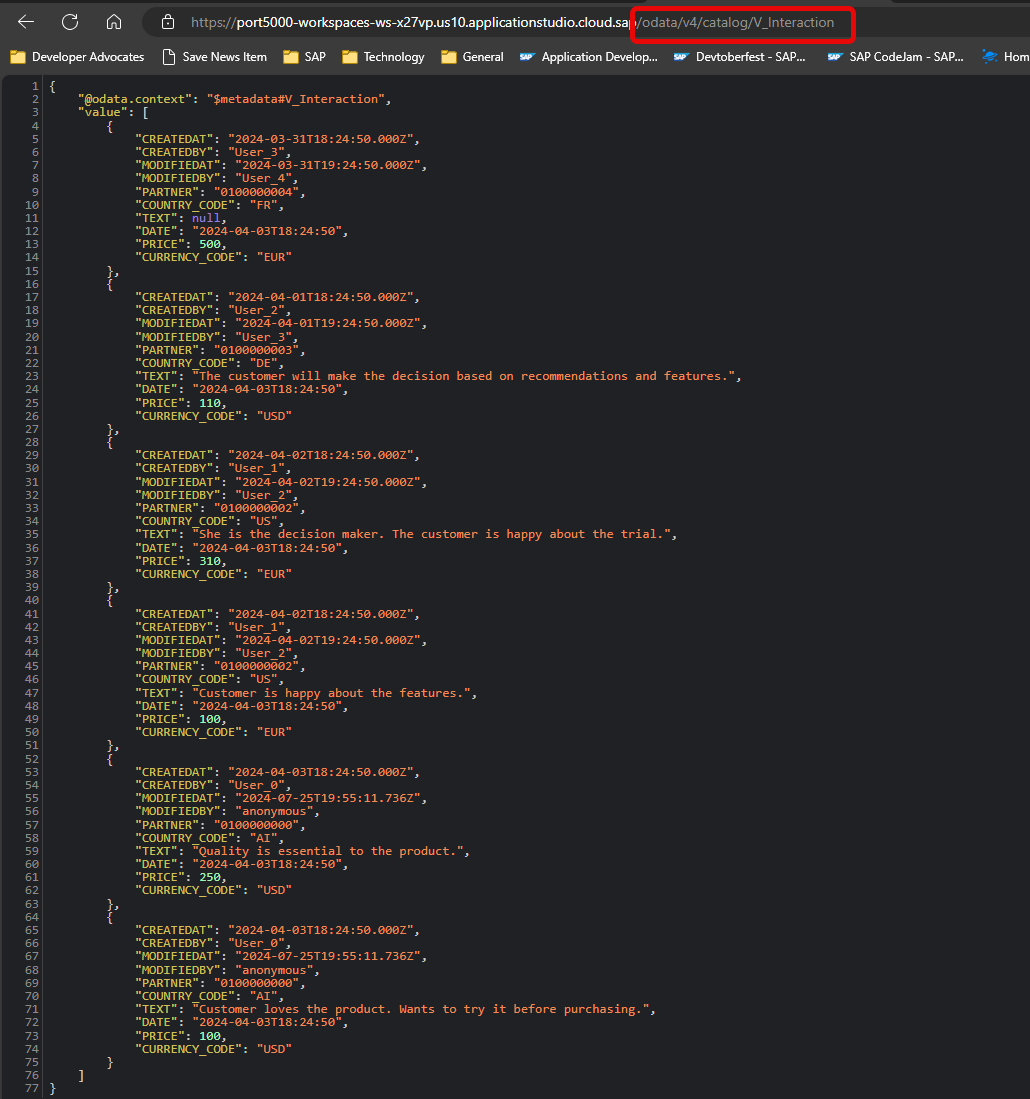
Congratulations! You have now successfully combined HANA native artifacts with the SAP Cloud Application Programming Model and learned the modern HANA way to expose Calculation Views via OData.
Background
What is a Calculation View?
A Calculation View is a HANA-native modeling artifact that lives in the HDI container alongside your tables. Unlike a SQL view (which is a single SELECT statement), a Calculation View is assembled graphically from nodes — Projection, Join, Aggregation, Union — and is compiled by HANA's query optimizer into a highly efficient execution plan at query time.
Key differences from a SQL view:
| Feature | SQL View | Calculation View |
|---|---|---|
| Authoring | SQL CREATE VIEW statement | Graphical node editor in BAS / HANA Studio |
| Multiple data sources | One query; joins written manually | Dedicated Join/Union nodes |
| Aggregation | Handled in the SELECT | Dedicated Aggregation node with measure/dimension semantics |
| Column engine | Standard SQL engine | HANA column store engine — parallelised, in-memory |
| Deployment artifact | .hdbview | .hdbcalculationview |
The .hdbcalculationview file you create is deployed into the HDI container during cds deploy. After deployment, HANA exposes it as a view-like object that can be queried with standard SQL.
The proxy entity pattern
CAP manages its own set of database objects. When you deploy a CAP project, the framework generates tables and SQL views from your CDS entities. If you want to expose a database object that CAP did not create — a Calculation View, a table from another schema, or a legacy view — you need to tell CAP to treat it as a proxy: an entity that maps to an already-existing database object without CAP trying to create or modify it.
Two annotations do this job together:
@cds.persistence.exists    // CAP: don't create or alter this object in the DB
@cds.persistence.calcview  // CAP: generate the OData-to-SQL translation layer for a calc view
Entity V_INTERACTION { ... }
@cds.persistence.exists alone would work for a regular SQL view or table. The additional @cds.persistence.calcview is needed because HANA Calculation Views require a thin SQL wrapper generated by CAP (a generated .hdbview) to be accessible over OData. Without it, the OData-to-SQL query generated by CAP would not reach the calculation view correctly.
Why context instead of namespace?
In the earlier exercises the CDS data model used a namespace declaration:
namespace app.interactions;
entity Headers { ... }   // becomes app.interactions.Headers in the DB
A namespace is file-scoped — it prefixes every entity in the file with app.interactions.. That works perfectly for your own entities because CAP controls their names in the database.
For the Calculation View proxy entity the name must match the underlying HDI object exactly — V_INTERACTION, not app.interactions.V_INTERACTION. To achieve this, the tutorial converts the namespace declaration to a context block:
context app.interactions {
    entity Headers { ... }   // still becomes app.interactions.Headers
    entity Items   { ... }   // still becomes app.interactions.Items
}

// V_INTERACTION is OUTSIDE the context — no prefix applied
@cds.persistence.exists
@cds.persistence.calcview
Entity V_INTERACTION { ... }
context applies the prefix only to entities declared inside the block, leaving V_INTERACTION at the top level where its name matches the HDI artifact exactly.
What the finished proxy entity looks like
After running hana-cli inspectView and copying the column definitions, the proxy entity in db/interactions.cds looks like this:
@cds.persistence.exists
@cds.persistence.calcview
Entity V_INTERACTION {
    key CREATEDAT    : Timestamp;
        CREATEDBY    : String(255);
        MODIFIEDAT   : Timestamp;
        MODIFIEDBY   : String(255);
        PARTNER      : String(10);
        COUNTRY_CODE : String(3);
        TEXT         : String(1024);
        DATE         : String;
        PRICE        : Decimal(10);
        CURRENCY_CODE: String(3);
}
And the service projection in srv/interaction_srv.cds exposes it as a read-only OData entity set:
@readonly
entity V_Interaction as projection on V_INTERACTION;
Why a database redeployment is required
Adding the Calculation View proxy entity to the CAP service definition triggers a database redeployment step (cds deploy --to hana). This is needed because CAP must generate and deploy a thin .hdbview wrapper on top of the Calculation View artifact so that the OData service layer can address it correctly. Without this deployment step the service will fail to resolve the entity at runtime.
This is different from the Stored Procedure you will add in Exercise 7 — stored procedures are exposed as CAP functions/actions and do not require a generated wrapper object, so no redeployment is needed there.
Summary
You've now built a Calculation View using the graphical editor in Business Application Studio and integrated it with CAP using the proxy entity pattern. The key takeaways are:
- The graphical Calculation View editor is available in BAS only — it is not supported in a local VS Code setup
@cds.persistence.exists+@cds.persistence.calcviewtogether tell CAP how to map an existing HANA artifact into the service layer without recreating it- Switching from
namespacetocontextlets you keep namespaced CAP entities while still having a top-levelV_INTERACTIONentity whose name matches the HDI artifact exactly - A database redeployment is required after adding a new proxy entity to generate the SQL wrapper CAP needs
Questions for Discussion
What is a Calculation View and how is it different from a SQL View?
Answer
A SQL View is a stored
SELECTstatement that is re-evaluated each time it is queried. It runs on the SQL engine and has no special awareness of column-store optimisations.A Calculation View is a HANA-native modeling artifact built from a graph of nodes (Projection, Join, Aggregation, Union). It is compiled into an optimised execution plan and runs directly on HANA's column store engine with in-memory parallelism. Calculation Views can model star-schema hierarchies, currency conversion, and other analytical patterns that would require complex, non-portable SQL in a plain view.
The graphical editor in BAS (or HANA Studio) generates the underlying
.hdbcalculationviewXML definition — you are authoring a model, not writing SQL.Why did we change from a namespace to a context in the tutorial steps?
Answer
A
namespaceis file-scoped and prefixes every entity in the file. Acontextblock applies the prefix only to entities declared inside it.The proxy entity for the Calculation View must have a name that matches the HDI object name exactly —
V_INTERACTION, notapp.interactions.V_INTERACTION. By placing the existingHeadersandItemsentities inside acontext app.interactions { ... }block and declaringV_INTERACTIONoutside it, we keep the namespaced names for the CAP-managed entities while giving the proxy entity the exact bare name HANA expects.What is
@cds.persistence.existsdoing?Answer
@cds.persistence.existstells CAP that the underlying database object already exists and must not be created, modified, or dropped by the CAP deploy process. Without this annotation, CAP would attempt to generate aCREATE TABLEorCREATE VIEWstatement for the entity during deployment, which would either fail (because the object already exists) or overwrite it.This annotation applies to any pre-existing database artifact you want to bring into a CAP service: tables from a legacy schema, SQL views created outside CAP, or — as here — HANA Calculation Views. The entity definition in CDS acts purely as a type description so the service layer knows the column names and types.
What is
@cds.persistence.calcviewdoing?Answer
@cds.persistence.calcviewtells CAP that the entity represents a HANA Calculation View specifically (not a plain table or SQL view). When this annotation is present, CAP generates a thin.hdbviewSQL wrapper duringcds buildthat sits between the OData service layer and the underlying Calculation View artifact. This wrapper is required because the OData-to-SQL translation CAP generates must address a SQL-accessible object, and the Calculation View is not directly addressable by generated SQL without the wrapper.Without
@cds.persistence.calcview, CAP would still skip creation of the object (because@cds.persistence.existsis also set) but would not generate the wrapper, and runtime queries against the entity would fail.What would happen if you placed
V_INTERACTIONinside thecontext app.interactions { }block instead of outside it? What database object name would CAP look for?Answer
If
V_INTERACTIONwere inside the context block, CDS would prefix it withapp.interactions., producing the fully-qualified nameapp.interactions.V_INTERACTION. CAP would then map that to the HANA object nameAPP_INTERACTIONS_V_INTERACTION— but no such object exists in the HDI container. The actual Calculation View artifact is namedV_INTERACTION(no prefix).The result would be a runtime error when any OData request tried to query the entity: CAP would generate SQL targeting a view that does not exist. The error would only surface at runtime, not at build time, which makes it particularly easy to miss during development.
This is exactly why the tutorial converts the
namespacedeclaration to acontextblock: it lets you keep theapp.interactions.prefix on the CAP-managed entities while placingV_INTERACTIONat the top level where its name matches the HDI artifact exactly.The
hana-cli inspectViewcommand was used to generate the CDS entity definition forV_INTERACTION. What problem does this tool solve, and what would you have to do without it?Answer
Without
hana-cli inspectView, you would have to:- Open the HANA Database Explorer and locate the Calculation View in your HDI container schema
- Inspect each column's name and HANA data type manually (e.g.
NVARCHAR(255),DECIMAL(10,2),TIMESTAMP) - Translate each HANA type to the corresponding CDS type (
String(255),Decimal(10,2),Timestamp) - Write the CDS entity definition by hand, getting the exact column names right (case-sensitive)
hana-cli inspectViewconnects to your HDI container, queries the view's column metadata from the HANA system catalog, and generates a ready-to-paste CDS entity definition. This avoids transcription errors and is especially valuable for views with many columns or complex types. The broaderhana-clitoolkit offers similar introspection commands for tables (inspectTable), procedures (inspectProc), and other HANA objects.You have now built a data model (Ex3), a UI (Ex4), and authentication (Ex5). Trace the full request path from the browser to SAP HANA Cloud for a
GETthat loads the list ofInteractions_Headerrecords. Which component handles each step?Answer
textBrowser │ GET /odata/v4/catalog/Interactions_Header ▼ Application Router (xs-app.json) │ Validates XSUAA session cookie │ Forwards request to srv-api with JWT in Authorization header ▼ CAP Service (interaction_srv.cds / interaction_srv.js) │ Validates JWT (checks signature, expiry, issuer) │ Checks @requires: 'authenticated-user' → passes │ Translates OData request to SQL SELECT ▼ HANA Cloud (HDI container) │ Executes SELECT against APP_INTERACTIONS_HEADERS │ Returns result set ▼ CAP Service │ Serialises rows to OData JSON format ▼ Application Router │ Passes response to browser unchanged ▼ Browser (SAPUI5 Fiori Elements) │ Receives OData JSON │ Renders list table columns defined by UI.LineItem annotationEach layer has a single, well-defined responsibility: the AppRouter owns authentication and routing, CAP owns authorization and data translation, HANA owns storage and query execution, and Fiori Elements owns rendering. No layer reaches into another's concern. This separation is what makes the stack maintainable and individually testable.
Further Study
- CAP - Using Native SAP HANA Artifacts — full reference for proxy entities,
@cds.persistence.exists, calc views, and user-defined functions - SAP HANA Cloud Modeling Guide for BAS — graphical Calculation View editor reference
- Calculation View vs SQL View — SAP HANA documentation on Calculation Views
- hana-cli inspectView — generates the CDS entity definition from an existing database view or Calculation View; used in the tutorial to scaffold the
V_INTERACTIONproxy entity
Next
Continue to 👉 Exercise 7 - Create HANA Stored Procedure and Expose as CAP Service Function (SAP HANA Cloud)