Prerequisite
Complete Exercise 4 before starting this exercise.
What you'll need
This exercise provisions a real XSUAA service instance. You'll need Cloud Foundry CLI logged in to your BTP space.
Exercise 5 - Add User Authentication to Your Application (SAP HANA Cloud)
In this exercise you will define security roles, provision a real XSUAA service instance, and wire it into your CAP application so that every request is authenticated via OAuth2. By the end, the Application Router, the CAP service, and SAP BTP all agree on who is allowed to do what.
Source
These steps are from Add User Authentication to Your Application (SAP HANA Cloud) on SAP Tutorials.
Create XSUAA configuration
We are going to set up production level security using the SAP Authorization and Trust Management service for SAP BTP in the Cloud Foundry environment and more specifically the User Account and Authorization or UAA Service. By default CAP allows you to mock your security for testing during development (which we used in the last tutorial). However we also want to teach you how to setup the full production security and test that during development as well.
The UAA will provide user identity, as well as assigned roles and user attributes. This is done in the form of a JWT token in the Authorization header of the incoming HTTP request. We will need the Application Router we added to our application in the last tutorial to perform the redirect to the UAA Login Page and then forward this JWT token to your CAP service. Therefore this will be a multiple step process.
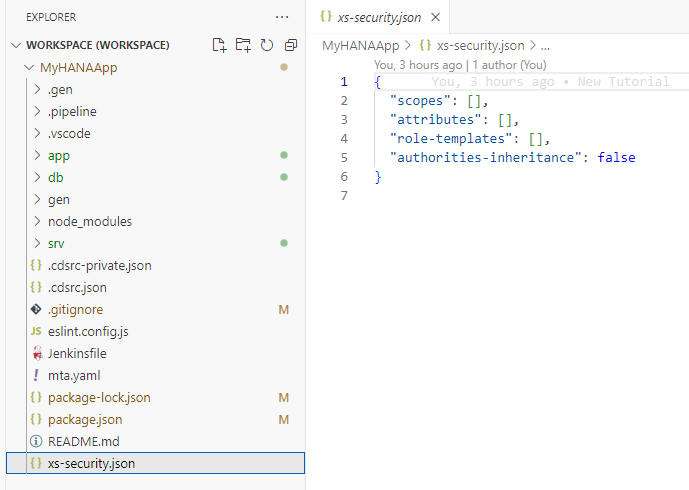
In the previous tutorial, we used an Application Router in our project. When we did, the wizard created an xs-security.json file in the root of the project. This file is used during the creation or update of the XSUAA service instance and controls the roles, scopes, attributes and role templates that will be part of the security for your application. What was generated was a basic version of the xs-security.json that will only require authentication but not specific roles.
To really test the impact of roles in our application, lets add some security to our services. Open the
interaction_srv.cdsfrom thesrvfolder. Adjust the code as follows to makeInteractions_Headerservice only available to authenticated users andInteractions_Itemsonly available to users with theAdminrole and restrict the results during certain read operations to only those records where the Country column has the value of German (DE).cdsusing app.interactions from '../db/interactions'; using {sap} from '@sap/cds-common-content'; service CatalogService { @requires : 'authenticated-user' @cds.redirection.target @odata.draft.enabled: true entity Interactions_Header as projection on interactions.Headers; @requires: 'Admin' entity Interactions_Items as projection on interactions.Items; @readonly entity Languages as projection on sap.common.Languages; @readonly @restrict: [{ grant: 'READ', where: 'country_code = ''DE'''}] entity HeaderView as projection on interactions.Headers; }When you do add scopes to the services as we did in the previous step you can generate a sample
xs-security.jsonusing the following command and merge that into the basicsxs-security.jsonfile generated by the Application Router wizard.shellcds compile srv/ --to xsuaa > xs-security.json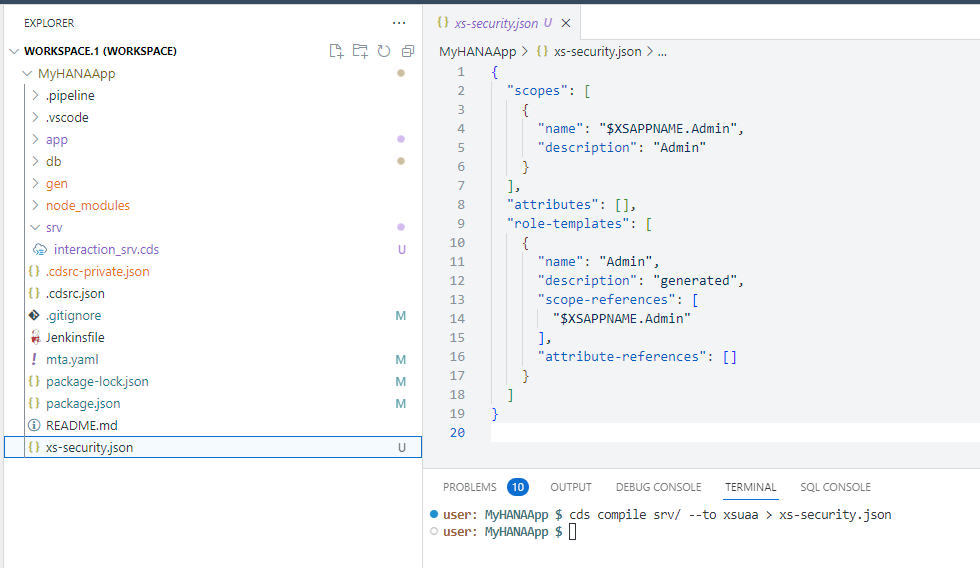
Since we want to test the security setup from the Business Application Studio, we are going to have add some additional configuration to the
xs-security.json. You need to add another property to thexs-security.jsonto configure which redirect URIs are allowed by theOAuthconfiguration. Also while editing, add anxsappnamewith the valuemyhanaapp(plus your group number or intials if you in a group workshop) and atenant-modeofdedicatedas well. We can also addcredential-typesas a security best practice. You can read more about the Credential Types in this blog post byDinu PAVITHRANjson{ "xsappname": "myhanaapp", "tenant-mode": "dedicated", "scopes": [ { "name": "$XSAPPNAME.Admin", "description": "Admin" } ], "attributes": [], "role-templates": [ { "name": "Admin", "description": "generated", "scope-references": [ "$XSAPPNAME.Admin" ], "attribute-references": [] } ], "oauth2-configuration": { "credential-types": [ "binding-secret", "x509" ], "redirect-uris": [ "https://*.applicationstudio.cloud.sap/**" ] } }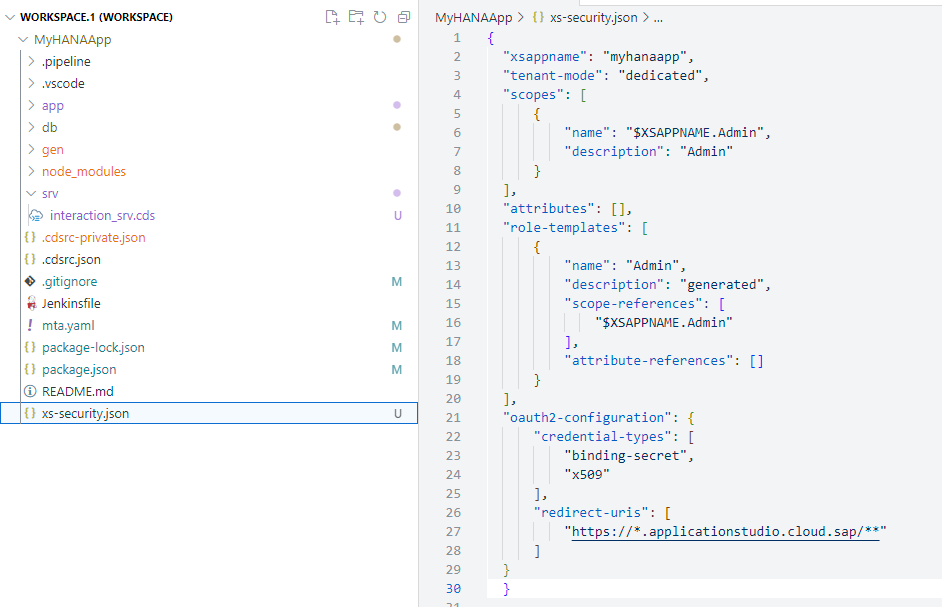
This wild card will allow testing from the Application Studio by telling the XSUAA it should allow authentication requests from this URL. See section Application Security Descriptor Configuration Syntax for more details on configuration options.
Open a terminal and create the XSUAA services instance with the
xs-security.jsonconfiguration using the following command (adjustingMyHANAApp-authto include your group number or intitials if you are in a group workshop like we did earlier):shellcf create-service xsuaa application MyHANAApp-auth -c xs-security.json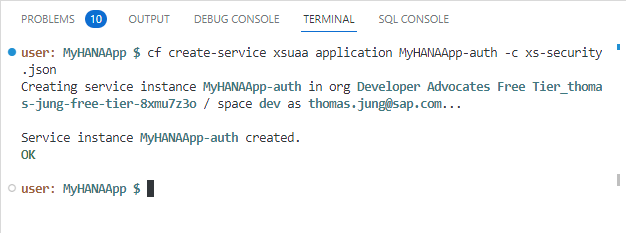
Finally return the
package.jsonfile in the root. In the last tutorial we changed the authentication configuration tomocked. Now we can change it back toxsuaa.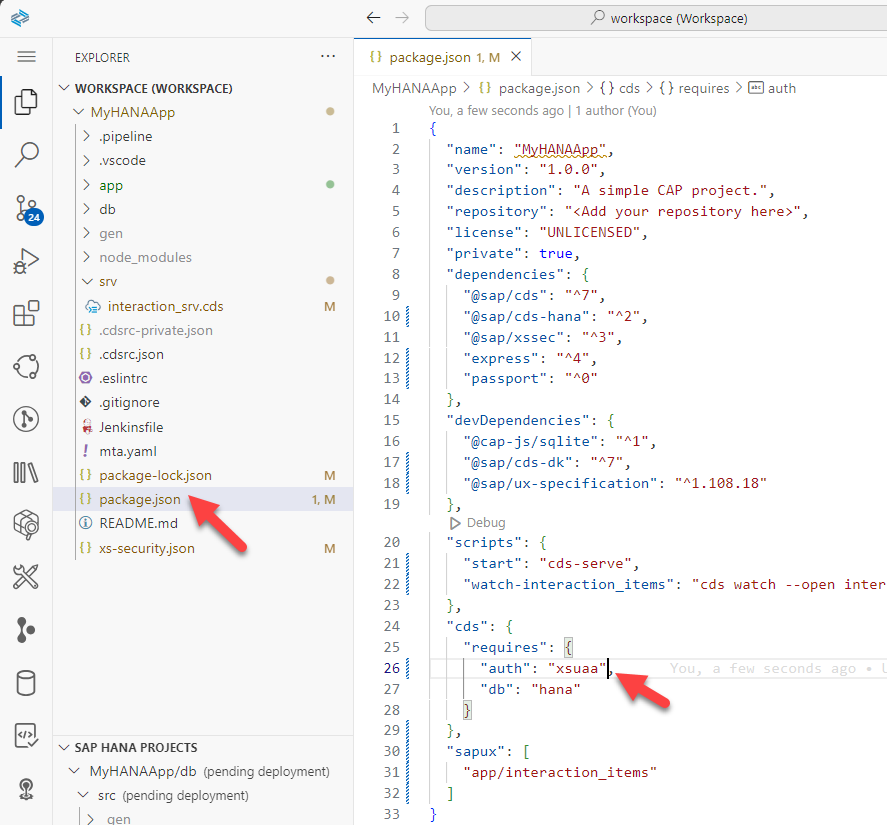
Configure the application
From the terminal, we need to create a service key (adjusting names to include your group number or initials if you are in a group workshop). This will give us access to the credentials for your XSUAA instance.
shellcf create-service-key MyHANAApp-auth defaultChange back to the root of your project in the terminal and issue the command
cds bind -2 MyHANAApp-auth:default. This is the same command that we used to bind our running CAP application to HANA DB earlier. Now we are adding a binding to the security XSUAA service as well.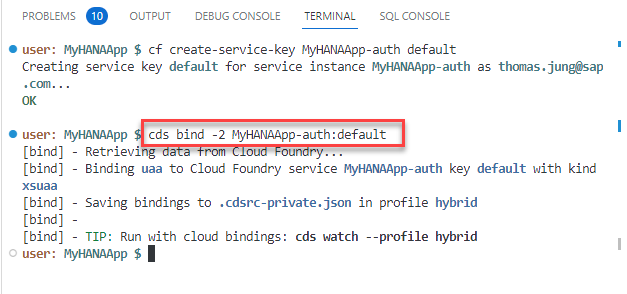
Create and grant roles for application
Before we can test our application, we need to create a role that includes the XSUAA instance details and grant to that our user. We will do this from the SAP Business Technology Platform cockpit. In the cockpit, you set up the roles and role collections and assign the role collections to your users. This brings the necessary authorization information into the JWT token when the user logs on to your application through XSUAA and Application Router.
Open the SAP BTP cockpit.
The roles collections are created on subaccount level in the cockpit. Navigate to your subaccount and then to Security > Role Collections. Then press the
+to create a new Role Collection.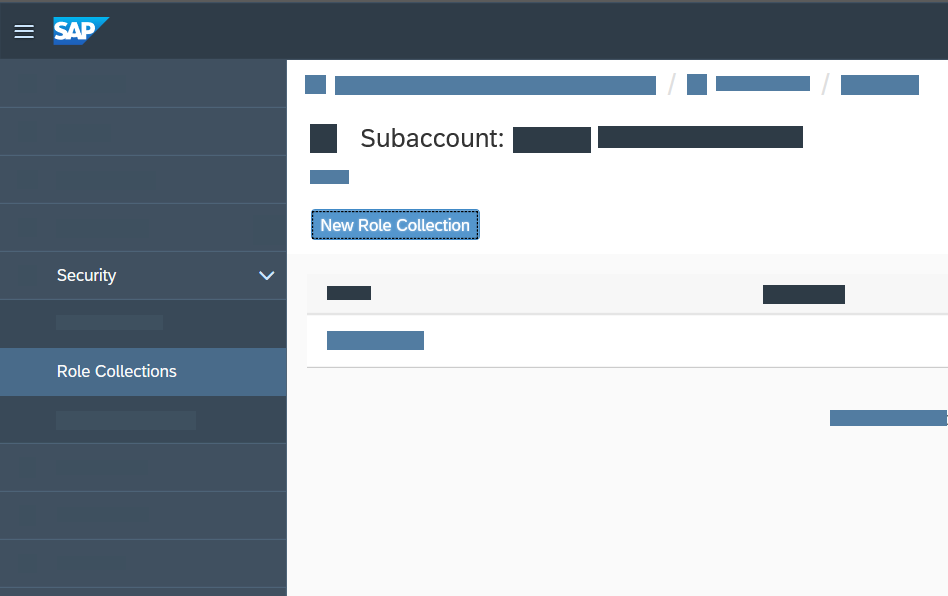
Name your role collection
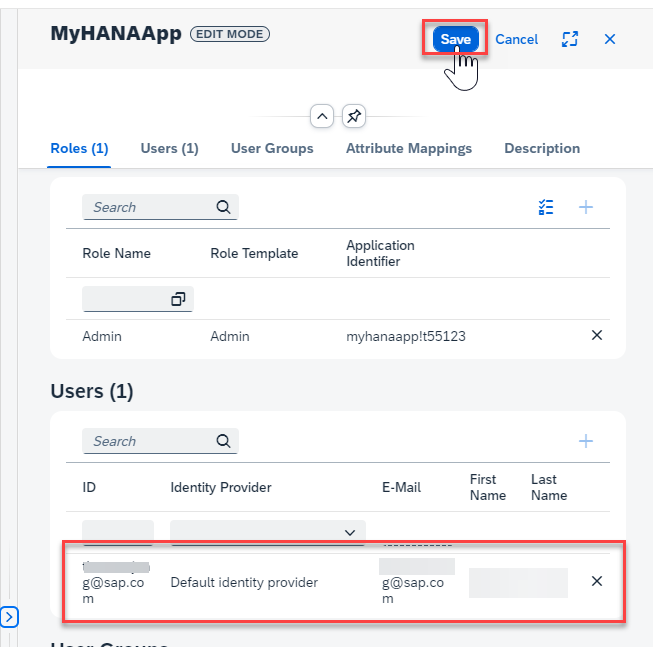
MyHANAApp(plus your group number or intials if you in a group workshop). Then go into edit mode on the role collection. Use the value help for the Role. Use the Application Identifier to find your service instance (myhanaapp!XXXXX). Select the role and press Add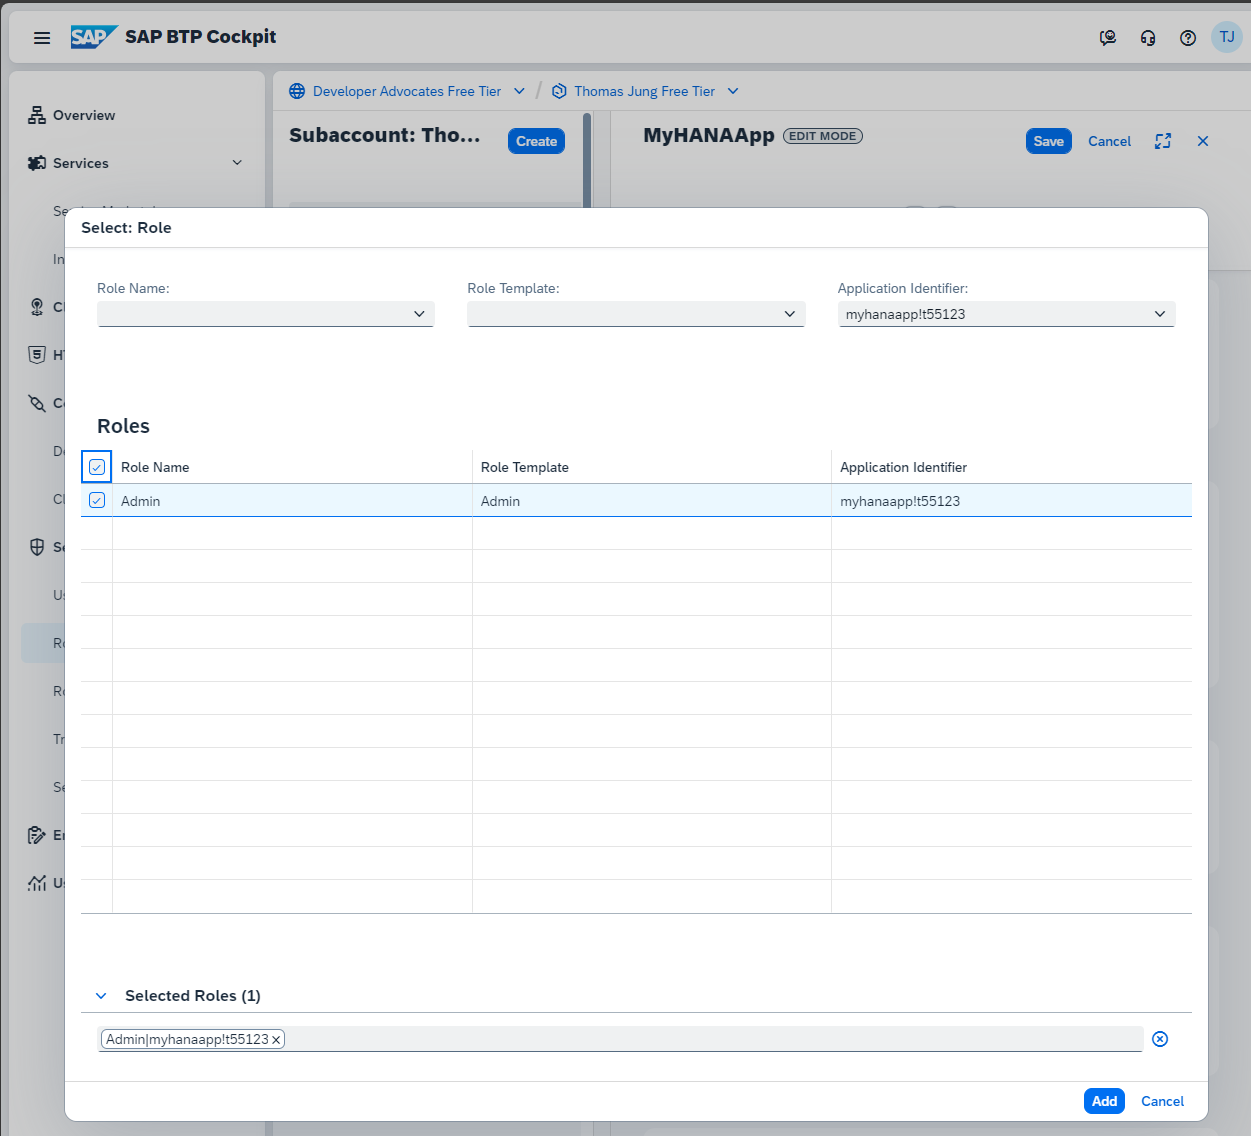
From the Role Collection edit screen you can also grant the role to your user. In the Users section fill in your email address you use for your SAP BTP account. Save the Role Collection.
See Assign Role Collections in SAP BTP documentation for more details.
Adjust Application Router
The
approutercomponent implements the necessary handshake with XSUAA to let the user log in interactively. The resulting JWT token is sent to the application where it's used to enforce authorization.Next open the xs-app.json file in the
/app/routerfolder. Here want to make several adjustments. Change theauthenicationMethodtoroute. This will turn on authentication. You can deactivate it later by switching back tonone. Also add/update the routes. We are adding authentication to CAP service route. We are also adding the Application Router User API route (sap-approuter-userapi), which is nice for testing the UAA connection. We will also add the customlogoutEndpointof/app-logout. You can add this path to your URL if you want to force logout your user; which can be helpful to pickup any changes to your role configuration during development. Finally add the route to the local directory to serve the UI5/Fiori web content.json{ "authenticationMethod": "route", "logout": { "logoutEndpoint": "/app-logout", "logoutPage": "/" }, "routes": [ { "source": "^/app/(.*)$", "target": "$1", "localDir": ".", "cacheControl": "no-cache, no-store, must-revalidate", "authenticationType": "xsuaa" }, { "source": "^/appconfig/", "localDir": ".", "cacheControl": "no-cache, no-store, must-revalidate" }, { "source": "^/user-api(.*)", "target": "$1", "service": "sap-approuter-userapi" }, { "source": "^/(.*)$", "target": "$1", "destination": "srv-api", "csrfProtection": true, "authenticationType": "xsuaa" } ] }
Test
If you open the CAP service test page (
cds watch --profile hybridif you need to restart it) and try to access one of the service endpoints or metadata, you should receive an Unauthorized error.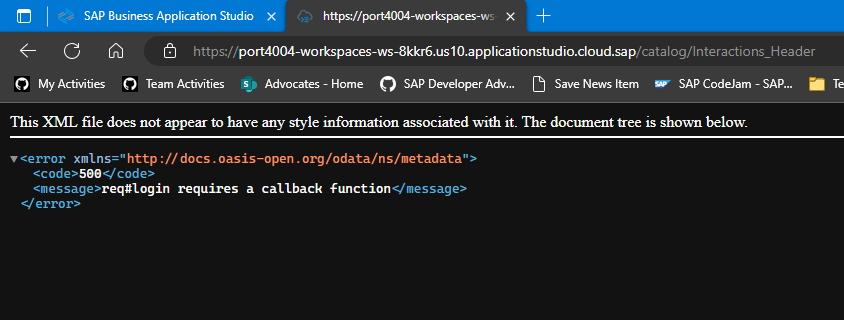
This means your security setup is working. Accessing the CAP service directly will always produce an error now as there is no authentication token present. We need to run via the Application Router to generate and forward the authentication token.
Without stopping the CAP service, open a second terminal. In this terminal run
cds bind --exec -- npm start --prefix app/routerto start the Application Router but using thecds bindcommand to inject all theUAAconfiguration into the Application Router automatically and securely as well.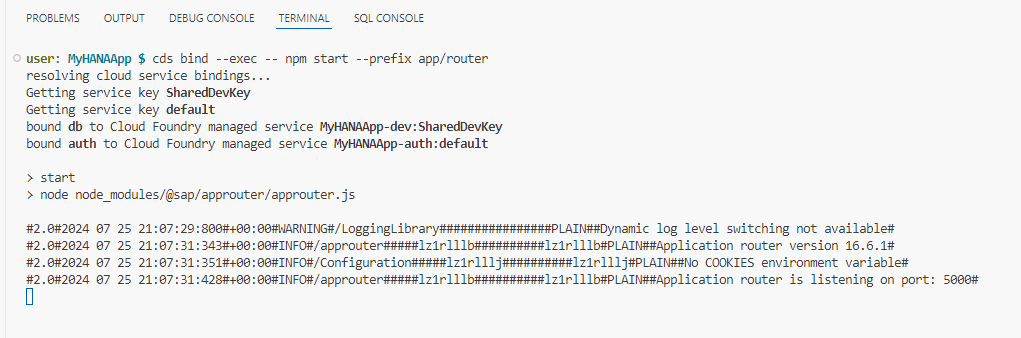
Open the application router in a new tab (the new service instance running on port 5000). Click on the
Interactions_Header. Now instead of the Unauthorized error you received when testing CAP service directly, you should see the data returned normally.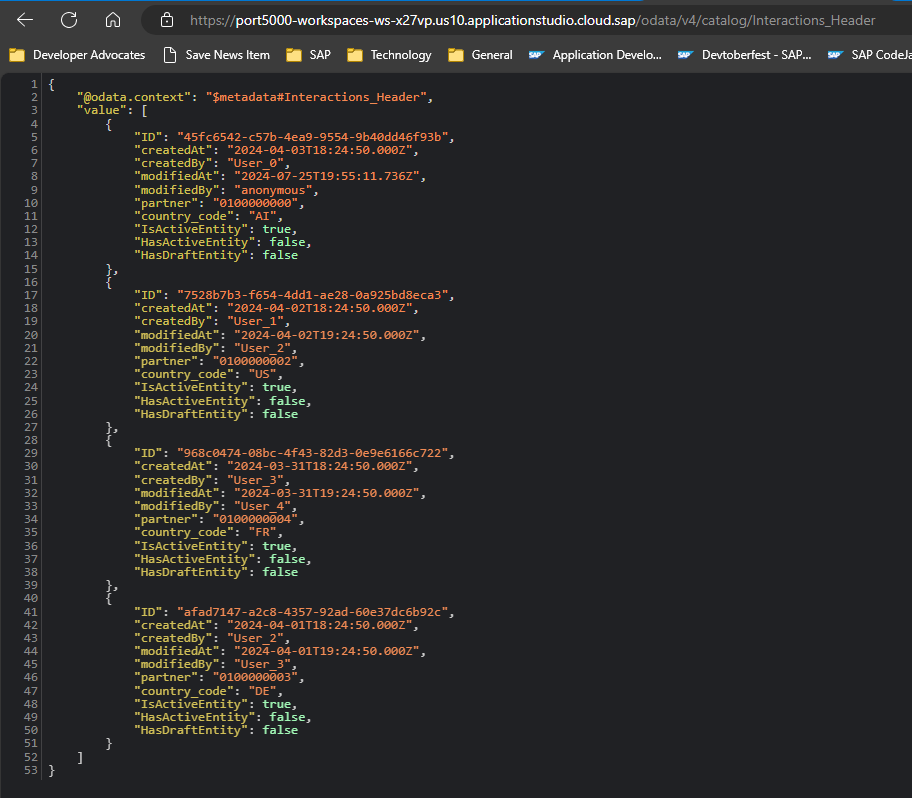
Finally change to the
HeaderViewfrom the test page. You are now testing with data from the CAP service but all with authentication. You should also only be seeing a single record thanks to the data restriction we placed on the service as well.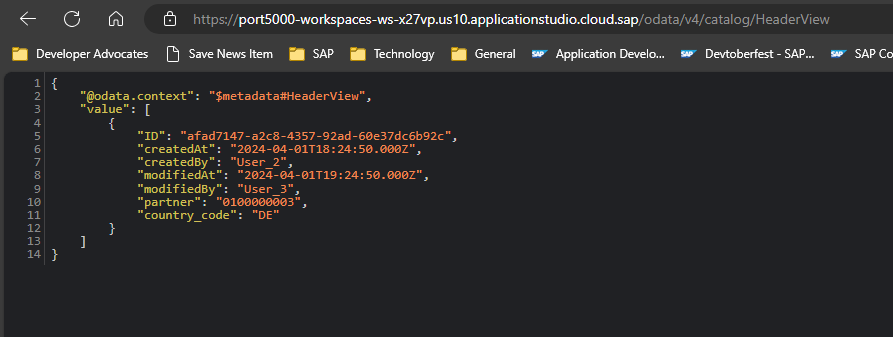
Add
/user-api/attributesto the end of the URL and you should see your Email and other User details. This is testing that the application router is actually getting the security token from the UAA instance.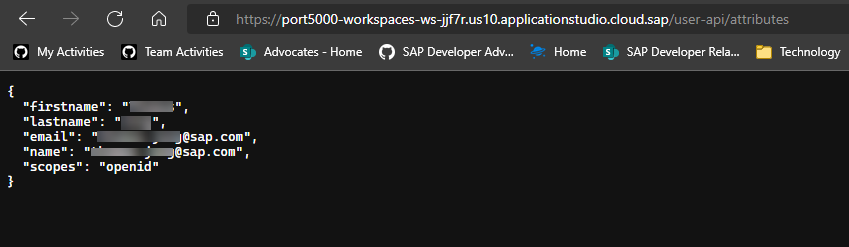
Congratulations! You have now successfully configured and tested with production level authentication and authorization for the SAP HANA Cloud and Cloud Business Application based project.
If you are wanting to learn about packaging and deploying this complete application as a Multi-Target Application to SAP BTP, Cloud Foundry runtime; there is a separate, optional tutorial which is not part of this mission that covers this step. Note: that this is an advanced topic and does allocate a large amount of your available resources in an SAP BTP trial account. Deploy CAP with SAP HANA Cloud project as MTA
Background
The three-layer auth model
When authentication is fully wired up, every request passes through three layers that each enforce a different concern:
Browser → Application Router (XSUAA OAuth2 flow) → CAP service (@requires annotations) → HANA HDI container| Layer | Enforces | How |
|---|---|---|
| Application Router | User is logged in | Redirects to XSUAA login; attaches JWT to every downstream request |
| CAP service | User has the right role or is authenticated | @requires: 'authenticated-user' / @requires: 'Admin' in srv/*.cds |
| HANA HDI | DB-level permissions | HDI container grants are set during deployment; CAP's technical user holds them |
What XSUAA does
XSUAA (SAP Authorization and Trust Management Service) is SAP BTP's OAuth2 authorization server. It:
- Authenticates the user against your identity provider (IDP)
- Issues a signed JWT (JSON Web Token) that lists the user's scopes
- Validates that JWT on every API call when the CAP service or Application Router checks it
The xs-security.json file is what you deploy to XSUAA to tell it which scopes and role templates your application defines. For this app it looks like:
{
  "xsappname": "myhanaapp00",
  "tenant-mode": "dedicated",
  "scopes": [
    { "name": "$XSAPPNAME.Admin", "description": "Admin" }
  ],
  "role-templates": [
    {
      "name": "Admin",
      "scope-references": [ "$XSAPPNAME.Admin" ]
    }
  ],
  "oauth2-configuration": {
    "redirect-uris": [ "https://*.applicationstudio.cloud.sap/**" ]
  }
}
The $XSAPPNAME macro is replaced at deploy time with the actual application name. The redirect-uris wildcard allows the XSUAA login callback to reach your app running inside Business Application Studio preview ports.
How CAP consumes the XSUAA token
Once "auth": "xsuaa" is set in package.json, CAP validates the incoming JWT on every request and maps the scopes it contains to the CDS authorization annotations in your service:
// srv/interaction_srv.cds

@requires: 'authenticated-user'        // any logged-in user
entity Interactions_Header as projection on interactions.Headers;

@requires: 'Admin'                     // only users with the Admin scope
entity Interactions_Items  as projection on interactions.Items;
A user without the Admin role will receive HTTP 403 when attempting to access Interactions_Items, even if they are authenticated. The role collection must be assigned to the user in BTP cockpit after deployment.
The hybrid testing flow
Because you are running the CAP server locally inside BAS but connecting to a real XSUAA instance in BTP, the authentication flow during development works like this:
- Your browser opens the Application Router preview URL in BAS
- The router detects no session and redirects to the XSUAA login page
- You log in with your BTP credentials; XSUAA redirects back to the
redirect-uriinxs-security.json - The router exchanges the authorization code for a JWT and stores it in a session cookie
- Subsequent requests to
/odata/v4/catalog/carry the JWT as aBearertoken - CAP validates the JWT against XSUAA's public keys and checks
@requiresannotations
This is what makes the redirect-uris wildcard for *.applicationstudio.cloud.sap necessary — without it XSUAA would reject the login callback as coming from an untrusted origin.
Exercise Steps
👉 Perform all the steps in the tutorial linked at the top of this page.
The tutorial covers:
- Creating the
xs-security.jsonwith scopes and role templates - Deploying a real XSUAA service instance using
cf create-service - Binding the XSUAA instance so the local Application Router can use it
- Setting
"auth": "xsuaa"inpackage.jsonundercds.requires - Adding
@requiresannotations insrv/interaction_srv.cds - Testing the secured app via the Application Router preview URL in BAS
- Assigning the
Adminrole collection to your BTP user in the BTP cockpit
Summary
At the end of this exercise you have:
- An
xs-security.jsonthat defines theAdminscope and role template for your application - A live XSUAA service instance bound to your project (replacing the mock auth from earlier exercises)
- CAP configured to validate real JWT tokens (
"auth": "xsuaa"inpackage.json) @requires: 'authenticated-user'onInteractions_Headerand@requires: 'Admin'onInteractions_Items- A working hybrid test setup: CAP runs locally in BAS but authenticates against the real XSUAA instance
While you could use CAP's mock authentication for unit testing, this exercise goes a step further by wiring up real XSUAA so you experience the full OAuth2 flow — including JWT issuance, scope mapping, and role collection assignment — before deploying to production.
Questions for Discussion
Why is the
redirect-urisentry needed inxs-security.json, and why does it use a wildcard?Answer
After a successful login, XSUAA redirects the browser back to the application with an authorization code. XSUAA will only redirect to URIs explicitly listed (or matched by wildcard) in
xs-security.json— any other target is rejected as a potential open-redirect attack.The wildcard
https://*.applicationstudio.cloud.sap/**is needed because each developer's BAS workspace gets a unique subdomain (e.g.,port8080-workspaces-ws-abc12.applicationstudio.cloud.sap). Using a static URI would mean every developer would have to updatexs-security.jsonwith their own subdomain and redeploy the XSUAA instance. The wildcard covers all BAS preview URLs without that overhead.In a production deployment the wildcard is replaced with the specific application URL from your Cloud Foundry space, which removes the security risk of an overly broad redirect target.
What other authentication strategies could you use with CAP, and when would you choose each?
Answer
Strategy When to use dummyLocal development only — any request is accepted as an admin user, no credentials needed mockedAutomated testing — define mock users with specific roles in cds.requires.auth.usersbasicSimple scenarios where HTTP Basic (username/password) is acceptable; not recommended for production xsuaaBTP production workloads — full OAuth2 with BTP role collections; what this exercise configures iasSAP Cloud Identity Services — preferred for new BTP apps; supports more IDP protocols than XSUAA JWT (custom) Bring-your-own token — validate tokens from any OAuth2 IDP by implementing a custom cds.auth.passportstrategyCAP's development default (
dummy) is deliberately insecure so that local testing requires no setup. The strategy is changed inpackage.json(cds.requires.auth) and does not require code changes in the service layer — the@requiresannotations remain the same regardless of strategy.Why did the request to
/user-api/work? We didn't implement it, and it is not part of the CAP service. Where does it come from?Answer
/user-api/is a built-in service of the SAP Application Router (@sap/approuter). It is not a custom route and is not implemented in your CAP backend. The route inxs-app.jsonthat maps it is:json{ "source": "^/user-api(.*)", "service": "sap-approuter-userapi" }The
"service": "sap-approuter-userapi"value is a special keyword — it tells the router to handle the request internally rather than forwarding it to a destination. The built-in handler reads the validated JWT from the session and returns the logged-in user's attributes (name, email, scopes) as JSON.This is useful for displaying the current user's name in a Fiori UI without making a separate backend call, and for debugging which scopes the JWT actually contains.
What is the difference between a scope, a role template, and a role collection in BTP, and how do they relate to each other?
Answer
These three concepts form a hierarchy from fine-grained permission to user assignment:
Concept Defined in Purpose Scope xs-security.json→ XSUAAThe atomic permission unit (e.g., $XSAPPNAME.Admin). Scopes are included in the JWT.Role template xs-security.json→ XSUAAA named grouping of one or more scopes. Templates are instantiated into roles per environment. Role collection BTP cockpit A grouping of role instances that can be assigned to users or groups. This is what you assign to a BTP user account. The flow is:
- You deploy
xs-security.json→ XSUAA creates the scope and role template - BTP automatically creates a role from the template (or you create one manually in the cockpit)
- You add that role to a role collection in the BTP cockpit
- You assign the role collection to your user
- XSUAA now includes the
Adminscope in the user's JWT - CAP's
@requires: 'Admin'check passes
If you skip step 3–4, authentication still succeeds (the user can log in) but authorization fails (HTTP 403) because the
Adminscope is absent from the JWT.- You deploy
What HTTP status code do you receive when calling a
@requires: 'Admin'endpoint without the Admin role assigned? Is it the same code you get when not logged in at all?Answer
They are different, and the difference is meaningful:
- Not logged in — the Application Router intercepts the request before it reaches CAP and issues an HTTP
302 Foundredirect to the XSUAA login page. If you call the CAP service directly (bypassing the router), you get401 Unauthorized. - Logged in but missing the Admin scope — the user has a valid JWT, so authentication passes. CAP validates the
@requires: 'Admin'check, finds the scope absent, and returns403 Forbidden.
The practical diagnosis rule: a
302or401means the authentication layer failed (no valid session or token). A403means authentication succeeded but authorization failed — the user is known but not permitted. When you see a403after deployment, the first thing to check is the role collection assignment in the BTP cockpit, not the XSUAA configuration.- Not logged in — the Application Router intercepts the request before it reaches CAP and issues an HTTP
Look at the JWT that XSUAA issues for your user. Can you find your scopes in it?
Answer
Navigate to
/user-api/currentUservia the Application Router preview URL in BAS. The built-insap-approuter-userapiservice returns a JSON object with your user attributes (name, email, and more) extracted from the validated JWT.To inspect the raw JWT, open the browser's developer tools (F12), go to the Network tab, and find any request to the CAP service. Look at the
Authorization: Bearer <token>request header. Copy the token value and paste it into jwt.io to decode it — never do this with production tokens in a shared environment. In the decoded payload you will find:scope— the list of granted scopes;<xsappname>.Adminappears here once the role collection is assignedsub— the user's unique identityemail— the user's email addressexp— the token expiry time (Unix timestamp)
If you receive a
403and cannot find your scope in thescopearray, the role collection has not been assigned to your user in the BTP cockpit — that is the fix.
Further Study
- CAP Authentication Strategies — full reference for dummy, mocked, XSUAA, IAS, and custom strategies
- CAP Authorization and Access Control —
@requires,@restrict, instance-based authorization - XSUAA in Hybrid Setup — how to bind a real XSUAA instance for local testing
- SAP BTP Roles and Role Collections — how to assign role collections to users in the BTP cockpit
- Application Router user-api service — built-in user info endpoint provided by
@sap/approuter xs-security.jsonreference — full schema for scopes, role templates, and OAuth2 configuration
Next
Continue to 👉 Exercise 6 - Create Calculation View and Expose via CAP (SAP HANA Cloud)