Prerequisite
Complete Exercise 2 before starting this exercise.
Known issue
HDI deployment can take 2–3 minutes on first run. If it times out, re-run cds build --production and redeploy.
Exercise 3 - Create Database Artifacts Using Core Data Services (CDS) for SAP HANA Cloud
In this exercise you will define a CDS data model, deploy it to SAP HANA Cloud via HDI, and load initial data using the SAP HANA Database Explorer. By the end you will have live database tables backed by HANA and a CAP service exposing them as OData endpoints.
Background
What CDS does for your database
In a standard CAP project you never write raw DDL (CREATE TABLE …). Instead, you describe your data model in CDS (Core Data Services) — a high-level, domain-focused language — and CAP compiles it into the correct HANA artifacts automatically.
When you run cds build --production, CAP translates each CDS entity into an .hdbtable or .hdbview file inside db/src/gen/. The HDI deployer (@sap/hdi-deploy) then pushes those artifacts into an isolated HDI container in your HANA Cloud instance. The container owns the schema, manages versioned deployments, and ensures each project's objects are fully isolated from one another.
The data model in this project
The solution app defines two entities in db/interactions.cds:
context app.interactions {
    entity Headers : cuid, managed {
        items   : Composition of many Items on items.interaction = $self;
        partner : BusinessKey;
        country : Country;
    };

    entity Items : cuid {
        interaction : Association to Headers;
        text        : localized Text;
        date        : DateTime;
        price       : Price;
        currency    : Currency;
    };
}cuid— a CDS aspect that adds a UUID primary key (ID) automatically.managed— a CDS aspect that addscreatedAt,createdBy,modifiedAt,modifiedByaudit fields automatically.Composition—HeadersownsItems; deleting a header cascades to its items.Association—Itemsholds a back-reference to its parentHeadersrow.Country/Currency— reused from@sap/cds/common, giving you standardized code-list associations without defining them yourself.
The service layer
srv/interaction_srv.cds exposes projections from the data model as a single OData V4 service named CatalogService. CAP generates the OData metadata document, all CRUD operations, and the $expand / $filter / $orderby query options from the CDS definition alone — no hand-written SQL or route handlers are needed for basic CRUD.
Exercise 3.1 — Define the CDS Model and Deploy to HANA
Source
These steps are from Create Database Artifacts Using Core Data Services (CDS) for SAP HANA Cloud on SAP Tutorials.
Create database entities
The SAP Cloud Application Programming model utilizes core data services to define artifacts in the database module. Because this model is meant to be database-agnostic -- i.e., work with any database -- it does not allow you to leverage features that are specific to SAP HANA Cloud. For this reason, you will also create two tables that do not require any advanced data types.
In the
dbfolder, right mouse click and choose New File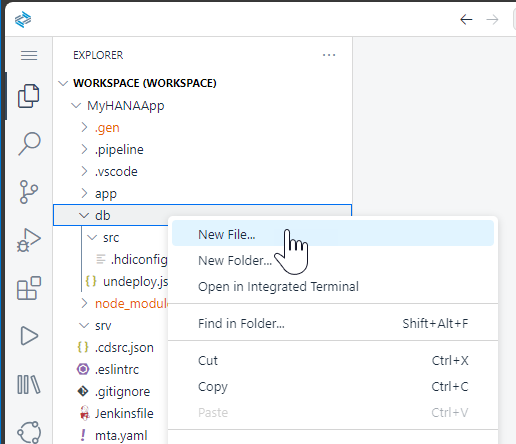
Use the following name:
Nameinteractions.cds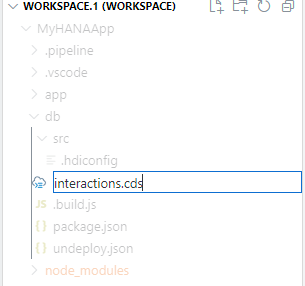
Use the following content in this new file:
CAPnamespace app.interactions; using { Country, Currency, cuid, managed } from '@sap/cds/common'; type BusinessKey : String(10); type Price : Decimal(10, 2); type Text : String(1024); entity Headers : cuid, managed { items : Composition of many Items on items.interaction = $self; partner : BusinessKey; country : Country; }; entity Items : cuid { interaction : Association to Headers; text : localized Text; date : DateTime; @Semantics.amount.currencyCode: 'currency' price : Price; currency : Currency; };What is going on?
You are declaring two entities with relationships between each other. The design-time artifacts declared in this file will be converted to run-time, physical artifacts in the database. In this example, the entities will become tables.
We are using a reusable set of content (lists of countries, currencies, etc) provided by SAP in the above model. We also have to add this dependency to our project. From the command line issue the following command to do so:
shellnpm add @sap/cds-common-content --save
Create service interface
In the
srv(notsrc!) folder create another file and name itinteraction_srv.cdsNameinteraction_srv.cds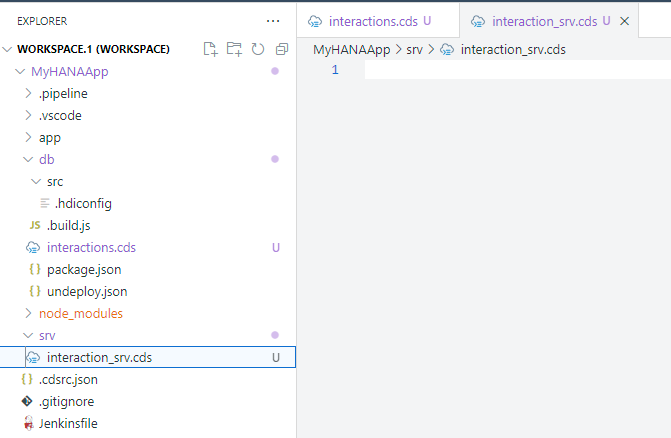
Use the following content in this new file:
CAPusing app.interactions from '../db/interactions'; using {sap} from '@sap/cds-common-content'; service CatalogService { @odata.draft.enabled: true entity Interactions_Header as projection on interactions.Headers; entity Interactions_Items as projection on interactions.Items; @readonly entity Languages as projection on sap.common.Languages; }Save all.
What is going on?
You are declaring services to expose the database entities you declared in the previous step.
From the terminal issue the command:
cds build --productionshellcds build --production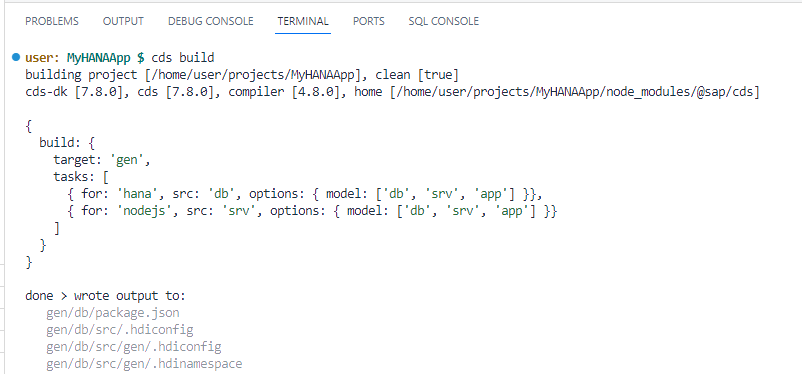
Look into the console to see the progress. You can scroll up and see what has been built
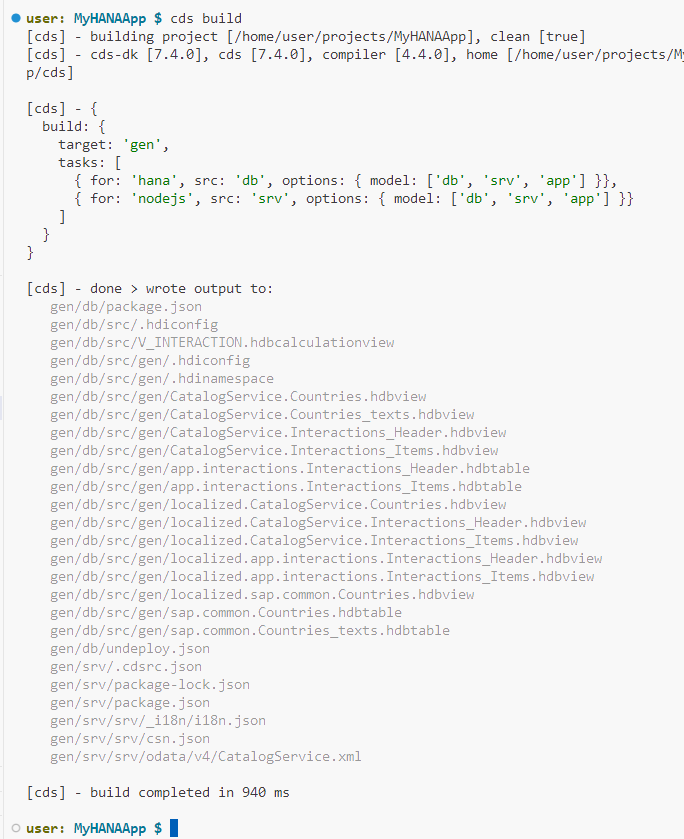
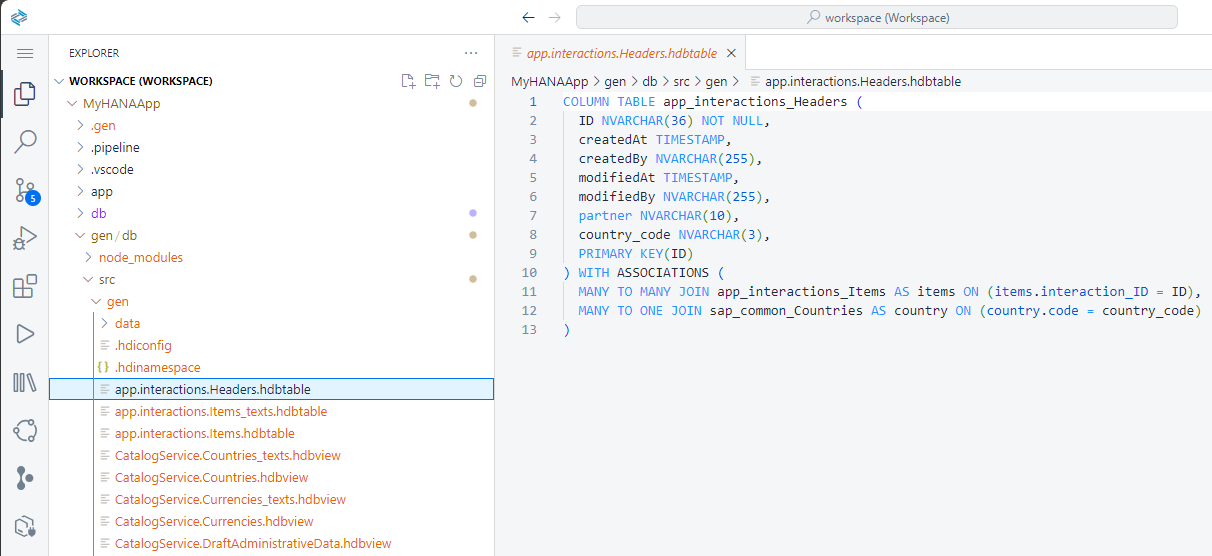
Explore generated design-time artifacts
If you pay attention to the build log in the console, you will see the
CDSartifacts were converted tohdbtableandhdbviewartifacts. You will find those artifacts in a new folder under/gen/db/srccalledgen.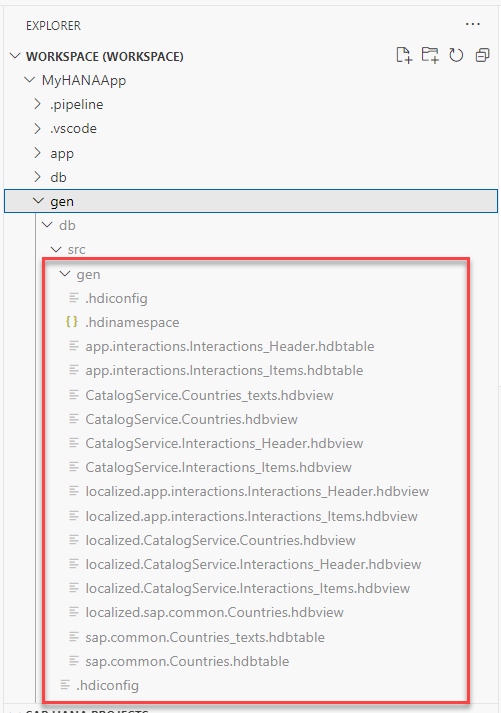
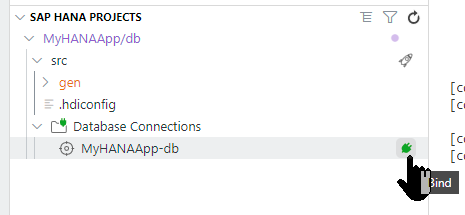
You will now deploy those objects into the HANA Database creating tables and views. We will use the SAP HANA Projects view to do this. Please expand this view and you will see the following:
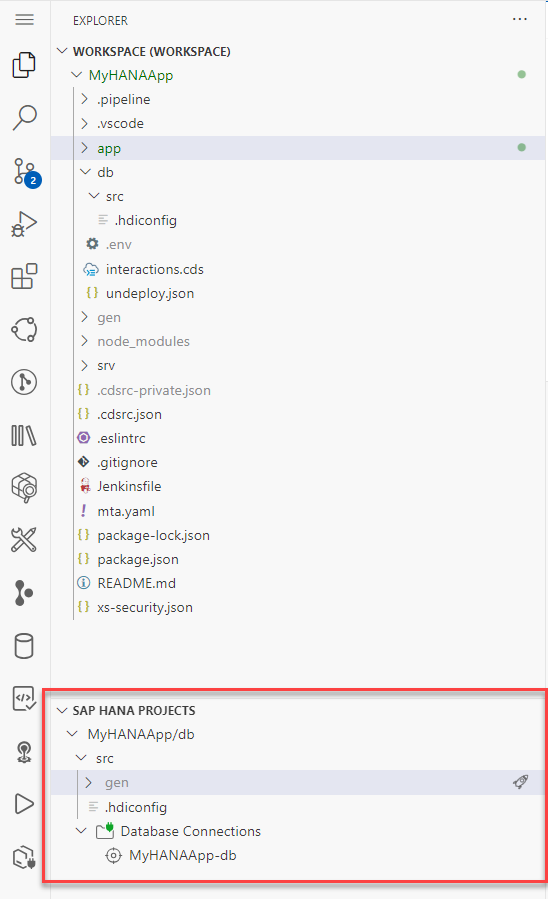
We need to bind our project to a Database Connection and HDI container instance. Press the bind icon to being the process.
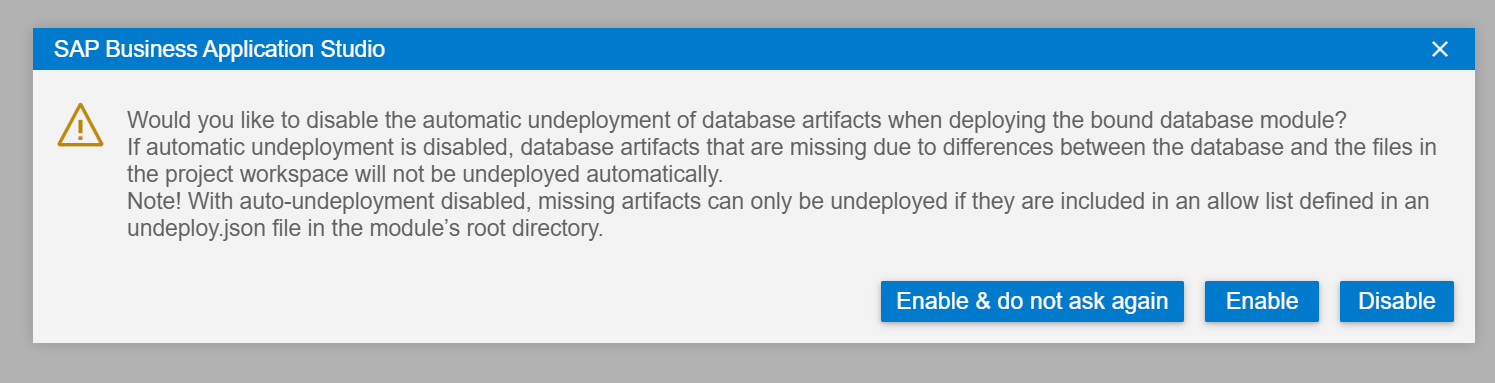
If you receive either of these two following warning dialogs, please just choose Continue (nothing will be deleted because we are create a new HDI Container Instance) and Enable (automatic undeploy is quite helpful during the development process for the reasons described in this dialog)

The bind process will start a wizard where you will be prompted for values via the command pallet at the top of the SAP Business Application Studio screen. You might be asked to confirm your Cloud Foundry endpoint and credentials depending upon how long it has been since you last login.

Your first choice will be for the binding option. Choose
Bind to an HDI container.
You might be presented with options for existing service instances (if you've completed other tutorials or have performed other HANA development). But for this exercise we want to choose Create a new service instance
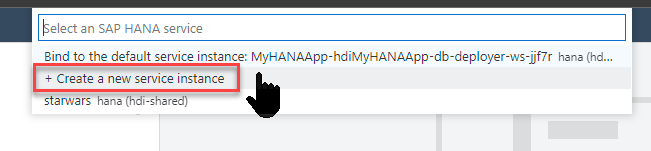
To make subsequent steps easier, shorten the generated name to
MyHANAApp-dev+ a group number or your initials if you are doing this tutorial as part of a group workshop/shared environment. This makes sure that everything remains unique per participant. Remember the value you used here and adjust the name in the subsequent steps. The remaining screenshots will always just show the base name.
It will take a minute or two for the service to be created in HANA. A progress bar will be shown in the message dialog

Sometimes the binding step fails due to a timing issue. If so simply repeat the binding but this time do not create a new container name but select the existing HDI container that has been created from the previous attempt
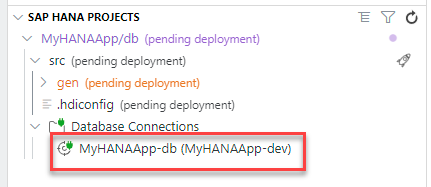
MyHANAApp-devUpon completion, the Database Connections will now show the service bound to the instance the wizard just created.
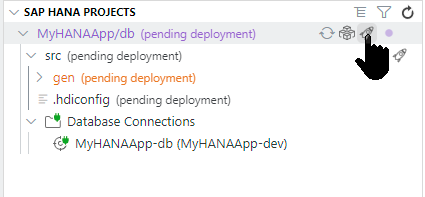
We are now ready to deploy the development content into the database. Before you go ahead, we recommend that you increase the default number of scrollback lines in the integrated terminal, if you're using a Dev Space in SAP Business Application Studio. This is because there are many lines of log output about to be generated and you will want to see them all. So use menu path File -> Preferences -> Settings and search for the "Terminal › Integrated: Scrollback" setting. Set the value to 10000. Now, once you've done that, you're ready to deploy. Press the Deploy button (which looks like a rocket) at the db folder level in the SAP HANA Projects view.
Scroll up to in the console to see what the build process has done.
What is going on?
CDS stands for Core Data Services. This is an infrastructure that allows you to create persistency and services using a declarative language. Notice how you are using the same syntax to define both the persistency and the services. You can find more information on CDS in the help
You defined a CDS artifact, this is an abstraction, a design-time declaration of the entities to be represented in a database and the services to expose them.
The original
.cdsfile was translated intohdbtable, which is the SQLDDL syntax specific to SAP HANA when you saved all of the files.These
hdbtablefiles were then translated into runtime objects such as tables in the HANA database.
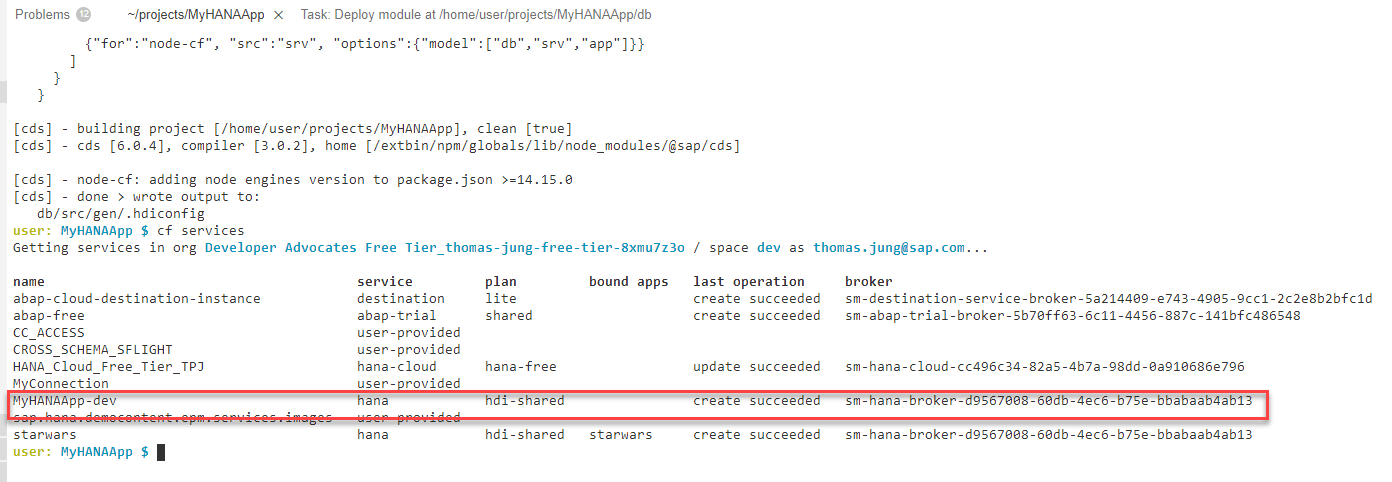
If you checked the services in your space, you would see the service for your HDI container.
You can find a similar example and further context on Core Data and Services in this explanatory video

Check the Database Explorer
You can now check the generated tables and views in the Database Explorer.
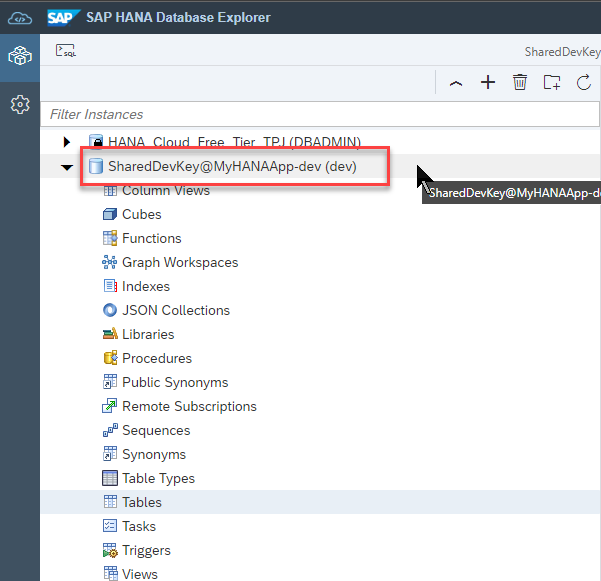
In the SAP HANA Projects view, press the Open HDI Container button
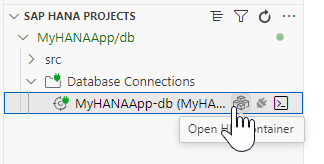
The Database Explorer will open in a new browser tab and automatically select the database entry for your project's HDI container.
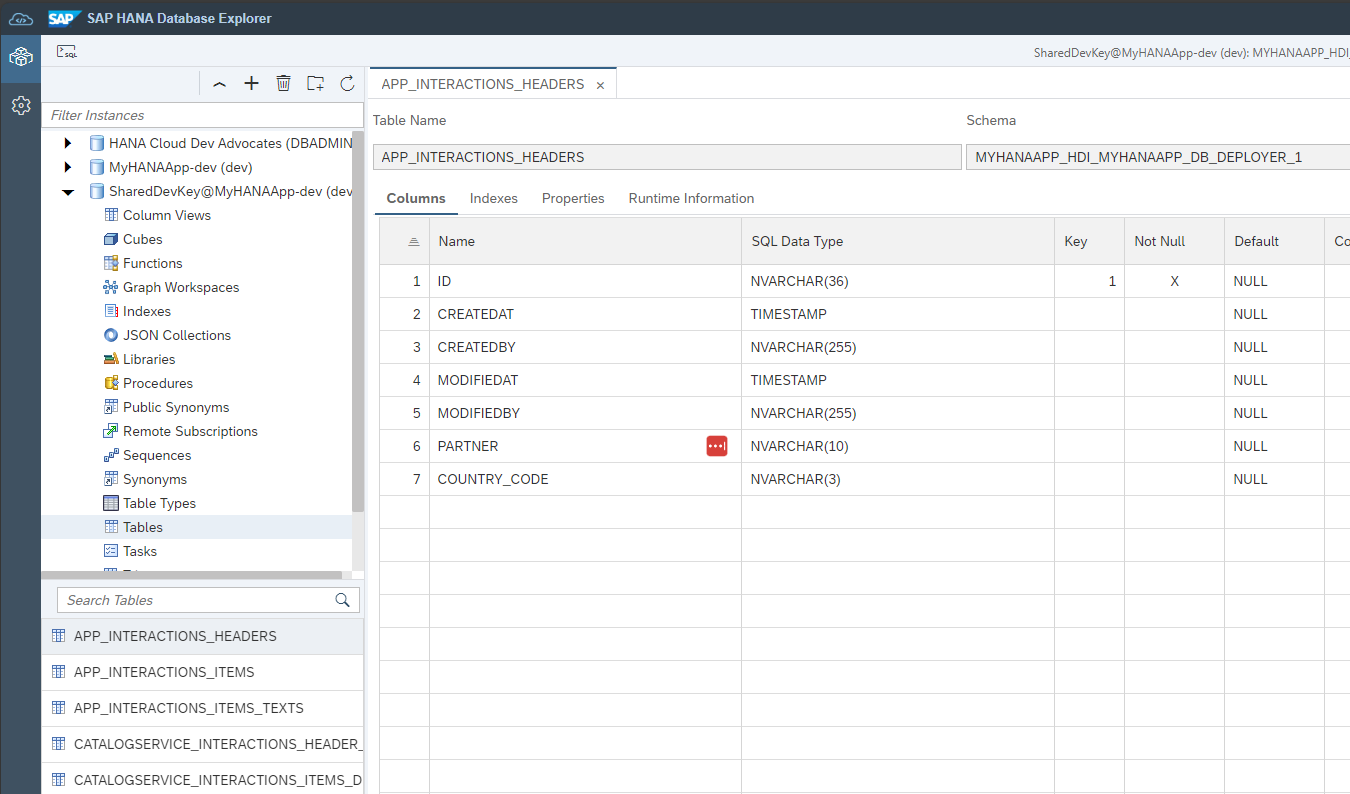
Once open, navigate to the
Tablessection and click on theHeadertable.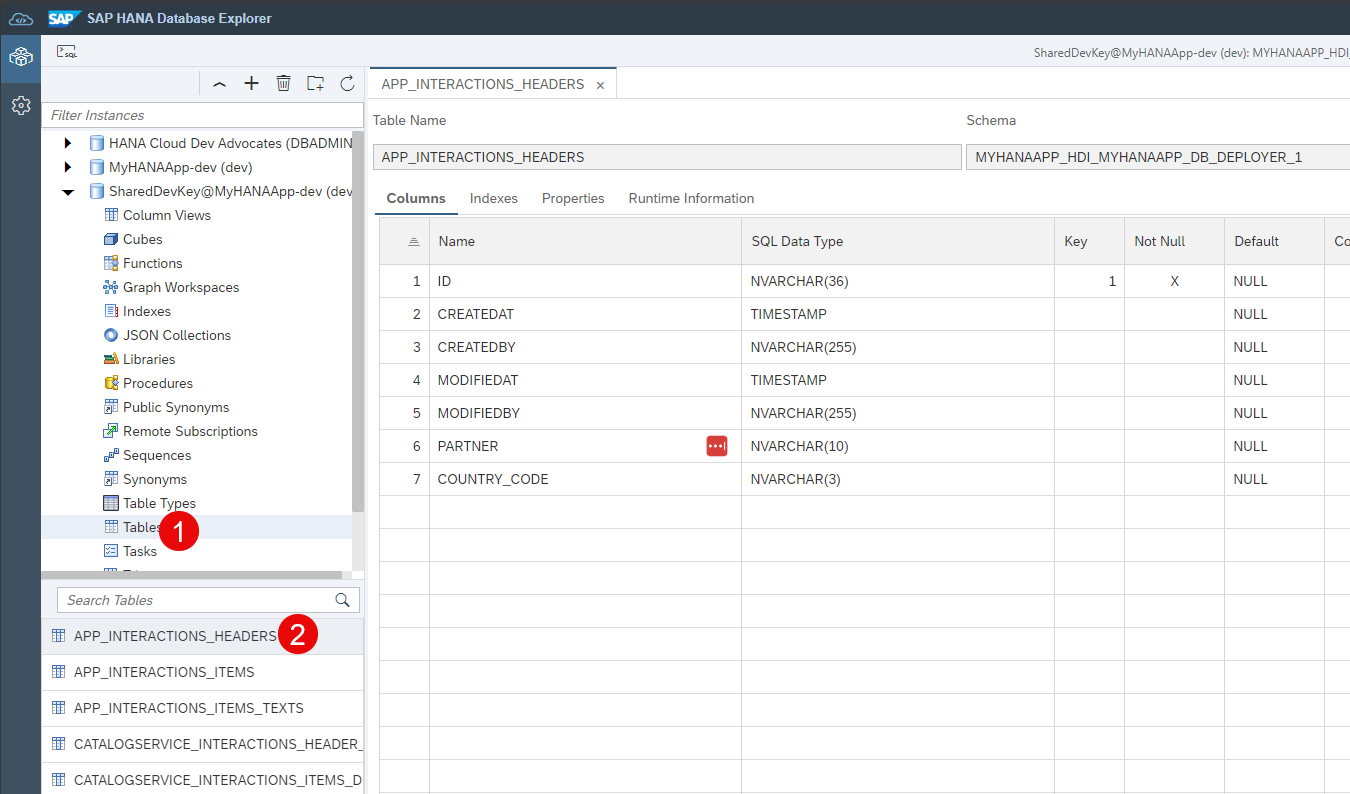
Note the name of the table matches the generated
hdbtableartifacts. You will also see the physical schema managed by the HDI container.Unless a name is specified during deployment, HDI containers are automatically created with names relative to the project and user generating them. This allows developers to work on different versions of the same HDI container at the same time.
Load data into your tables
Download the header file and the items file and the texts file into your local file system.
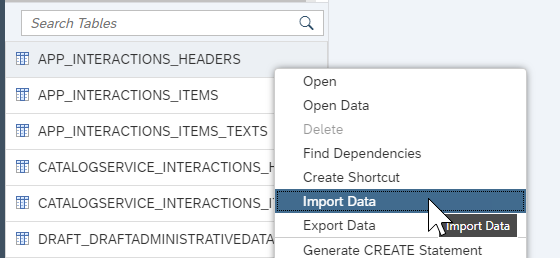
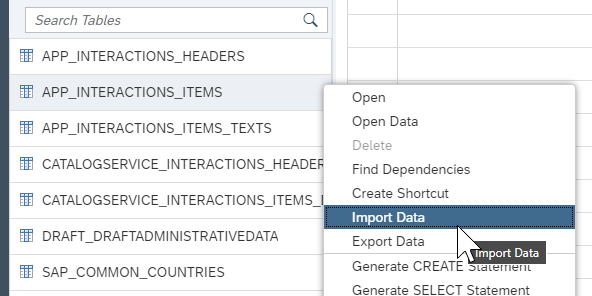
Right-click again on the header table and choose Import Data.
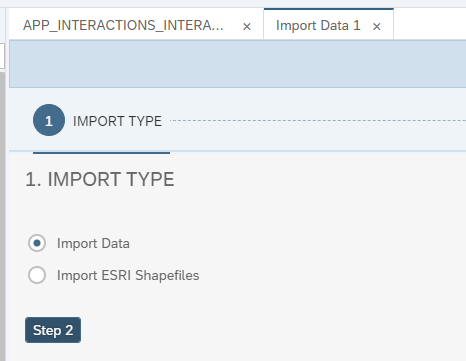
Choose Import Data and press Step 2
Choose Local for the Import Data From: option. Browse for the
Headerfile and click Step 3.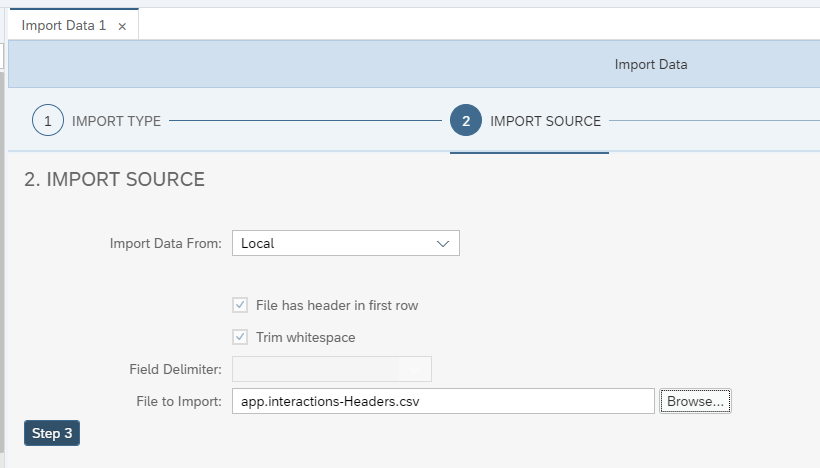
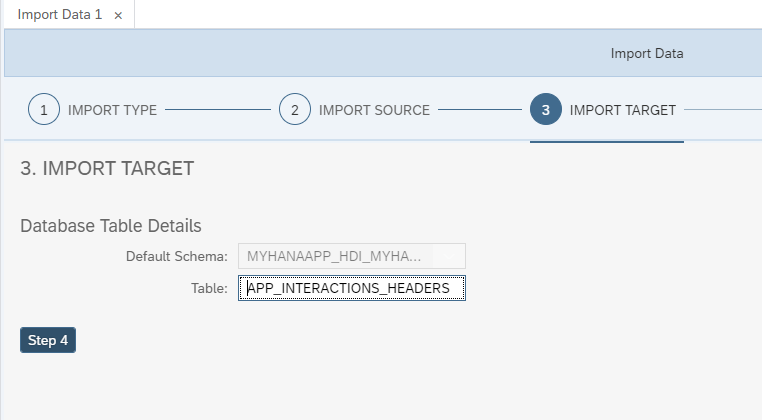
Keep the default import target and click Step 4.
Keep the default table mapping and press Step 5.

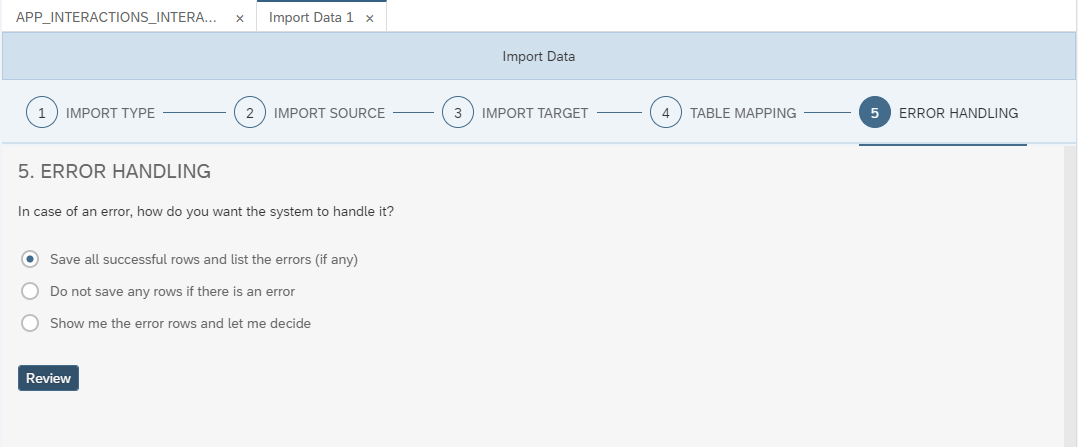
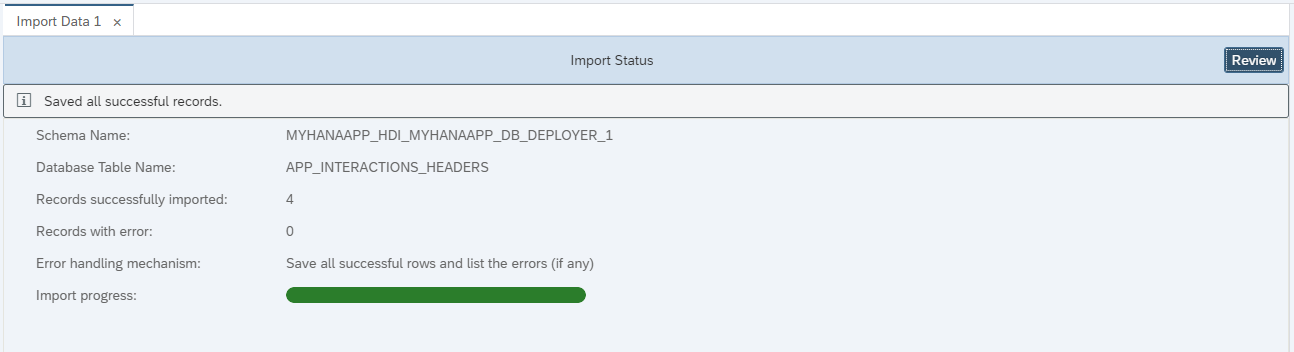
Keep the default error handling and press Review
Choose Import into Database.
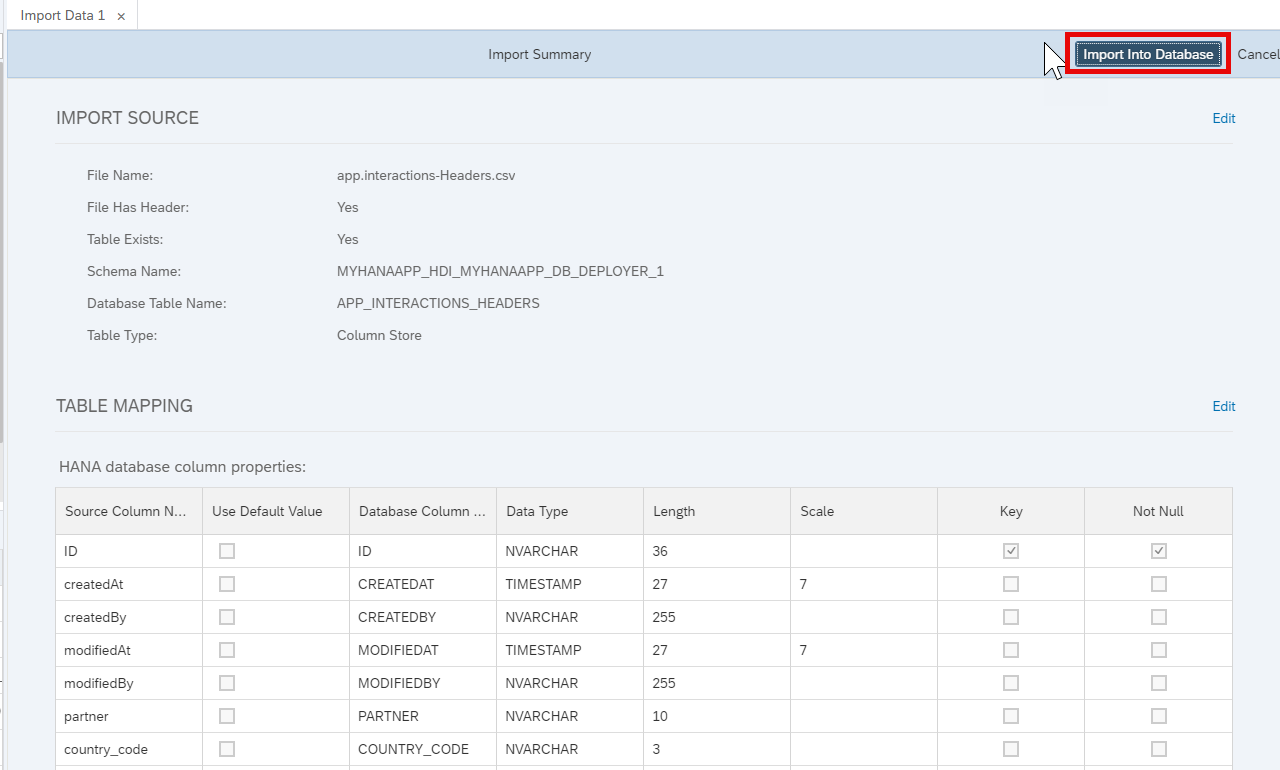
You will see confirmation that 4 records have imported successfully.
Repeat the process with the
app.interactions-Items.csvandapp.interactions-Items.texts.csvfiles into theITEMSandITEMS_TEXTStables.1
Check data loaded into the tables
You can now check the data loaded into the tables. Right-click on the
Itemstable and click Generate Select Statement.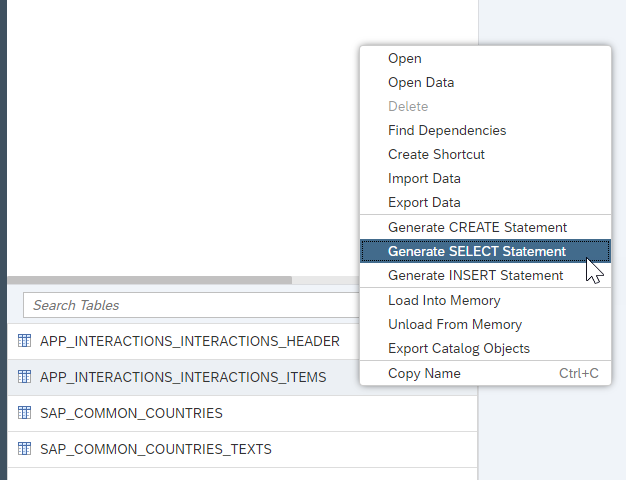
Add the following WHERE clause to the SELECT statement and execute it to complete the validation below.
SQLwhere "TEXT" like '%happy%';
What the tutorial covers: You will create the
db/interactions.cdsdata model, add the service projection insrv/interaction_srv.cds, runcds build --productionto generate the HDI artifacts, and then deploy them into your HANA Cloud instance using the MTA build and deploy tools in BAS.Where the generated files go: After
cds build --production, look insidedb/src/gen/— you will find.hdbtablefiles for each entity and.hdbviewfiles for any CDS views. These are the HANA-native artifacts that HDI manages. You do not edit these files directly; they are regenerated every time you build.
Exercise 3.2 — Load Data Using the SAP HANA Database Explorer
Once the tables exist in HANA, use the Database Explorer to import sample data.
👉 Follow the data-import steps in the tutorial above. Use the Import Data wizard in the Database Explorer to upload the provided CSV files into APP_INTERACTIONS_HEADERS and APP_INTERACTIONS_ITEMS.
Why the Database Explorer? The Database Explorer connects directly to your HANA Cloud instance and lets you browse schemas, run SQL, inspect HDI containers, and import data — all without leaving the browser. It is the primary tool for ad-hoc database work during development.
Naming convention: CAP maps the CDS context
app.interactionsand entityHeadersto the HANA table nameAPP_INTERACTIONS_HEADERS. The dot-separator becomes an underscore and everything is uppercased. Keep this mapping in mind when writing raw SQL queries against your HDI schema.
Summary
At the end of this exercise you have:
- A CDS data model (
db/interactions.cds) with two related entities usingcuid,managed,Composition, andAssociation - A CAP service (
srv/interaction_srv.cds) exposing the entities as an OData V4CatalogService - HANA tables deployed into your HDI container via the MTA build and deploy pipeline
- Sample data loaded into those tables via the SAP HANA Database Explorer
Questions for Discussion
We loaded data using the Database Explorer import wizard. Are there alternatives for getting initial data into CAP tables?
Answer
Yes — the most common CAP-native approach is to place CSV files in the
db/data/folder. Name each file after the entity it targets using the fully qualified namespace, for example:textdb/data/app.interactions-Headers.csv db/data/app.interactions-Items.csvCAP detects these files automatically and loads them during
cds deploy(local SQLite) or as part of an HDI deployment. For HANA targets the data is seeded using.hdbtabledataartifacts that CAP generates from the CSV files.SAP Build Code also has an AI-assisted CSV generator that can create realistic sample data from your CDS model in seconds.
When to use HANA Table Import (Database Explorer) instead of CSV files:
- Large data sets — HDI table import streams data directly; CSV files via CAP load everything in memory first.
- External sources — you can import from spreadsheets, other database tables, or custom formats.
- Incremental loads — import only new or changed rows without a full redeployment.
- Data transformations — apply column mappings or default values during import.
The CSV-in-project approach wins for reproducibility: the data travels with the code and is automatically available in every developer environment and CI pipeline.
Where does
Countrycome from ininteractions.cds? HintAnswer
At the top of
db/interactions.cdsyou will find:cdsusing { Country, Currency, cuid, managed } from '@sap/cds/common';@sap/cds/commonis a built-in CDS library (part of the@sap/cdspackage) that ships a set of pre-built aspects, types, and code-list entities used across nearly every SAP business application:Name What it provides cuidA key ID : UUIDfield, auto-generated by CAPmanagedcreatedAt,createdBy,modifiedAt,modifiedByaudit fieldsCountryAn association to sap.common.Countries(ISO 3166 alpha-2 codes)CurrencyAn association to sap.common.Currencies(ISO 4217 codes)LanguageAn association to sap.common.Languages(BCP 47 tags)The companion package
@sap/cds-common-contentseeds theCountries,Currencies, andLanguagescode-list tables with their standard values at deployment time.By reusing these common definitions you get consistent field names and structures across all CAP projects, and tools like Fiori Elements can automatically render country/currency pickers and locale-aware labels.
What is the difference between Composition and Association?
Answer
Both model relationships between entities, but they differ in ownership and lifecycle:
Composition — the child cannot exist without the parent.
In
db/interactions.cds,HeadersownsItems:cdsentity Headers : cuid, managed { items : Composition of many Items on items.interaction = $self; ... };- Deleting a
Headersrow automatically deletes all itsItems(cascading delete). - CAP's deep-insert and deep-update APIs let you create a header and all its items in a single OData request.
- OData draft mode (enabled on
Interactions_Headerininteraction_srv.cds) requires a Composition root — it cannot be applied to a standalone Association.
Association — the related entity can exist independently.
Itemsholds a back-reference to its parent via an Association:cdsentity Items : cuid { interaction : Association to Headers; ... };- Deleting an
Itemsrow does not affectHeaders. - Associations map to foreign-key columns in HANA (here:
INTERACTION_ID). - Use Associations when modelling relationships between independently-managed entities, for example linking an order to a product catalogue entry.
Rule of thumb: if the child's existence is meaningless without the parent (like order line items), use Composition. If both sides can live and be managed independently, use Association.
- Deleting a
In
interaction_srv.cds, how do you know that CAP is creating an OData service?Answer
The
servicekeyword in CDS always produces an OData service in CAP — it is the default protocol. No extra annotation is needed to opt in to OData; you would need an explicit annotation to opt out.Looking at the solution's
srv/interaction_srv.cds:cdsservice CatalogService { @requires : 'authenticated-user' @cds.redirection.target @odata.draft.enabled: true entity Interactions_Header as projection on interactions.Headers; @requires: 'Admin' entity Interactions_Items as projection on interactions.Items; @readonly entity Languages as projection on sap.common.Languages; function sleep() returns Boolean; }Several signals confirm this is an OData V4 service:
service CatalogService { … }— CAP compiles this into an OData service descriptor and registers it at/catalog/(by convention, lowercase service name without "Service").@odata.draft.enabled: true— activates the OData Draft protocol (specific to OData V4) onInteractions_Header.function sleep() returns Boolean— CDSfunctionmaps to an OData Function Import (a GET-based action in OData terminology).@readonly— restricts the OData capabilities toGETonly (noPOST/PATCH/DELETE).
When you run the CAP server, you can confirm the service is live by navigating to
$metadata(e.g.http://localhost:4004/catalog/$metadata) — this is the OData service document that describes every entity set, property, and function.What is a CDS aspect, and why are
cuidandmanagedused here instead of defining the fields manually?Answer
A CDS aspect is a named, reusable fragment of a CDS definition — similar to a mixin or trait in other languages. You apply it to an entity with
:syntax:cdsentity Headers : cuid, managed { … }This is exactly equivalent to writing:
cdsentity Headers { key ID : UUID; createdAt : Timestamp @cds.on.insert : $now; createdBy : String(255) @cds.on.insert : $user; modifiedAt : Timestamp @cds.on.insert : $now @cds.on.update : $now; modifiedBy : String(255) @cds.on.insert : $user @cds.on.update : $user; … }The
@cds.on.insertand@cds.on.updateannotations tell the CAP runtime to populate those fields automatically — you never setcreatedAtormodifiedBymanually. CAP handles it for everyINSERTandUPDATEoperation, regardless of whether the request comes via OData, a CAP handler, or thecds.run()API.Using
cuidandmanagedmeans:- Every entity in the project gets a consistent, UUID-based primary key — no accidental integer keys or composite keys.
- Audit fields are guaranteed to be present and correctly populated without any custom handler code.
- Fiori Elements can automatically detect and display the audit fields in the object page.
After running
cds build --production, look insidedb/src/gen/. What files were generated, and how do they correspond to the CDS entities you defined?Answer
Inside
db/src/gen/you will find files like:textAPP_INTERACTIONS_HEADERS.hdbtable APP_INTERACTIONS_ITEMS.hdbtableEach
.hdbtablefile is an HDI table artifact containing the SQLCREATE TABLEDDL that HANA will execute when the HDI deployer runs. CAP derives the filename from the CDS entity's fully-qualified name: the context prefixapp.interactionsbecomesAPP_INTERACTIONS_, and the entity nameHeadersbecomesHEADERS, all uppercased.If your CDS model includes views (e.g. projections with computed fields), CAP generates
.hdbviewfiles for those instead. These generated files are the bridge between your high-level CDS definitions and the HANA-native artifacts that@sap/hdi-deploypushes into the database. Never edit them directly — regenerate them by re-runningcds build --production.What would happen if you ran
cds buildwithout the--productionflag? Why does HANA deployment require it?Answer
Without
--production,cds buildgenerates artifacts for the default local database — SQLite. It produces agen/srv/folder containing the CAP Node.js runtime bundle but does not generate the.hdbtable/.hdbviewfiles indb/src/gen/that@sap/hdi-deployneeds.The
--productionflag activates the HANA build profile, which tells CAP to generate HDI-compatible artifacts instead of SQLite-compatible ones. Forgetting the flag is one of the most common deployment mistakes: thembt buildcommand succeeds, the.mtararchive is created,cf deployruns — but the db-deployer finds nothing to push into HANA and the deployment either fails or leaves the database schema unchanged.
Further Study
- Video Version of this Tutorial
- SAP HANA Database Explorer
- Domain Modeling with CDS
- CDS Built-in Types and Aspects (
@sap/cds/common) - Generated HDI Artifacts
- Providing Initial Data (CSV files in CAP)
- CDS Compositions and Associations
Next
Continue to 👉 Exercise 4 - Create a User Interface with CAP (SAP HANA Cloud)